
You want your app’s homepage to be more than a simple page or post list? Here’s how to create a fully customized home screen for your app.
Along with building a custom homepage, this tutorial is also a good occasion to put into practice some of the key notions of WP-AppKit theme customization:
- Create a custom route and display it at app launch
- Create a custom template and pass custom data to it
- Retrieve and use app components data manually
- Manage app history and app transitions to customize back button behavior
- See how to add custom styles specifically for your homepage
You can find a fully working example of what is done in this tutorial in this example theme on github. (If you use it don’t forget to set the correct component slugs corresponding to your own component here instead of “blog” and “tutorials”).
Starting Point
Let’s build our homepage on the following basis:
- We have 2 categories for our WordPress posts: “Blog” and “Tutorials“, and we’d like to display the 3 last posts of each of those categories on the app’s homepage: first the 3 last “Blog” posts, then the 3 last “Tutorials” posts.
- The 2 categories will also have their own “post list” screen in the app, displaying all posts from respectively “Blog” and “Tutorials” categories, with the corresponding “Blog” and “Tutorials” entries in app navigation.
- So we consider that we have 2 components (type “Post List”, taxonomy Category) added to our app in WordPress Back Office: first component labelled “Blog” with component slug “blog”, and second named “Tutorials” with component slug “tutorials”.
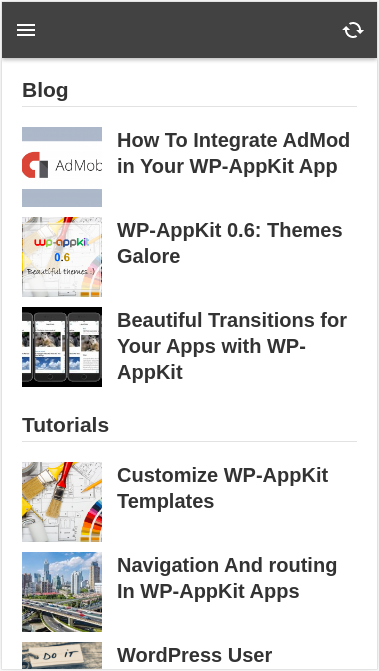
Here’s an example of what this homepage could look like:
Create A Custom Screen For The Homepage
Except when specified otherwise, all the following code snippets go in the functions.js file of your WP-AppKit theme. HTML examples are based on the Q-Android and Q-iOS default themes but the same principle could work for any other theme.
To create our custom home screen, simply add the following App.addCustomRoute() call to add a new home route that will render using the home.html template:
App.addCustomRoute( 'home', 'home' ); //Create home route associated with home.html template
Then set this new home route as app’s default route, so that it displays at app launch:
App.filter( 'default-route', function( default_route ) {
	default_route = 'home';
	return default_route ;
} );
Create The HomePage Custom Template
Create a file named home.html at the root of your WP-AppKit theme. This will be the template used to render our homepage.
In this template let’s write the 2 loops that will display our “Blog” and “Tutorials” lists:
<!-- In home.html template -->
<div id="content-home" class="content list-template">

	<h2>Blog</h2>
	<% if( blog_posts.length ){ %>
	<ul>
		<% _.each( blog_posts, function( post ){ %>
			<li class="has-ripple-feedback">


					<% if(  post.thumbnail && post.thumbnail.src && post.thumbnail.src.length && post.thumbnail.thumb ){ %>

                        <img class="content-thumbnail" src="<%= post.thumbnail.thumb %>" onerror="displayDefaultImage(this);" />

                    <% } %>

					<h3><a href="<%= TemplateTags.getPostLink( post.id, 'posts' ) %>"><%= post.title %></a></h3>


			</li>
		<% }); %>
	</ul>
	<% }else{ %>
		<div class='content-message'>No blog post found</div>
	<% } %>

	<h2>Tutorials</h2>
	<% if( tutorials_posts.length ){ %>
		<ul>
			<% _.each( tutorials_posts, function( post ){ %>
				<li class="has-ripple-feedback">


						<% if(  post.thumbnail && post.thumbnail.src && post.thumbnail.src.length && post.thumbnail.thumb ){ %>

							<img class="content-thumbnail" src="<%= post.thumbnail.thumb %>" onerror="displayDefaultImage(this);" />

						<% } %>

						<h3><a href="<%= TemplateTags.getPostLink( post.id, 'posts' ) %>"><%= post.title %></a></h3>


				</li>
			<% }); %>
		</ul>
	<% }else{ %>
		<div class='content-message'>No tutorial post found</div>
	<% } %>

</div>
Maybe you noticed that we’re using post.thumbnail.thumb here to display post featured images in small size as shown in the above homepage screenshot. This image size is not present by default in WP-AppKit web service. We’ll see how to add it in the following “Add custom styles” section.
Build Post Lists And Pass Them To The Homepage Template
In the previous home template you can see that we used blog_posts and tutorials_posts variables to display our posts.
Those 2 post lists must respectively contain the last 3 posts of our “Blog” and “Tutorials” components. Here’s how we retrieve those posts from our components using TemplateTags.getComponent() and how we pass them to the home.html template, using the template-args filter:
App.filter( 'template-args', function( template_args, view_type, view_template ) {
	if ( view_template === 'home') { //Don't need .html here

		//Get blog posts from our "blog" component and keep only 3 of them to display in template:
		template_args.blog_posts = _.first( TemplateTags.getComponent('blog').view_data.posts.toJSON(), 3 );

		//Same with tutorials posts, from our "tutorials" component:
		template_args.tutorials_posts = _.first( TemplateTags.getComponent('tutorials').view_data.posts.toJSON(), 3 );

		//Now "blog_posts" and "tutorials_posts" variables are available in our home.html template :)
	}
	return template_args;
} );
Handle Back Button
At this point if you launch your app you should see your homepage, displaying the last 3 posts of Blog and Tutorials categories.
If you click on a post in a list, the post will display. However, you may notice that the back button that should appear to come back to the home screen does not show up. This is due to 2 things:
- The home screen is a custom screen that we created manually with App.addCustomRoute(), so it is not linked by default to App History, which is used to display the back button. Here’s how to take our home screen into account in app history so that the back button displays when we expect it to:
App.filter( 'make-history', function( history_action, history_stack, queried_screen, current_screen, previous_screen ) {
	//If coming from "home" screen and going to a "single" screen, consider it as a "push" in app history:
	if( current_screen.item_id === 'home' && queried_screen.screen_type === 'single' ) {
		history_action = 'push';
	}
	return history_action;
});
- Q themes use custom screen transitions between screens, so we have to define how our custom screen behaves regarding app screen transitions: to do so, we use the transition-direction filter:
App.filter( 'transition-direction', function ( direction, current_screen, queried_screen ) {
	//If coming from "home" screen and going to a "single" screen, consider it as a "next screen" transition:
	if ( current_screen.item_id === 'home' && queried_screen.screen_type === 'single' ) {
		direction = 'next-screen';
	}
	//If coming back from a "single" screen to the "home" screen, consider it as a "previous screen" transition:
	else if ( current_screen.screen_type === 'single' && queried_screen.item_id === 'home' ) {
		direction = 'previous-screen';
	}
	return direction;
} );
Now the back button should display well when navigating from home to a post.
Add Home Screen To App’s Menu
Finally, let’s add our home screen to the our app’s off-canvas menu:
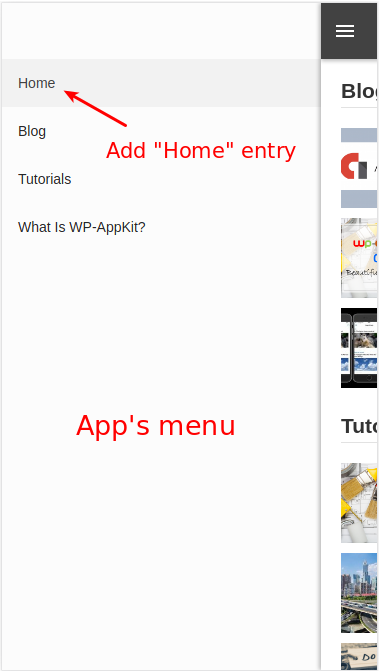
Our “Home” custom screen is not part of the app components that we set in app’s edition panel, so it won’t appear automatically in your app’s navigation. To add it, simply go to your menu.html template and add the “Home” entry (i.e. a link to our custom “#home” route) to the menu items list:
<ul id="menu-items" class="menu-items" style="display:none;">

    <% if(menu_items.length){ %>

        <li class="has-ripple-feedback"><a href="#home">Home</a></li>

        <% _.each( menu_items, function( menu_item ){ %>

            <li class="has-ripple-feedback"><a href="<%= menu_item.link %>"><%= menu_item.label %></a></li>

        <% }) %>

    <% } %>

</ul>
Add custom styles
If you want your homepage’s post lists to appear like shown in the above screenshot, you will also have to add custom styles to your theme.
To do so, create a [your-wp-appkit-theme]/css/home.css file in your theme and put the content that you can find here in the example theme.
Then link this new home.css file by adding the following line to the head.html template :
<link rel="stylesheet" href="<%= TemplateTags.getThemeAssetUrl('css/home.css') %>">
as done here in the example theme.
Finally, to display post featured images in the correct format (thumbnail size, used as post.thumbnail.thumb in the above home.html template) you will have to add it to the default data sent to the app. To do so, create a [your-wp-appkit-theme]/php/home.php file in your theme with the content that you can find here in the example theme.
Now your homepage’s post lists should display correctly !
Here You Go!
We hope this tutorial will help you building nice homepages for your apps. Custom screen creation, template customization and custom app data retrieval like we did here are really useful in many other situations where you want to go further than the default app’s behavior of simply displaying post lists, singles and pages…
Thanks for reading and don’t hesitate to post any questions or feedback in the comments!
Hi Mathieu !
Great post indeed ; a useful summary of many key notions leading to an efficient home page. Think I’m gonna try it for my next app.
Keep on the good job !
Best regards,
Phil
P.S. : I’ve migrated my web site under SSL ; your team told me it was not harmful for my running app and at the end od the process, I can tell you it’s right. Changing all url to https (and implementing redirections) didn’t impact my app at all. This could be an interesting topic for your blog…
Thanks Philippe!
Thanks for your feedback about https migration, good news that it went well for you, could be an interesting topic for a future post indeed.
I created a custom page and did the implementations described in this article for android native, but the back button of android does not work to exit the app. without the custom page works.
Hi Tenclar, to exit the app when pressing back button on home screen, you can use this snippet: https://uncategorized-creations.com/4263/exit-the-app-with-back-button-on-home-screen/.
Hope this helps. For any further questions you can reach us at support[at]uncategorized-creations.com.
Hi Mathieu, I want to create home page whith all categories with image category. Can i do that? Im using ACF to assign image to category. Thanks
Hi Gaston, could you reach us at support@uncategorized-creations.com please? We’ll see what we can do for you.
Hi, the limit to 3 leave the firts 2 post out, in my case. if my first 5 post are, for example: A, B, C, D, E only show C,D,E
Do not know if i’m doing something wrong or is a mistake in the code. Thanks
Hi Diego,
You’re totally right, the correct code is to use _.first() instead of _.last() in “template-args” filter.
This is now fixed in the above example.
Thanks for your feedback!
Hi Mathieu please i want to display my homepage as it is in my website and i want a list of all my categories when i enter category menu
Hi Walson,
App theme (Javascript based) is fully separated from website theme (PHP based), so if you need to have the same elements on your app home screen as on your website home page, you’ll have to add those elements manually in your app theme, like we do in this tutorial.
Regarding your “category menu”, can you please write to support[at]uncategorized-creations.com explaining what you want to do exactly, so that we can help you finding the best implementation for your need?
Regards
Awesome explanation, especially for nerds like me :). It will be a great help if you show how to put a “More” button under the 3 last posts of a Category.
Thanks Rajesh!
What would you like to happen when you click on this “More” button? Open the “post list” app screen corresponding to the category?
Hello Mathew thanks for the tutorial , I am having issues creating my own custom homepage with own categories in my website. I want to Display two Categories like “Scholarship and Competions” and “School news”. Can you please help me out with Code example, just as you showed us in the tutorial above.
Thank you
Hi Israel, thanks for your feedback, we’ve talked about your case on email support, you were almost there, simply missing the
<%= post.title %>display in home.html template, so that your post links can display.I’ve updated the above tutorial to clarify this point.
Regards