Welcome!
Even if you are familiar with development, building your first mobile app can be intimidating. We know that, we’ve been there before 🙂
The goal of this page is to guide you through the process of building a simple test app with WP-AppKit (whether it is a mobile app or a progressive web app) from configuration in WordPress to installing the app on your phone. Thereby we hope to give you a better insight on how to build a mobile app and how WP-AppKit works.
Obviously, it’s not the WordPress 5 minutes install 😉 But you will see that we are commited to ease the process as much as possible.
We’ll see how to:
- install WP-AppKit and an app’s theme
- create a simple test app
- compile it with Cordova or VoltBuilder (optional)
- install it as a Progressive Web App (optional)
- get your phone ready for tests
- install the test app on your phone
By the way, WP-AppKit is open source. It is FREE and will remain free (released under the GPL v3).
Install the WP-AppKit Plugin
As with any other WordPress plugins, this step is a simple one.
You first need to download the latest release from WordPress plugins directory. Then, extract the zip file you get into your wp-content/plugins/ folder: you should now have a wp-appkit folder created here.
The last thing to do is to activate WP-AppKit from your WordPress backoffice (inside “Plugins” menu).
Please be aware that WP-AppKit requires that permalinks are activated (whatever the structure is) for the preview to work: see Preview and Troubleshooting Common Problems.
Install a Theme
Thanks to the activation you’ve just done, you should now see a new “WP-AppKit” menu, with a “Themes” submenu. This allows you to see and manage the list of available themes for your apps.
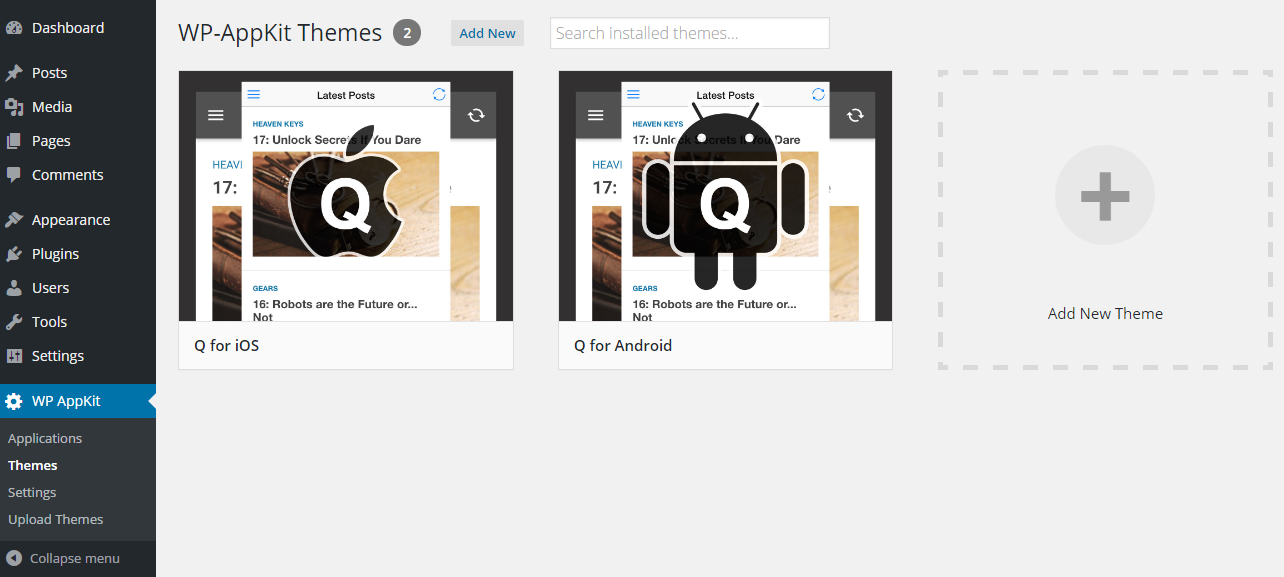
WP-AppKit Themes Management Screen
By default, you should only have our 2 starter themes: Q for iOS and Q for Android. You can easily add new ones and here’s how:
- Download the theme for example from our github repo
- Click on “Add new” from the themes management screen, or click “Upload Themes” inside “WP-AppKit” menu
- Upload the zip you got earlier into the dedicated form
If you are in the process to build a PWA, choose Q for Android. The theme has been adapted for that specific type of apps.
Create a Test App
First of all, let’s talk about risks and good practices.
As you’ll notice, many things you can do within WordPress backoffice will directly have an impact on all already installed apps. Instantly. In a few words: you can completely ruin your users experience in a click. Don’t worry though, the UI will warn you when you change something like that.
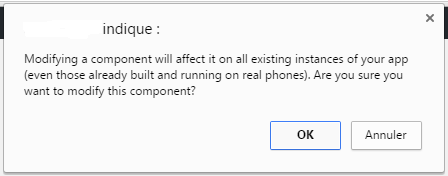
WP-AppKit Warning Window
That being said, themes are another aspect of “live” changes. This means that when you choose a theme for an app, every change under “php” folder into this theme will be instantly available into all already installed apps.
And this leads us to good practices:
- Create a copy of default themes if you want to use them, this will ensure future upgrades won’t break your apps
- Generally, create copies of your themes to work and test before releasing them live: you should follow a workflow similar to code versioning, branches being themes here
- Create a theme by OS (one for Android, one for iOS): as both will surely have more and more differences, this will ensure you don’t break your apps on one OS because of changes related to the other one
- Directly related to previous point: create one app per OS
Now, we can start building our app. If you already are familiar with WordPress, you should easily find how to proceed to create a new app: click “WP-AppKit / Applications”, then “Add New”.
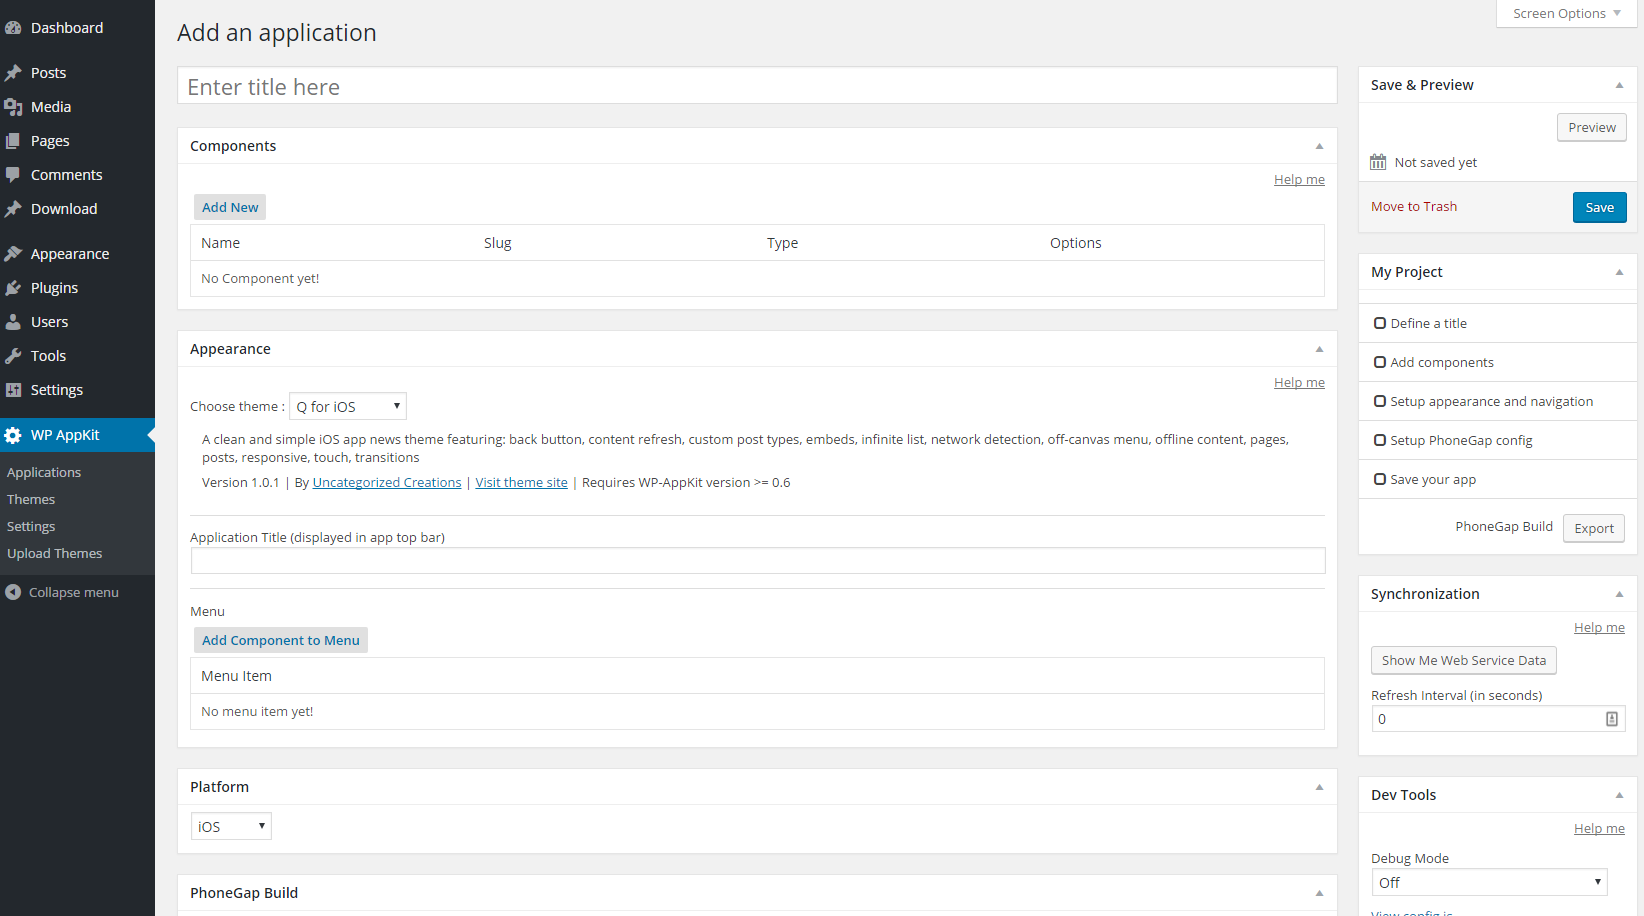
WP-AppKit Add Screen
This screen is quite different from what you’re used to with the other post types, so here is what you need to know:
- Globally, you should fill in the forms in the order they appear on the screen
- You have a visual progression tool in “My Project” box, usually on the right, so that you can see how far you are in the creation process
- Some fields are optional if you only need to test an app and don’t want to publish it yet
- If you’re lost, click “Help me” on top of each metabox to see some explanations about the fields it contains
To be able to have a fully working test app, you’ll have to do following things:
- Choose a title: you can even choose the application title that will be displayed in the app top bar (from “Appearance” metabox)
- Choose a theme: you can see in “Appearance” metabox the list of available themes (see Install a Theme)
- Choose components: from “Components” metabox, you can create different types of component with different options, give them a label. Once created, their content is instantly available from the app. If default components aren’t enough for your needs, see our doc section about custom components.
- Create the app menu: you need to have at least 1 component created, and then from “Appearance” metabox, you can add your components to the menu and reorder them by drag&drop. Adding all your components in the menu is not mandatory, you could have only one over three components into it.
- Choose a platform (iOS / Android / Progressive Web App): you don’t need it to test, but it can change some fields from the form
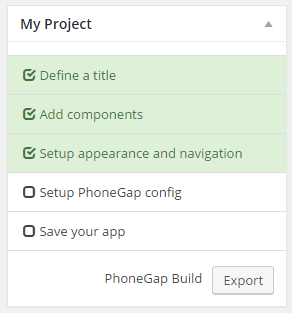
At this step, you should see that you’re 2 steps far from the app completion thanks to the visual progression tool. Click “Save” to complete one more!
WP-AppKit App Creation Progress: Almost There!
The other one should be either “Setup Progressive Web App config” or “Setup PhoneGap config”. These are mandatory only if you want to install the app on a phone. We’ll see how to do that later.
As soon as you save your app project, you can “Preview” it directly in the browser. Make sure you activate touch events emulation if your theme uses them, otherwise you won’t be able to navigate through the app.
Previewing the app allows you to see how it will render on a phone, so that you can make adjustments on the theme, menu, components and so on. Plus, if you activate “Debug mode”, your browser’s console will show you a lot more information, so that you can go through bugs in the theme for example.
You should note that native phone functions (accessible through cordova plugins) are not available through your browser, so you won’t be able to test sharing a post for example.
Of course, content is dynamically retrieved, so feel free to add a new post in WordPress backoffice and see how it magically comes into your app!
Finally, preview also support offline. This means that you can disconnect your computer from the internet and you’ll still be able to navigate through your app!
Now that your app is great in preview, it’s time to see how it is on a real phone!
A Progressive Web App needs to provide information to compatible browsers thanks to a file named manifest.json. In order to properly generate this file, you need to fill in the corresponding metabox. It is divided into 4 fieldsets: Install, Paths, Manifest, and Version.

WP-AppKit Progressive Web App Metabox
Here are some explanations:
- You can downlowd PWA sources if you want to install it on another server for example
- Before installing the PWA, you should choose a path for the URL where it will be available. By default, WP-AppKit will propose one based on the app’s title
- Name and Short Name are both used when you install the app on a phone
- Description is useful for SEO
- If your theme provides icons (in themes-wp-appkit/[your-theme]/icons/ directory), they will automatically be detected and used by WP-AppKit for your PWA, otherwise default icons will be included
- Background and Theme Colors are used to style your app once installed on a phone (splashscreen, app’s title bar)
- Version is an optional field, useful to debug installed apps and see if your PWA has been updated
After having filled these fields and saved the project, you can click the “Install” button for WP-AppKit to generate your PWA at the specified location.
Now that your PWA is up and running on the server-side, you only need to go to its URL with your phone. You should then see the home screen of your app and a banner asking you if you want to add it to Home Screen.
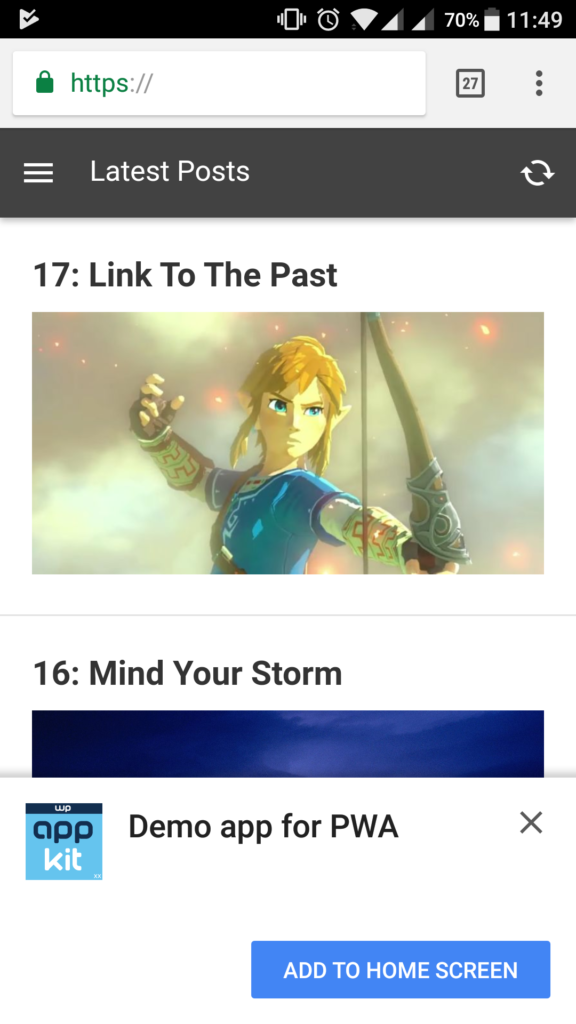
A WP-AppKit PWA
Click this button will allow your phone to add you PWA as a real app on your phone. You can now launch it from the Home Screen as any other apps and don’t need to go to the URL anymore!
By default with Android phones, you cannot install an app if it comes from an unknown source, which is basically everything except Google Play Store. Of course, if you need to test your app, you don’t need to publish it each time on the app store, so here’s how to allow your app to install:
- On your phone, go to “Settings”
- Find something containing “Security” (it could vary with your Android version)
- Find a switch called “Unknown sources” and check it. It should say “Allow installation of apps from sources other than the Play Store”
You are now ready to get your app!
NOTE : The following instructions are for PhoneGap Build, which has been discontinued on October 2020. You can’t build WP-AppKit apps with PhoneGap build anymore, but since WP-AppKit version 1.6.0 you can use Cordova or VoltBuilder instead. See the Cordova tutorial or the VoltBuilder tutorial for detailed information about how to build your WP-AppKit app with those tools.
The following steps to setup Phonegap Build are the same when you export your app for Cordova or Voltbuilder (all solutions are Cordova based). Simply replace “PhoneGap Build” by your chosen platform.
Since you’ll compile your app through PhoneGap Build, you should first take care of the “PhoneGap Build” metabox from the app edit screen. This tool requires a configuration file (named config.xml), and this metabox allows you to generate it properly. It is divided into 3 fieldsets: Application, Author and PhoneGap.
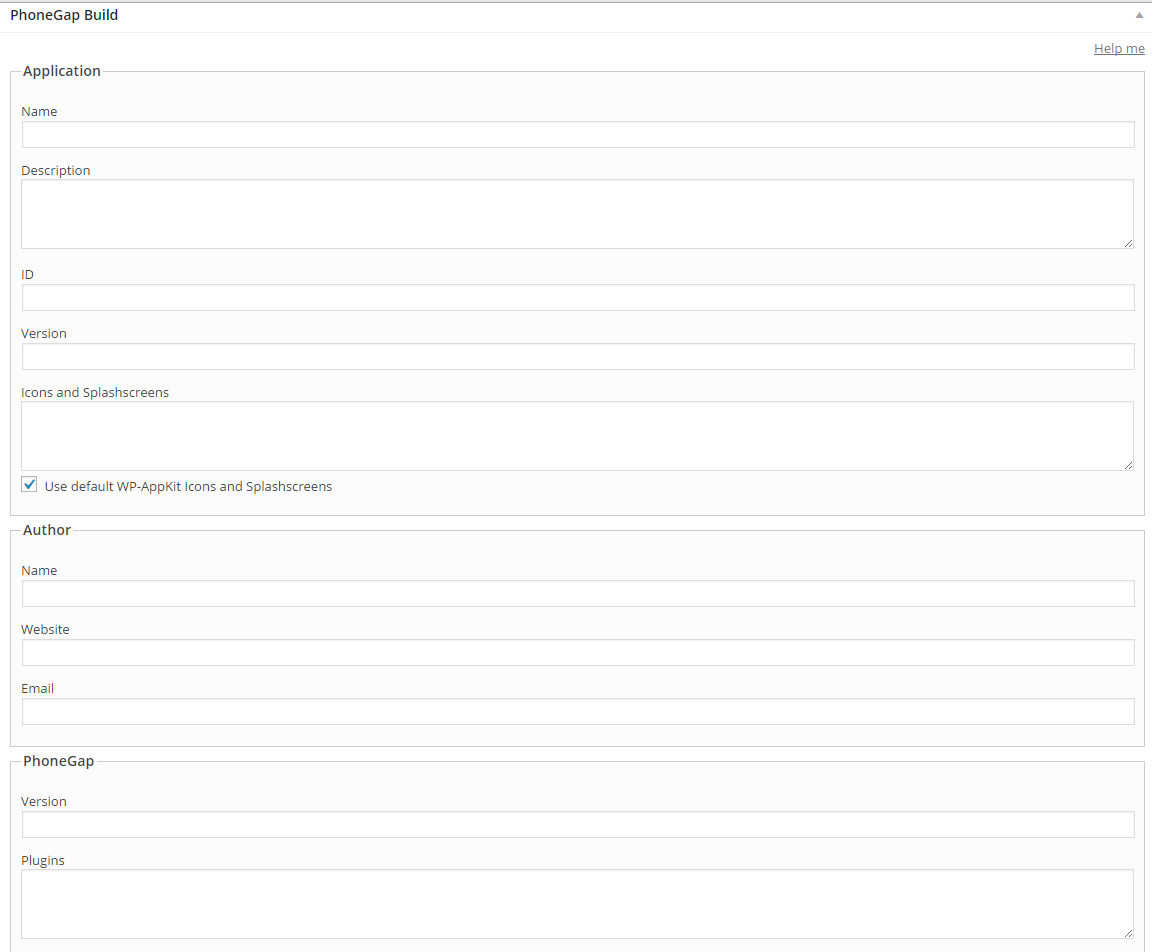
WP-AppKit PhoneGap Build Metabox
Here are some explanations:
- The name and description of your app will both appear in PhoneGap Build and app stores
- The ID is a string uniquely identifying your app, usually looking like com.yourcompany.yourapp
- Application > Version is a name for your app version (e.g. “1.0.0”) that will appear in app stores
- On Android (you can let it empty for iOS), VersionCode is a integer representing your app version, so it should increase with each new release
- In “Icons and Splashscreens” field, you can put XML in order to use your own images. Please see our tutorial to know more about it.
- Author data will appear on app stores, so you should put public information about your company here
- PhoneGap > Version allows you to choose a specific version of PhoneGap your app should use to compile. Currently, the last (and default) version is “cli-6.5.0” (see PhoneGap Build current support table for more details). Let this field empty to automatically use the last PhoneGap version available.
- In “Plugins” field, you can put XML in order to add cordova/PhoneGap plugins you want to use
If you want to know more about PhoneGap Build configuration, you can check their documentation.
Update your app, then click “Export”. You’ll get a zip file containing everything PhoneGap Build needs to compile your app: save it somewhere and let’s move on!
NOTE : The following instructions are for PhoneGap Build, which has been discontinued on October 2020. You can’t build WP-AppKit apps with PhoneGap build anymore, but since WP-AppKit version 1.6.0 you can use Cordova or VoltBuilder instead. For detailed information about how to build your WP-AppKit app with those tools, see:
- the Cordova tutorial
- or the VoltBuilder tutorial
What follows about PhoneGap Build is for legacy.
This part is probably the most magical one. All you have to do is:
- Login into PhoneGap Build
- Click “New app” and choose “Upload a .zip file”
- Select the file you saved earlier and upload it
PhoneGap Build will then take care of compiling your app for the specified platform, and you will be able to download and install it as soon as it ends compiling.
Regarding Android, you only have to download the apk, in flashing the provided QR-Code for example, and install it on the phone you prepared earlier.
For iOS, it’s a bit more complicated… You need to sign your app with a certificate that allows your phone and this test app to fit together, and you need to subscribe to Apple Developer Program to do that.
For more details about how to compile with PhoneGap Build, you can read our tutorial.
What’s Next?
This adventure ends where another one begins: build an app for real and publish it in app stores. We provide a complete documentation to help you build and customize your app. Also, publishing in app stores takes time. Be sure to have enough time to learn how to do it. It can be intimidating the first time.
Troubleshooting Common Problems
Through support, we regularly have the issues raised. We’ll maintain answers to most common ones in that section.
Once you activated WP-AppKit and want to preview your app, you might encounter a white screen of the death, or an error screen.
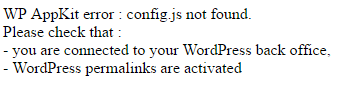
WP-AppKit error screen
As stated in Install the WP-AppKit Plugin, you should activate WordPress permalinks (any other option than “Plain”) in order to preview your app. A complete white screen can show up if you didn’t do that.
Plus, if you didn’t make your preview public by choosing it under “App Simulation Visibility”, you need to be logged in.
This error screen can also show up in case your website runs a cache or security plugin. Indeed, these plugins often block URL parameters or Web Service calls your app may need. Try to deactivate all your other plugins and see if it works, so that you will have a clue about what is causing your issue.