
All right, it may change in the future but currently, setting up icons and splashscreens for your apps is not (totally) done in the plugin’s admin panel. You’ll have to do 3 things:
- Prepare assets
- Reference assets in the config.xml file (using WordPress)
- Download the project ZIP and add assets to it
Preparing Assets
First thing to do is to create all the needed assets. The difficulty comes from the different screen densities support. Basically you’ll have to do one asset per density, per OS for icons and splashscreens.
Android and iOS handle things differently. Android defines density ranges and iOS has fewer variations (retina/non retina and iPhone 4/iPhone 5).
WP-AppKit icons for Android
Referencing Assets
In the WordPress edit panel of your application, search for the PhoneGap Plugins text area. This is where you’ll add the XML tags that reference the app’s icons and splashscreens.
Referencing icons and splashscreens for PhoneGap Build is explained here.
Here what we use for our demo apps.
<!-- Icons -->
<icon src="icon.png" />
<icon src="./icons/icon-wp-appkit-ldpi.png" gap:platform="android" gap:qualifier="ldpi" />
<icon src="./icons/icon-wp-appkit-mdpi.png" gap:platform="android" gap:qualifier="mdpi" />
<icon src="./icons/icon-wp-appkit-hdpi.png" gap:platform="android" gap:qualifier="hdpi" />
<icon src="./icons/icon-wp-appkit-xhdpi.png" gap:platform="android" gap:qualifier="xhdpi" />
<icon src="./icons/icon-wp-appkit-xxhdpi.png" gap:platform="android" gap:qualifier="xxhdpi" />
<icon src="./icons/icon-wp-appkit-xxxhdpi.png" gap:platform="android" gap:qualifier="xxxhdpi" />

<!-- Splashscreens -->
<gap:splash src="splash.9.png" />
<gap:splash src="./splashscreens/splashscreen-wp-appkit-ldpi.9.png" gap:platform="android" gap:qualifier="ldpi" />
<gap:splash src="./splashscreens/splashscreen-wp-appkit-mdpi.9.png" gap:platform="android" gap:qualifier="mdpi" />
<gap:splash src="./splashscreens/splashscreen-wp-appkit-hdpi.9.png" gap:platform="android" gap:qualifier="hdpi" />
<gap:splash src="./splashscreens/splashscreen-wp-appkit-xhdpi.9.png" gap:platform="android" gap:qualifier="xhdpi" />
<gap:splash src="./splashscreens/splashscreen-wp-appkit-xxhdpi.9.png" gap:platform="android" gap:qualifier="xxhdpi" />
<gap:splash src="./splashscreens/splashscreen-wp-appkit-xxxhdpi.9.png" gap:platform="android" gap:qualifier="xxxhdpi" />
<!-- Icons iOS 7.0+ -->

<!-- iPhone / iPod Touch  -->
<icon src="./icons/icon-60.png" gap:platform="ios" width="60" height="60" />
<icon src="./icons/icon-60@2x.png" gap:platform="ios" width="120" height="120" />

<!-- Spotlight Icon -->
<icon src="./icons/icon-40.png" gap:platform="ios" width="40" height="40" />
<icon src="./icons/icon-40@2x.png" gap:platform="ios" width="80" height="80" />

<!-- Icons iOS 6.1 -->

<!-- iPhone / iPod Touch -->
<icon src="./icons/icon.png" gap:platform="ios" width="57" height="57" />
<icon src="./icons/icon@2x.png" gap:platform="ios" width="114" height="114" />

<!-- iPhone Spotlight and Settings Icon -->
<icon src="./icons/icon-small.png" gap:platform="ios" width="29" height="29" />
<icon src="./icons/icon-small@2x.png" gap:platform="ios" width="58" height="58" />

<!-- Splashscreens -->

<!-- iPhone and iPod touch -->
<gap:splash src="./splashscreens/Default.png" gap:platform="ios" width="320" height="480" />
<gap:splash src="./splashscreens/Default@2x.png" gap:platform="ios" width="640" height="960" />

<!-- iPhone 5 / iPod Touch (5th Generation) -->
<gap:splash src="./splashscreens/Default-568h@2x.png" gap:platform="ios" width="640" height="1136" />
Adding Assets To The Project
When you’ve finished creating assets (i.e. PNG files), you’ll have to add them manually to your project’s archive (i.e. ZIP file). It means that once you have downloaded the ZIP file of your project from the edit panel in WordPress, open it and add the icon and splashscreen images to it before submiting the archive to the PhoneGap Build.
At this step, errors come often from the fact that you have stored the assets in a place which is different from what you have declared in the config.xml. Make sure that the two match. In the examples above, assets are stored in an icons and a splashscreens subfolders (except for the Android default icon and splashscreens).
Here how we store icons and splashscreens for our demo apps.
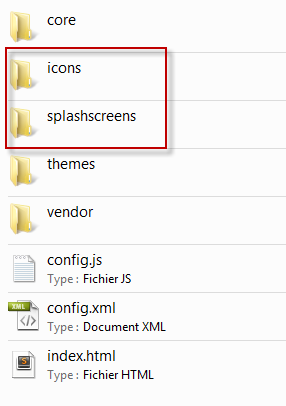
Wp-AppKit demo app icon and splashscreen folders
Happy coding!
Splashscreens don’t work, only icons. I tried the ones you have by default and they don’t appear. Is there something that needs to be installed extra?
Hi Jhon,
Sorry to hear that splashcreens don’t work for you.
Do you have the problem if you export and build your app directly from the default WP-AppKit zip file (with option “Use default WP-AppKit Icons and Splashscreens” checked in your app edition panel in Back Office) without modifying any icons or splashscreens ? or only when you try to customize icons/splashscreens?
For further help, please write directly to our email support support[at]uncategorized-creations.com.
Regards