
In the previous tutorial we’ve seen how to add image zooming with PhotoSwipe for single images inserted in post content. But what about image galleries? WordPress makes it really easy to create and include image galleries in posts. Let’s see how to display those galleries gracefully in our apps by extending the work that we did in the previous tutorial.
Before starting, please make sure that you’ve followed all the steps of the “Image Zooming with PhotoSwipe” tutorial and that it works for you 🙂 We consider here that you have a “Q for Android – PhotoSwipe Demo” theme in the state where we left it in the first tutorial.
The complete “Q for Android – PhotoSwipe Demo” theme corresponding to the result of the 2 PhotoSwipe tutorials (Image and Galleries) can be found here.
Create a WordPress Image Gallery
If you don’t have any gallery in your posts, now is a good time to create one 🙂
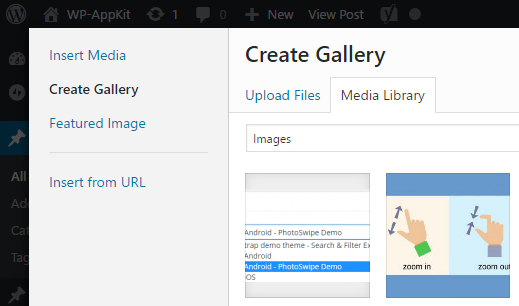
To add a gallery to a post, simply click the “Add Media” button in post edition and choose “Create Gallery“:
For any further information about WordPress Image Galleries, you can see the corresponding Codex section.
Add Full Size Info To Webservice For Gallery Images
Unlike single images, gallery images are not really inserted in post content HTML. Galleries are added to post content via a shortcode
![]()
and rendered dynamically when displaying the post.
So the PHP code we used for single images won’t work for galleries. We have to add a specific treatment that will hook into the WordPress process of building image galleries, so that we can add the full size’s information to the img tag. To do so we (re)open the “php/prepare-images-for-photoswipe.php” file of our theme and append the following code:
/**
 * Galleries images are inserted dynamically in post content by WordPress when it
 * builds the post content. We need to add our full size image information at the
 * moment WordPress is building the gallery's images tags.
 */
add_filter( 'wp_get_attachment_image_attributes', 'prepare_gallery_images_for_photoswipe', 10, 3 );
function prepare_gallery_images_for_photoswipe( $image_attributes, $attachment, $size ) {

	//If the image is retrieved for an app, add full width's data attributes to it:
	if ( wpak_is_app() ) {
		$image_src_data = wp_get_attachment_image_src( $attachment->ID, 'full' );
		$image_attributes['data-full-img'] = $image_src_data[0];
		$image_attributes['data-width'] = $image_src_data[1];
		$image_attributes['data-height'] = $image_src_data[2];
	}

	return $image_attributes;
}
Update Javascript Code For Galleries
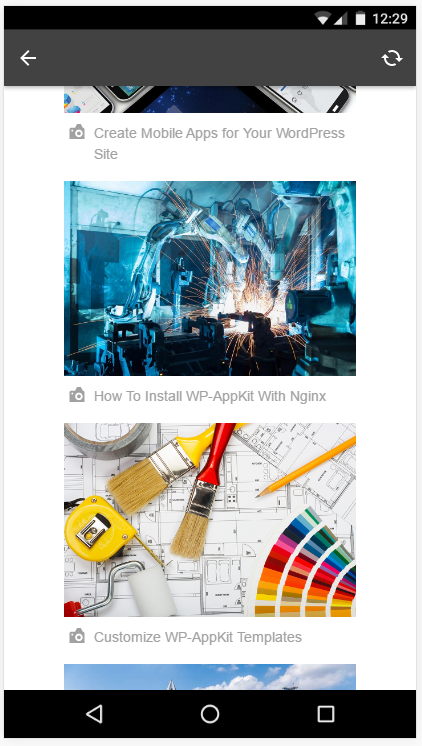
By default, WordPress renders galleries in post content just by displaying the images one after another:
Let’s change that so that only the first gallery’s image is displayed (and the other images show when we open the gallery with PhotoSwipe).
In functions.js (after the touchend handler for example), let’s write the following code:
/**
 * Prepare gallery images when a post or a page is displayed in the app:
 * only show first gallery image thumbnail in post content by default.
 *
 * If you want to display all gallery image thumbnails, just don't add this 'screen:showed' block.
 */
App.on( 'screen:showed', function( current_screen, view ) {
	if ( current_screen.screen_type === "single" || current_screen.screen_type === "page" ) {

		//First hide all gallery images
		$( '.gallery .gallery-item' ).hide();

		//Then display only the first image of each gallery:
		$( '.gallery .gallery-item:first-child' ).show();

	}
} );
Finally, let’s open the gallery when taping on its first image.
To do so we pass all the images of the gallery to PhotoSwipe, by updating the touchend handler like follows (add only highlighted lines):
$( "#app-layout" ).on( "touchend", ".single-content img", function() {

	//Don't open image if currently dragging it:
	if ( img_dragging ) {
		return;
	}

	//Detect if the image belongs to a gallery
	var is_gallery = $( this ).closest( '.gallery' ).length !== 0;

	if ( is_gallery ) {
		//Open PhotoSwipe for all images of the gallery:
		open_with_photoswipe( $( this ).closest( '.gallery-item' ).siblings().addBack().find( 'img' ), $( this ).closest( '.gallery-item' ).index() );
	} else {
		//Open PhotoSwipe for the image we just touched:
		open_with_photoswipe( $( this ) );
	}

});
Edit: In previous version of this tutorial, jQuery .andSelf() was used, which has been removed from jQuery as of version 3.0. .addBack() must be used instead as in the updated example above.
And here we go, all images and galleries in post content can now be viewed full size and with nice zooming interactions thanks to PhotoSwipe.
This is just an example of how to plug PhotoSwipe into our app’s images. PhotoSwipe is flexible and has a bunch of interesting options that you can use to go further and enhance your user experience with images.
Happy app coding and don’t hesitate to share your feedback in the comments below 🙂