You will see here how to setup OneSignal push notifications on WP-AppKit apps using the “OneSignal for WP-AppKit” addon.
We will first configure OneSignal notifications for a native Android app, then for a PWA, and see how to use deeplinks in both cases to open a given post in the app.
Finally we’ll see how to use the addon along with the OneSignal WordPress plugin to send notifications directly from WordPress when a post is published or updated.
Install
Install this addon using the downloaded zip file as you would install any WordPress Plugin (Plugins > Add new > Upload plugin).
Then in your WP-AppKit app edit panel, check the “OneSignal for WP-AppKit” addon checkbox in the “Addons” panel (at the bottom of the screen), then save the app.
Configuration for a Native Android App
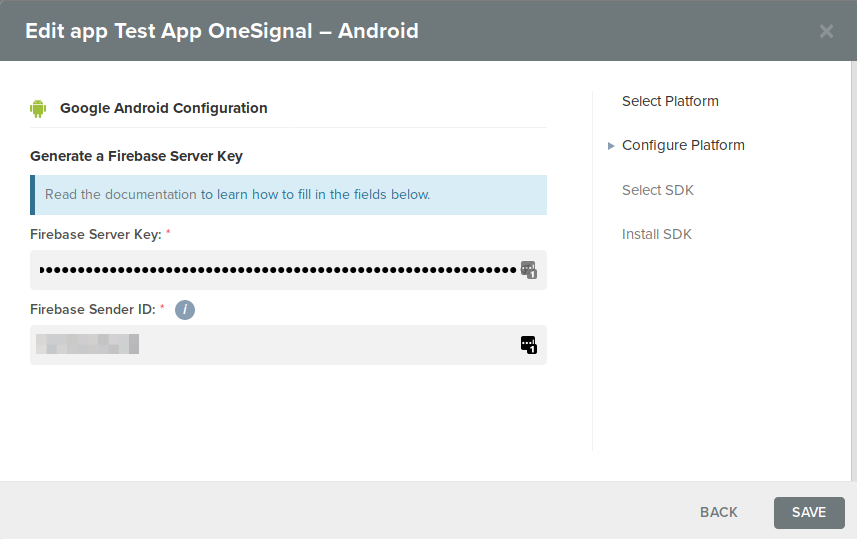
To set up your OneSignal app, you first have to create a Firebase project, which will give you a Firebase Server Key and a Firebase Sender ID. To do so, simply follow the steps 1 and 2 of this OneSignal documentation here: Generate a Firebase Server Key.
You now have your Firebase Server Key and Firebase Sender ID ready? Great! Let’s go create the OneSignal app.
Login to your OneSignal account and click “Add App“.
Enter an App name, then in the “Select platform” tab, choose “Google Android“.
In the “Configure platform” tab, copy the Firebase Server Key and Sender ID generated in previous step:
In the “Select SDK” tab, choose “PhoneGap, Cordova, …”.
Then in the “Install SDK” tab, you will find your OneSignal App ID:

Copy this App ID. This is the ID that we are now going to use to configure OneSignal addon in the WP-AppKit app.
First, make sure you have installed the addon “OneSignal for WP-AppKit”. You can install it as any other WordPress plugin, by copying the .zip to wp-content/plugins, then activate it in WordPress back office.
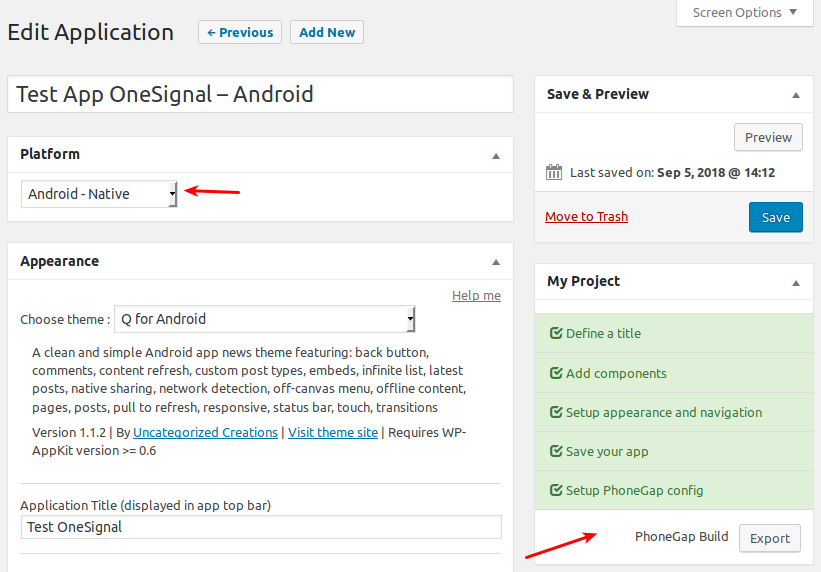
Then we suppose that you have created a WP-AppKit app using the “Android – Native” platform:
In this app’s edition panel, activate the addon “OneSignal for WP-AppKit” then save the app.

You will then see the “OneSignal configuration” box, where you can paste the OneSignal App ID that you got in the previous step “OneSignal side”:

Note that you can find this OneSignal App ID at any time by opening you app in OneSignal and go to “Settings”, then “Keys & Ids”.
Then save your app, and that’s it!
You can now export your app, built it with PhoneGap Build and install it on your device.
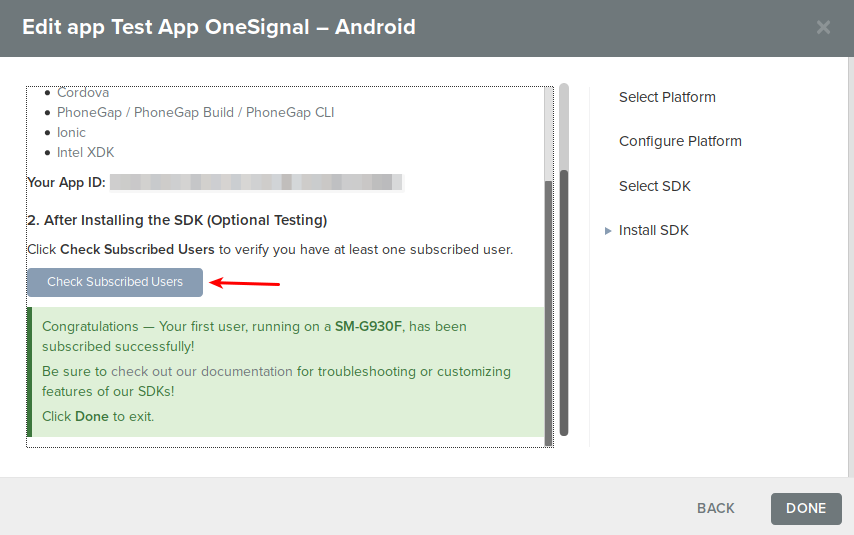
Once your app is installed on your device and you’ve opened it at least once, you can check that everything is setup correctly by using the “Check subscribed users” button (if you still have the “Install SDK” tab open), which should detect the fact that you just subscribed to notifications from the app on your device:
Then you can start sending notifications by going to “Messages” > “New Push” in OneSignal interface.
Configuration for a Progressive Web App
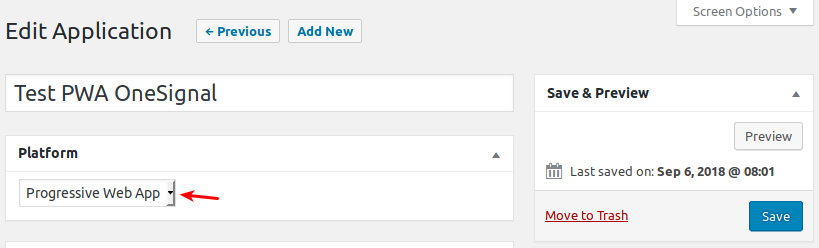
We suppose here that you have created a PWA using WP-AppKit.
We’ll consider in this documentation that your PWA url is https://my-domain.com/pwa/onesignal-test/.
To configure OneSignal push notifications on your PWA you can:
- either create a new OneSignal app as we did for Android Native, but choosing “Web Push” platform instead,
- or use the same OneSignal app that you created earlier for Android Native, which will allow to send notifications both to your Native App and PWA at the same time. In that case, open your existing OneSignal app, go to “Settings” > “Web Push Platforms” > “All Browsers (except Safari)”.
Then choose “Typical site” integration and provide your site url. This “site url” must be the root of the domain where your PWA is installed (eg. https://my-domain.com) and not the full PWA path (eg. https://my-domain.com/pwa/onesignal-test).
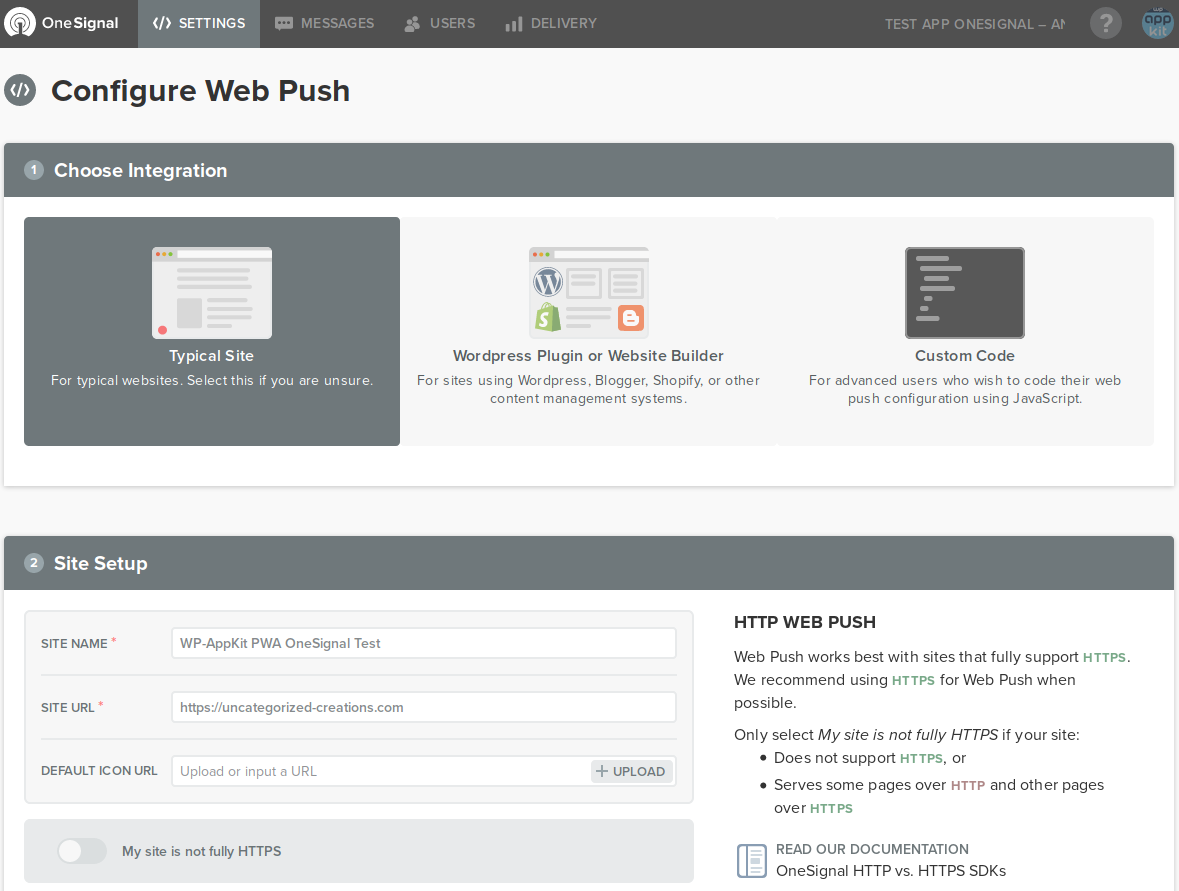
If your website is not fully HTTPS, you can use the “My site is not fully HTTPS” option.
In section “3 – Permission Prompt Setup“, choose and configure a prompt so that your users can be notified that they can subscribe to notifications. This can be either the OneSignal Bell, a slide prompt or custom link to put somewhere in your app.
Optionally setup a welcome notification in section “4 – Welcome Notification“.
Then, last but not least, in the “5 – Advanced” section, you have to activate “Service Workers” settings so that OneSignal can know where to find your PWA’s service Workers:
- activate the “Customize service worker paths and filenames” switch
- “Path to service worker files“: relative path of your PWA (eg. /pwa/onesignal-test/)
- “Main service worker filename“: must be “service-worker-cache.js”
- “Updater service worker filename“: must be “service-worker-cache.js”
- “Service worker registration scope”: relative path of your PWA (eg. /pwa/onesignal-test/)
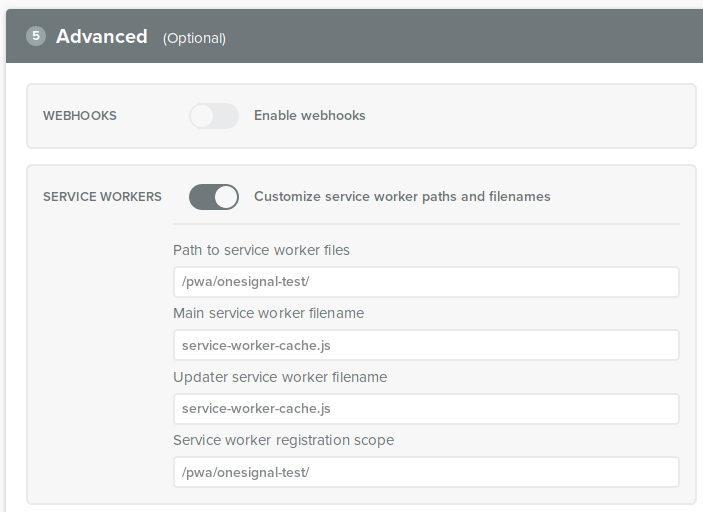
You can leave all other settings by default and hit the “Save” button at the bottom.
On the following page you don’t have to setup anything: this config is already embedded in WP-AppKit OneSignal addon. Simply note the App ID that appears in section “7 – Add code to site“.

This is the OneSignal App ID that we are now going to use in our WP-AppKit app on WordPress side.
You can now click “Finish” button on the bottom and go back to your WordPress back office 🙂
First, make sure you have installed the addon “OneSignal for WP-AppKit”. You can install it as any other WordPress plugin, by copying the .zip to wp-content/plugins, then activate it in WordPress back office.
Then you can go to your WP-AppKit PWA edition panel and activate the addon:
You will then see the “OneSignal configuration” box, where you can paste the OneSignal App ID that you got in the previous step “OneSignal side”:
Then re-save the app and re-export its sources by clicking the “Update PWA” button:

That’s it! You can now open your PWA in your browser (flush your cache to refresh app sources and Service Workers) and you should be able to subscribe to notifications from your PWA 🎉
Then go to the “Messages” tab in your OneSignal app to start sending notifications to your PWA and or to your Native App!
Sending notifications with deeplinks
Deeplinks allow to target a given screen (a post or page) in your app when the app opens from a notification.
There are 2 ways of sending a notification with a deeplink in native apps :
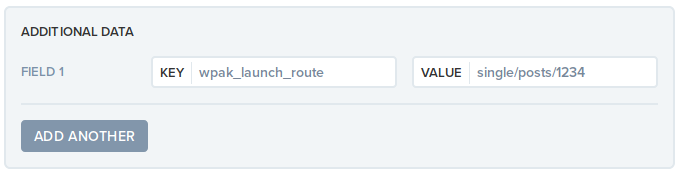
- use “wpak_launch_route” param passed in OneSignal’s “Additional Data” field
- use a “Custom URL Scheme”.
Native app deeplink with wpak_launch_route param
When setting up your push in OneSignal’s interface, find “Additional Data” box and add a “wpak_launch_route” field containing the app route that you want to open when the notification is received. For example “single/posts/[post-id]” to open the post with ID [post-id]):
Native app deeplink with Custom URL Scheme
Another solution is to define an app’s custom URL scheme that will be used to tell the device to open your app instead of the browser when it receives the notification.This is slightly more complex and need to rebuild the app. One advantage is that custom URL scheme can be used not only in notifications but also for example to point to your app from a website.
To set a custom URL scheme for your app, go to your app edition panel in WordPress, and fill the “Custom URL Scheme” field in the “Deeplinking” box:
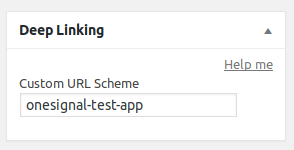
You can choose any URL Scheme. For example if your URL Scheme is “your-url-scheme”, you will then be able to open the screen “/your/app/screen/fragment” in the app by passing the deeplink “your-url-scheme://your/app/screen/fragment” to your app through the notification.
Then save your app, re-export, re-build, and re-install it on your device.
When sending your message in OneSignal, provide the deeplink under the “3 – Options > Launch URL” section. For example if you want to open the post with ID=1234 when the notification opens, set Launch URL = “your-url-scheme://single/posts/1234/”.
Note that for your custom URL scheme to be accepted by OneSignal you must choose only “Send to Google Android“ for your message and deactivate “Send to Google Chrome” or to any other browser (which only accept http/https launch urls). As said above, to send a deeplink you have to do it one platform at a time.
Then send your notification and the post 1234 should open when the app opens on device!
As for native apps there are 2 ways of sending a notification with a deeplink in native apps :
- use “wpak_launch_route” param passed in OneSignal’s “Additional Data” field
- use OneSignal’s “Launch URL” field
PWA deeplink with wpak_launch_route param
This is the same as for native apps: find “Additional Data” box and add a “wpak_launch_route” field containing the app route that you want to open when the notification is received. For example “single/posts/[post-id]” to open the post with ID [post-id]):
PWA deeplink using “Launch URL” field
You don’t need to setup a Custom Scheme URL for your app here, you will just use the PWA’s full url of the screen you want to target.
For example if you want to open the post that has the url https://my-domain.com/pwa/onesignal-test/single/posts/1234/ you will simply set OneSignal message’s launch url to this same url (under section “3 – Options > Launch URL):
This url will automatically open in the PWA installed on your device 🙂
Sending notifications from WordPress
WP-AppKit OneSignal addon is compatible with the OneSignal WordPress plugin, which allows you to send notifications directly from WordPress when you publish or update a post.
First, install and configure the OneSignal plugin to send web push to your site’s front end, as explained in this OneSignal documentation.
Once you have notifications setup and working on your website, here’s how to send notifications to your WP-AppKit mobile app in addition to your website:
- On OneSignal side, add and configure a “Native app” platform to the same OneSignal app that you are using for your web push on your website.
- Follow the same steps as explained earlier in this tutoial: “Configuration for a Native Android App“.
You should now have 2 platforms configured for the same OneSignal App:
And on WordPress side a WP-AppKit app configured with OneSignal addon activated and OneSignal App ID provided.
- Finally, still on WordPress side, go to “OneSignal Push” > “Configuration” > “Sent notification settings” and activate the option “Send notifications additionally to iOS & Android platforms“:
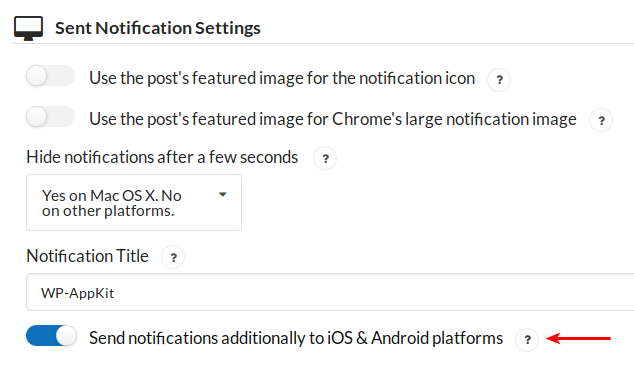 When you publish or update a post, notifications will then be sent both to your website’s front end and to your mobile app!
Sending notifications to your WP-AppKit Progressive Web App directly from WordPress is not possible for now, because :
- As seen in the “Configuration for a Progressive Web App” section, PWA configuration on OneSignal side requires a specific configuration related to Service Workers.
- Deeplinks format (to send the post url) is different for a Website than for a PWA
So, to handle notifications in PWA, we have to create a separate OneSignal App for the PWA and send notifications manually from OneSignal.
When using “OneSignal for WP-AppKit” addon along with OneSignal WordPress plugin, the default behavior is to send 2 notifications: one to your website and one to your app.
If you only want to send notifications to your app and not to your website, you can use this micro plugin. Once activated, it will avoid the notifications to your website from being sent: users will only receive notifications on their app.