You’ve got your app deployed on App Stores? Cheers!
Now you may wonder: what are the best practices to develop and distribute the next versions of my app? What will happen to your existing app if you modify its theme or content on server side?
Here are the things you need to know to handle your app’s updates in a safe way, without impacting already distributed versions, or impacting them purposely if you want to.
Static vs Dynamic Resources
- Once your app is built and distributed in App Stores, it embeds all non PHP parts of your theme: templates, CSS, images, fonts, and Javascript sources (like functions.js). All those resources are then totally independent from their version on the server. Modifications of those files on server side after the app build have no impact on already distributed apps.
- On the other hand, the PHP parts of your theme (files that are in the php folder of the theme on your server) are still active for all apps installed on user’s phones, as they’re executed on server side. Any change to those files on server side is immediately transmitted to all distributed apps. It can be great power but it’s most importantly great responsibilities, so you should always be careful when dealing with those PHP files of your themes.
- Regarding app content defined in the app’s edition panel in the back office (components and navigation), changing them has also an immediate effect on distributed apps (takes effect the next time the user refreshes content in his/her app). But you’re probably already aware of that if you created and previewed an app, as warning messages are displayed in the WordPress admin when any app content gets modified 😉
How To Manager Your App’s Versions
The general and safest way to handle a new version of an app is to:
- Create a new theme by cloning the previous one: create a new theme folder, copy previous theme sources in the new folder and update the theme’s version in the theme’s readme file header. This will ensure that apps that are already running on users’ devices are not impacted by the changes you’ll make on the new app on server side. It also allows to keep track of any previous version of your app theme and to do maintenance work on them if needed.

- Create a new app in WordPress back office, and plug this new app on the new theme from previous step.
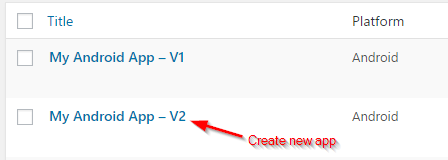
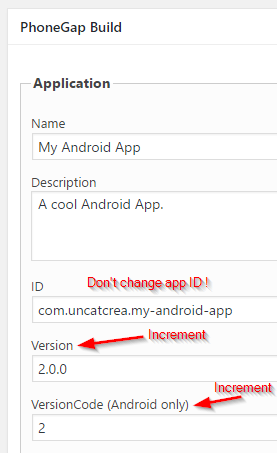
This new app should be set up with the exact same PhoneGap Build settings (especially the same Application > ID), except for the app’s version (Application > Version and VersionCode) that should of course be incremented (see the note about Android VersionCode at the end of this tutorial).
- Then you can test, preview and break this new app and its content without having any impact on previous versions.
- When your new version is ready, you can export, build and deploy it in stores to replace the previous one. Users that don’t update and stay with the previous version of the app won’t be impacted as their app is connected to the old app (and its old theme) that is still up and running unmodified on your WordPress 🙂
The Hotfix Case
Maybe for some minor changes that don’t correspond to a new version of the app but more to a live fix in production (for example you realize that a line of your theme’s CSS is wrong and is breaking one of your app screen), you can totally fix the current app’s theme without having to clone it like we advised for the general case.
- If this is a non PHP fix (CSS, template, Javascript etc), just apply and preview the fix on the current theme on server side as this won’t affect distributed apps. When ready, just increment the application version in PhoneGap Build settings, then save, export, build and deploy this fixed version in stores.
- If the fix is on a PHP file, be aware that your modifications on the file on the server will impact all distributed apps immediately. It can be convenient because in this case you don’t need to re-deploy in stores, but of course it must be used with caution!
The Android Version Code
For Android’s apps, when creating the new version of your app, you’ll increment the Application > Version field but also the Application > VersionCode field. You may have been surprised to see that the VersionCode that you provided for the previous version of your app is not exactly the same as the one that appears in your Google Play Developper Console for this app. For example you set a VersionCode to “1” for your app in back office, and you see “APK Version Code = 12” in Google Play. This is due to the fact that Cordova applies a different encoding to VersionCode according to the platform you’re building your app for. The algorithm used is detailed here for example. So the VersionCode value that you have to increment is the one that you set for your app in WordPress (increment VersionCode “1” to “2” for example), and Cordova will apply its logic to it to build a the new VersionCode that will appear in Play Store (“22” for example).
We hope this will help you managing your different app versions. Don’t hesitate to post your questions or feedback in the comments!
Hi Mathieu,
thanks a lot for this really helpful post. It answers many questions new users have to cope with.
Best regards.
And thank you Philippe for contributing to this post through your questions and feedback on support!
When will you integrate with wordpress 4.7 native rest API?
Hi, we have no defined date at the moment. First tests are on going.