In this tutorial we will see how to send OneSignal push notifications to WP-AppKit apps (and PWAs) targeting specific, chosen, WordPress users.
Here’s the idea:
- The user subscribes to OneSignal notifications in the app,
- Then, still in the app, the user logs in with his WordPress login (using native WP-AppKit login feature). When he/she does, we send his/her WordPress ID to OneSignal, which allows to map the WordPress user to the corresponding OneSignal user.
- From WordPress Back Office we select some users and send push notifications only to the apps of those chosen users.
What we will do technically:
- Use WP-AppKit OneSignal addon to handle push notifications in the app,
- Use WP-AppKit login feature so that WordPress users can log into the app,
- See how to map WordPress users to OneSignal users,
- Finally send push notifications from WordPress Back Office to chosen WordPress users’ devices only.
OneSignal configuration
You can download WP-AppKit OneSignal addon here on our website or directly on github.
You will find all OneSignal installation and configuration instructions on both OneSignal and WordPress sides here.
In a nutshell:
- Install the addon like any other WordPress plugin and activate it. Then, in your WP-AppKit app edition panel, activate the addon for the app.

- On OneSignal side, create a new app and get its “App ID”.

- Copy this OneSignal App ID into WP-AppKit app config. Don’t forget to re-save your app.

Once OneSignal is configured for your app, you can export/install it and run a first test to check that OneSignal subscription from the app works well and that your app receives push notifications that you send from OneSignal interface.
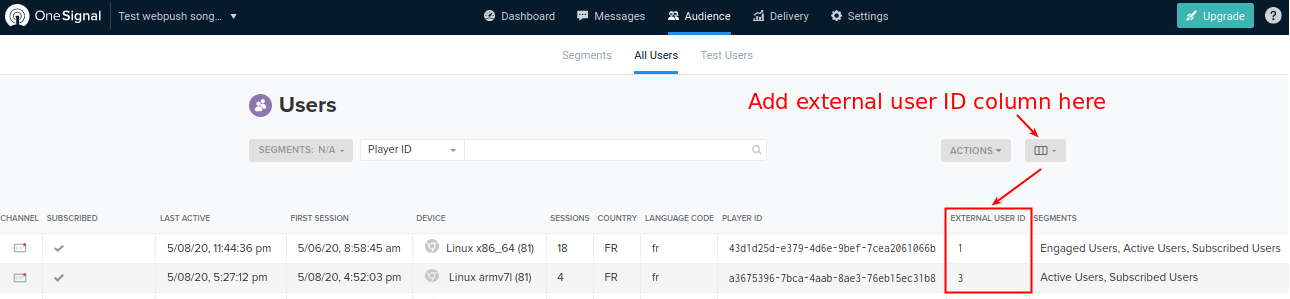
In OneSignal you can also check that your subscription tests appear in “Audiences” > “All users”. Those OneSignal users are not mapped to WordPress users yet, they only have a “Player ID” that is not related to WordPress user IDs. That’s what we are going to work on now.
Allow WordPress users to log into your app
You can find all instructions about how to setup WordPress login in a WP-AppKit app in the corresponding documentation.
Here are the main steps to follow:
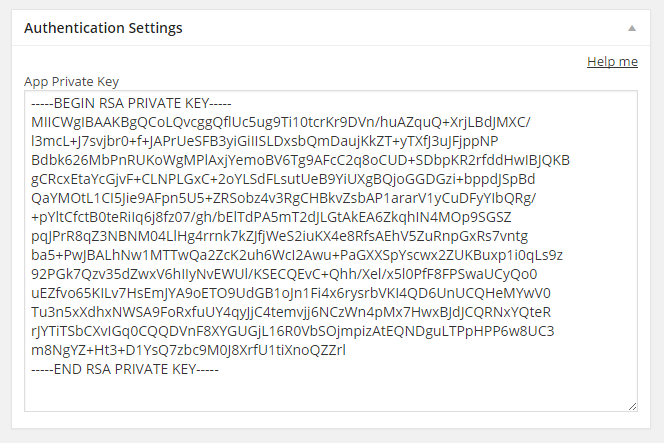
- Create a RSA private key that you copy to your WP-AppKit app “Authentication Settings” section to create a secure communication between your app and WordPress:
- Download, install and activate the Q for Android (User Authentication Demo) theme for your app. To do so, create a directory (for example “q-android-login”) in wp-content/themes-wp-appkit/ and clone or download the sources from this theme’s github repository. Then activate this new theme for your app and save.
- Of course this Demo theme is only an example of how the user login can be implemented in a WP-AppKit app. You can adapt it to your needs or use it as an example to implement a fully custom login management in your app. If you feel like doing so you can look at the “authentication” directory of the theme and at the Authentication API details in the documentation.
Once user authentication is configured for your app (private key and authentication demo theme installed), you can test it by trying to log in in the app (you will see a login form at the top of the app) with your WordPress login/password.
Map WordPress users to OneSignal users
This is where we really start to implement new features that are not in WP-AppKit by default 🙂
The goal of this tutorial is to be able to send push notifications to specific WordPress users. So the first thing we need to add is a way to map WordPress user IDs to OneSignal “player IDs”. Fortunately OneSignal provides a user field that is designed for this kind of mapping: external_user_id.
So what we need to do is send the WordPress user ID of the user logged in in the app to OneSignal as an external_user_id.
Here’s how to implement this:
- First, we have to add the WordPress user ID to the user information that is sent from WordPress to the app (by default WP-AppKit only send user login to the app, not user ID). To do so, create a wordpress-user-id.php file in wp-content/themes-wp-appkit/[your-app-theme]/php with the following code in it:
<?php

//Add WordPress user ID to the authentication user info sent to the app
//when a user logs in:
add_filter('wpak_auth_user_info', function($user_info, $user_id, $app_id) {
        $user_info['id'] = $user_id; //This allows to retrieve "current_user.info.id" on app side
        return $user_info;
}, 10, 3);
Note: If this is the first time that you add a PHP file into a WP-AppKit theme, you may wonder what is happening: WP-AppKit apps are Javascript based webapps, why are we including a PHP file in it? The answer is that WP-AppKit themes can add server side customization to modify what is returned by WP-AppKit content or authentication web services. Any PHP file found in [your-wp-appkit-theme]/php folder will be included in WP-AppKit webservice context (but not in the exported app sources, which is pure Javascript). That’s what we use here to add our user ID info to the default authentication webservice answer. You can find other useful information about this php folder in this article.
- Create a Javascript file named onesignal-external-user-id.js in wp-content/themes-wp-appkit/[your-app-theme]/js and put the following code in it:
define([
        'core/theme-app',
        'core/modules/authentication',
        ], function(App,Auth) {

        //When WordPress user logs in, set OneSignal's external user ID:
        App.on( 'info:auth:user-login', function( info ) {
                var current_user = Auth.getCurrentUser();
                OneSignal.setExternalUserId(current_user.info.id);
        } );

        //When WordPress user logs out, unset external user id
        App.on( 'info:auth:user-logout', function( info ) {
                OneSignal.removeExternalUserId();
        } );
} );
- Require this new “onesignal-external-user-id” Javascript module in the js/functions.js file of your theme (which is the main entry point for any custom Javascript added to a WP-AppKit app) by adding “theme/js/onesignal-external-user-id” as a dependency:
//In [your-wp-appkit-theme]/js/functions.js
define([
     'theme/authentication/js/top-login-form',
     'theme/authentication/js/premium-posts',
     'theme/authentication/js/pages',
     'theme/js/jquery.fitvids',
     'theme/js/onesignal-external-user-id'
     ], function($,App,Storage,TemplateTags,Config,Moment,Velocity) {
Now if you save and re-export/install your app, then log a WordPress user in on app side, you can check in OneSignal (Audience > All users) that your WordPress user ID is set as external ID:
Now if you log your user out in the app, you should see that the external user ID on OneSignal side is removed.
And that’s it concerning mapping WordPress users with OneSignal users. Now it is possible to send push notifications on a “per WordPress user” basis, by sending OneSignal notifications filtered by “external user IDs”. Let’s see how to do this.
Send push notifications to selected WordPress users
You can find here a micro WordPress plugin “OneSignal push to WP users” that was made for this tutorial and that implements:
- a WordPress admin page where you can select WordPress users and send a notification only to those selected users
- a basic example of how to create and send OneSignal notifications from WordPress using the OneSignal API along with the external_user_id targeting.
You will find explanations about how to setup this plugin in its readme file.
Here are the key concepts implemented:
- Create an admin page under tools menu that displays a form listing all the WordPress users with a checkbox to select them.
- When the form is submitted we send a notification that only the selected users will receive, if they are logged in in their app.
- The notification is sent by calling the OneSignal API’s notifications endpoint (https://onesignal.com/api/v1/notifications) and providing our selected WordPress user IDs in the “include_external_user_ids” request field.
Once you’ve followed indications from the plugin’s readme file and configured it with your own OneSignal App Id and Auth key (which you can find in OneSignal under Settings > Keys & Ids), you can go to the “Tools > OneSignal push to WP Users” WordPress admin page and finally test sending notifications to the selected users that are currently logged in in the instances of your WP-AppKit app!
We hope that this tutorial will help you build cool notification based applications linked to WordPress. Don’t hesitate to post your questions or feedback in the comments!