App themes are rendered via HTML templates, styled with CSS and motorized with Javascript.
Here is how to build a Theme and use the Javascript Theme API to display app content, customize rendering, communicate with app core and implement some key features like data storage or user authentication.
Build Your First Theme
Create a sub-folder in the themes folder (wp-content/themes-wp-appkit). We’ll call it my-theme for this example (wp-content/themes-wp-appkit/my-theme).
Add the following (empty) files in the my-theme folder:
- my-theme/head.html
- my-theme/layout.html
- my-theme/archive.html
- my-theme/single.html
- my-theme/menu.html
Add also a js sub-folder (my-theme/js) and a file named functions.js inside it (my-theme/js/functions.js). Even if it’s empty for now, this file is required and is the entry point for all the JavaScript of your theme.
At this point, your theme is a valid WP-AppKit theme and can be seen and chosen in the WordPress admin panel as a theme for one of your apps.
Write “Hello nice and shiny WP-AppKit world :-)” in the layout.html template. Running the app in your browser, you should see your message.
Theme Resources
To style a theme, you can use CSS files, images, fonts… You are free to create your own folders to store your resources. A classic organization can be something like:
- my-theme/css
- my-theme/images
- my-theme/fonts
As for any regular HTML page, we link to our theme’s CSS files in the <head> section. For that, we use the head.html template. As the app engine builds a page, it simply includes the content of the head.html template at the beginning of the <head> tag.
The head.html template is also where you can define your <meta> markup : charset, viewport…
Here is an example of a head.html template. It assumes that you’ve put your CSS rules in a /css/styles.css file in your theme’s folder:
<meta http-equiv="Content-Type" content="text/html; charset=UTF-8" />
<meta name="viewport" content="width=device-width, initial-scale=1.0, maximum-scale=1.0, user-scalable=no">
<link rel="stylesheet" href="<%= TemplateTags.getThemePath() %>/css/styles.css" media="all"/>
See the head.html template section for more details.
One important thing to know is that JavaScript files must not be included in the head.html template but included as RequireJS dependencies of functions.js. RequireJS is used by WP-AppKit to handle JavaScript modules dependencies. More details below.
Template Files
Theme templates are HTML files located at the root of the WP-AppKit theme’s folder: wp-content/themes-wp-appkit/[your-theme].
Dynamic parts of templates are rendered using the UnderscoreJS template engine.
In a nutshell, here is how you can use this template engine in your theme’s HTML templates:
- Any JavaScript can be executed anywhere in your template using <% … %>.
- To print a JavaScript variable, use <%= my_var %> notation.
- “if”, “else” or any JavaScript statement can be used inside <% … %>.
- UnderscoreJS powerful tools can be used of course (eg. _.each)
Each template is loaded by the core with default global variables (title, posts etc…) that can be accessed directly in the template. Those predefined variables change according to which template you’re in and are detailed in the following reference. You can also pass your own custom variables to templates using the template-args filter.
All templates can also use the Template Tags module to retrieve and display dynamic data concerning app entities or current app context.
A short example of a template that could be used to list posts (title, excerpt and comments number) in the archive.html template:
<h1>Posts archive for <%= list_title %></h1>
<% if( posts.length ){ %>
      <ul>
            <% _.each( posts, function( post ){ %>
                  <% var nb_comments = post.nb_comments %>
                  <li>
                        <h2><a href="<%= TemplateTags.getPostLink(post.id) %>"><%= post.title %></a></h2>
                        <p><%= post.excerpt %></p>
                        <span><%= nb_comments %> comment<% nb_comments > 1 ? print('s') : '' %></span>
                  </li>
            <% }); %>
      </ul>
<% }else{ %>
      <p>No post found!</p>
<% } %>
As an example let’s see how to display a simple WordPress page in our minimalist app using the layout.html and single.html templates:
Provided you have set a page as first navigation element on the WordPress side (by default, first navigation element is displayed at app’s launch), add the following in the layout.html template:
<h1>My app</h1>
<%= content %>
And in your single.html template:
<h2><%= post.title %></h2>
<div class="my-content">
   <%= post.content %>
</div>
Run your app in a browser, you should see your page content. Take a look at the rendered HTML, you see something like:
<body>
   <div id="app-layout">
      <h1>My app</h1>
      <div id="app-content-wrapper">
         <div class="app-screen">
            <h2><!-- Your wordpress page title --></h2>
            <div class="my-content">
               <!-- Your wordpress page content -->
            </div>
         </div>
      </div>
   </div>
</body>
Next step is probably to use the menu.html template to display the app’s menu, and the archive.html to display a list of WordPress posts. But before that you certainly want your app to look a little better using some CSS. Let’s do that with the head.html template.
The Head.html template is where you add the resources (CSS, images… but not javascript as explained here) and define HTML metas (viewport, content-type…) needed by your app’s theme.
Internally, the content of the head.html template file is copied to the <head> tag.
Example of a head.html template that uses the Bootstrap front-end framework CSS:
<meta http-equiv="Content-Type" content="text/html; charset=UTF-8" />
<meta name="viewport" content="width=device-width, initial-scale=1.0, maximum-scale=1.0, user-scalable=no">
<title><%= app_title %></title>
<link rel="stylesheet" href="<%= TemplateTags.getThemePath() %>/css/bootstrap.min.css">
<link rel="stylesheet" href="<%= TemplateTags.getThemePath() %>/css/bootstrap-theme.min.css">
<link rel="stylesheet" href="<%= TemplateTags.getThemePath() %>/css/styles.css" media="all"/>
In the head.html template, the following variable is automatically defined:
- app_title: the Application Title defined in the WordPress admin panel.
The TemplateTags.getThemePath() template tag retrieves the path to your theme’s folder. Use it to be sure that your resources are located correctly by the app.
The layout.html template is where you define the HTML app’s skeleton. Before doing so, you may take a look back at the Layout’s areas section where the main app regions are detailed.
In the layout.html template, you set the location of the menu and the content elements, using the following layout template tags:
- <%= menu %>: displays the menu items, using the menu.html template. The menu is rendered in a div with id #app-menu.
- <%= content %>: displays the main content using the appropriate template (ie. single.html, archive.html or comments.html) depending on which app’s screen is currently displayed. The content is rendered in a div with the id #app-content-wrapper.
<%= app_title %> can be used to display the title of the application. This is the Application Title defined in the WordPress admin panel for the app (same as in the head.html template).
As explained here, don’t forget to put to good use of the fact that the HTML markup defined in this template (that is to say everything except the dynamic layout tags <%= … %>) will stay static during all the app’s life cycle, which means that the app’s core won’t modify it. So you are the only master of the JavaScript events that you may bound to it to dynamize your DOM. Layout.html is the only template where this is the case: all other templates (included via <%= menu %> or <%= content %>) are handled (modified/created/deleted) by the app’s engine. So interact with those using JavaScript requires more binding/unbinding events logic, with the help of the app’s core events API.
In a word :
- Put all the HTML structure you can in the layout.html because you will be able to interact with it easily in JavaScript.
- Avoid as much as possible to define dynamic DOM elements in the other templates, where it is more difficult (yet very possible) to maintain JavaScript dynamization.
An example of a minimalist layout.html template :
<div id="my-container">
   <div id="my-topbar"><span id="my-menu-button"></span> <%= app_title %></div>
   <div id="my-menu-drawer"><%= menu %></div>
   <%= content %>
</div>
The archive.html template is used to render post lists, typically corresponding to the Posts List WP-AppKit component in the WordPress admin panel.
The global variables accessible in this template are:
- list_title: the label of the Post List component defined in the WordPress admin panel.
- posts: array of the posts to display for this archive (only for the current page of the pagination). Each post of this list is a JSON object. See the single.html template for detailed reference of what each post contains.
- total: total number of posts for this archive (not only those present on this page of the pagination).
Archive.html example:
<h1>Posts archive for <%= list_title %> (Total <%= total %>)</h1>
<% if( posts.length ){ %>
<ul>
<% _.each( posts, function( post ){ %>
<% var nb_comments = post.nb_comments %>
<li>
<h2>
<a href="<%= TemplateTags.getPostLink(post.id) %>"><%= post.title %></a>
<small><%= TemplateTags.formatDate(post.date,'d/m/Y') %></small>
</h2>
<p><%= post.excerpt %></p>
<span><%= nb_comments %> comment<% nb_comments > 1 ? print('s') : '' %></span>
</li>
<% }); %>
</ul>
<% }else{ %>
<p>No post found!</p>
<% } %>
The Single.html template is used to render a post detail (and by default pages details too).
You access the post data in this template using the post JSON object. By default, this post object contains:
- post.id: WordPress post ID.
- post.post_type: WordPress post type.
- post.date: post creation date (timestamp).
- post.title: post title.
- post.content: post content (use the wpak_posts_list_post_content or wpak_post_content_format hooks to customize it).
- post.excerpt: post excerpt (use the wpak_post_excerpt, wpak_excerpt_length and wpak_excerpt_more hooks to customize it).
- post.featured_img: post featured image. A JSON object containing post.featured_img.src, post.featured_img.height and post.featured_img.width.
- post.author: post author (nickname by default).
- post.nb_comments: number of comments for the post.
Those same fields can be used in the archive.html template when looping on the posts array.
They are fully customizable via hooks on the WordPress side of the WP-AppKit, allowing to control what post info you pass from WordPress to your app. For example, to add a post meta data (that you created on the WordPress side) to the post object used in the single.html and archive.html templates, simply add it on the WordPress side using the wpak_post_data hook, and it automatically appears in the post JSON object in your app templates. See the WP-AppKit WordPress hooks reference for detailed info about that.
Single.html example:
<h1><%= post.title %></h1>
<% if( post.nb_comments > 0 ){ %>
<a href="<%= TemplateTags.getCommentsLink(post.id) %>">
<% print(post.nb_comments) %> comment<% post.nb_comments > 1 ? print('s') : '' %>
</a>
<% } %>
<div class="my-single-content">
<% if( post.featured_img && post.featured_img.src && post.featured_img.src.length ){ %>
<img src="<%= post.featured_img.src %>" />
<% } %>
<%= post.content %>
</div>
Here, if the post has comments, we display comments number as a link pointing to the app comments screen for this post. If the post has a featured image, we display it before post content.
The page.html template is used to render WordPress page details. If not present, the single.html template is used instead.
You access the page data in the exact same way that you do with a post in the single.html template, using the post JSON object.
If the page is part of a page tree (ie. has a parent page or sibling pages), you can use the following template tags to retrieve information about its position in the tree:
getPageParent(), getPageSiblings(), getNextPage(), getPreviousPage(), getPageChildren(), getPageDepth(), getPageBreadcrumb().
The comments.html template is used to render comments for a given post.
Comments can be found in the comments array, that contains comment JSON objects, ordered by descending date by default and taking comments responses imbrication into account through the comment.depth property:
- comment.id: WordPress comment ID.
- comment.date: comment date (timestamp).
- comment.author: comment author (nickname).
- comment.content: comment content.
- comment.depth: depth starts at 1. If the comment is a response to a comment, depth equals 2. If it is a response to a response, depth equals 3…
You can customize those fields on the WordPress side using the wpak_comments_data hook. Order in which the comments appear can be changed using the wpak_comments_list_args hook.
In the comments.html template you can also use the post JSON object that corresponds to the post on which the comments have been posted. See the single.html template for details about its properties.
Example of comments.html template:
Comments on <a href="<%= TemplateTags.getPostLink(post.id) %>"><%= post.title %></a></li>
<% if(comments.length){ %>
<ul class="media-list">
<% _.each( comments, function( comment ){ %>
<li style="padding-left:<% print((comment.depth)*2) %>em">
<h4>
<%= comment.author %>
<small><%= TemplateTags.formatDate(comment.date,'d/m/Y') %></small>
</h4>
<p><%= comment.content %></p>
</li>
<% }) %>
</ul>
<% }else{ %>
<p>No comment!</p>
<% } %>
Here, to render comment imbrication we use the comment.depth property to apply a left padding to comment list items.
You can also define your own custom templates for singles, pages and lists.
This is useful if you want to have a specific template for a given category, page or post type.
You set up a custom template by :
- creating the corresponding .html template file in your theme directory (for example “archive-my-category.html”). You are free to name your custom templates files whatever you want, there are no template naming rules according to taxonomies or post types in WP AppKit themes.
- using the “template” filter to link your new template to the chosen screen.
App.filter( 'template', function( template, current_screen) { ... return template; } )
Filters that allows to set a custom template for a given screen.
(Note that if you created a custom screen with the addCustomRoute() method, you don’t need to set your template with this “template” filter: the template is already set by addCustomRoute() )
For example, if you want to use a custom template of your own (let’s name it “archive-my-category.html”) for your category “my-category” (WordPress slug for your category), you will do something like this in functions.js :
App.filter( 'template', function( template, current_screen) {
      if( TemplateTags.isCategory('my-category', current_screen) ){
            template = 'archive-my-category'; //Don't need .html here.
      }
      return template;
} );
To use a custom single template (let’s say “single-my-post-type.html”) for a given WordPress post type “my-post-type” :
App.filter( 'template', function( template, current_screen) {
      //Check the screen's post type with "TemplateTags.isPostType()" :
      //as we have to pass the current_screen as 3rd argument, we pass an empty post_id=0 as 2nd argument
      //( because we don't have to check a specific post ID here, just the post type 'my-post-type' ):
      if( TemplateTags.isPostType('my-post-type', 0, current_screen) ){
            template = 'single-my-post-type'; //Don't need .html here.
      }
      return template;
} );
Note : here we have to pass the “current_screen” argument to the isCategory() and isPostType() template tags (which you don’t have to do when using those template tags in templates). This is because when the ‘template’ filter takes action, the current_screen is not set in the global App context yet (internally we have to check if the given template is right before really switching the App engine to the new screen).
- template : string : change this template value to one of your custom template to change the template used to render the current screen. No .html is needed at the end of the template name here (for example if your custom template is my-template.html, you would set template = "my-template" here.
- current_screen : JSON object : the screen that is being rendered (see getCurrentScreen() for details about the JSON object )
String : The modified template
App.filter( 'template-args', function( template_args, view_type, view_template ) { ... return template_args; }
Filter that allows to customize variables that are passed to templates.
Each template (single.html, archive.html etc) has its own set of variables that are automatically defined and that you can use to display the different screen elements.
For example, in the archive.html template the following vars are available by default: “list_title”, “posts”, and “total”.
We also have the “TemplateTags” object that is available in all templates by default.
If you need to pass other variables or modules to your templates you can use the “template-args” filter.
Here is an example that shows how to pass some “my_stored_data” (that we stored to local storage using the PersistentStorage module for example) to the single.html template:
//In functions.js
define( [ 'core/theme-app', 'core/modules/persistent-storage', ... ], function( App, PersistentStorage, ... ) {

    App.filter( 'template-args', function( template_args, view_type, view_template ) {

        //Make "my_stored_data" available in the "single.html" template:
        if( view_template == 'single' ) {
            template_args.my_stored_data = PersistentStorage.get( 'my_stored_data' );
            //('my_stored_data' is a JSON object for example)
        }

        return template_args;
    } );

} );
And in the “single.html” template you can now use “my_stored_data”:
<h1>My single title</h1>
<div class="my-custom-data">
    <p>Here's the first thing I stored to local storage: <%= my_stored_data.first_thing %></p>
    <div>
        And the second thing is a list:
        <ul>
            <% _.each( my_stored_data.second_thing, function( item ) { %>
                <li><%= item.name %>: <%= item.value %></li>
            <% } %>
        </ul>
    </div>
</div>
- template_args: JSON Object: current template default variables. Add your own variables to this object.
- view_type: String: type of template's view (one of 'archive', 'comments', 'custom-component', 'custom-page', 'head', 'layout', 'menu', 'page', 'single')
- view_template: String: the template used to render the view (without the final '.html'): 'single', 'archive', etc, or any custom template of yours
JSON Object: The modified 'template_args' with your custom vars and/or modules added.
App.filter( 'preloaded-templates', function( preloaded_templates ) { ... return preloaded_templates; }
When the app navigates to a screen (eg. post list, post detail etc), it loads the corresponding template file (eg. archive.html, single.html etc) dynamically (RequireJS).
Loading a template is fast but it still takes some milliseconds, especially when previewing in browser, which can be disturbing when implementing transitions between screens for example.
By default, app core preloads single.html and archive.html templates at app launch so that they don’t have to be loaded on screen display.
You can use the “preloaded-templates” filter to add other native templates or templates of your own to preloaded templates.
Example to preload the “page.html” template in your theme:
//In functions.js
App.filter( 'preloaded-templates', function( preloaded_templates ) {
	preloaded_templates.push('page');
	return preloaded_templates;
});
- preloaded_templates: array: Array of preloaded templates : add templates you want to preload to this array before returning it.
JavaScript in Themes
In WP-AppKit apps, all JavaScript files inclusions are centralized by RequireJS. It allows to handle JavaScript module dependencies and files loading order in a robust way. To include JavaScript files in your theme you have to use the RequireJS syntax.
The default and best way to implement a JavaScript functionality (module) in a RequireJS driven application is to follow the Asynchronous Module Definition (AMD) pattern. But including a good old regular JavaScript file that doesn’t respect this pattern in your theme works also just fine. You don’t really need to know anything about RequireJS or AMD to add javascript to your theme. Just remember that you must not include your JavaScript files in the <head> (or at the bottom of the <body>) section. Instead, insert them as a dependency of the app in the theme’s functions.js file.
define(['jquery','core/theme-app','theme/js/my-javascript'],function($,App){
   //Your functions.js content here, where :
   // - $ = jQuery
   // - the theme-app core module is accessed through "App"
});
Doing that includes the [your-theme]/js/my-javascript.js file, by adding it as a dependency of the “functions” module defined in functions.js.
Note that:
- You don’t need the “.js” at the end of “my-javascript” for the RequireJS dependency (but your javascript file must have the .js extension).
- The path must start with “theme” which is replaced by your theme’s folder name internally.
- Your JavaScript files can be organized freely under your theme’s folder, as long as you respect the theme/[my/path/to/my/js]/my-file format.
In the example above, our functions module is declared with 2 other dependencies: jquery and theme-app. Thereafter, jQuery is used with the $ variable and the theme-app module via the App variable.
There are 3 types of Javascript files that can be required in your theme:
- your my-javascript file defines a module that follows the AMD pattern, you can access this module with a variable that you add after App in the function arguments.
- your my-javascript file exports a global variable in the global context that you can access directly in the functions.js content.
- your my-javascript implements some Javascript logic or library that is required for your theme but that does not require to be used through a variable in functions.js. That also works fine: in that case, you should require those Javascript files at the end of your dependencies declaration (with no corresponding argument after App), and your JavaScript will simply be included in the JavaScript context of the app.
For example, if you use the FitVids jQuery plugin (file theme/js/jquery.fitvids.js), you’ll include it like that:
define(
    ['jquery', 'core/theme-app', 'theme/js/jquery.fitvids'],
    function($, App) {
        ...
    }
);
Note that theme/js/jquery.fitvids does not have a corresponding argument in function($, App), because this is a jQuery plugin that just needs to be included in the Javascript context and does not require to be accessed directly through a variable in functions.js.
Then for example if you need to include the core/modules/persistent-storage module (that has a corresponding PersistentStorage argument), you’ll have to add it before theme/js/jquery.fivids, because as said earlier, dependencies that don’t have a corresponding argument (here theme/js/jquery.fivids) must be declared at the end of the dependencies declaration:
define(
    ['jquery', 'core/theme-app', 'core/modules/persistent-storage', 'theme/js/jquery.fitvids'],
    function($, App, PersistentStorage) {
    }
);
The functions.js file is the entry point of all the JavaScript used in a WP-AppKit app theme. It is required and must be located in wp-content/themes-wp-appkit/[your-app-theme]/js folder.
This is where you:
- Follow and react to what happens in the app, binding to core events and using the ThemeApp module (typically available as the App object in functions.js).
- Include your own JavaScript files, declaring them as app’s dependencies, as explained in the JavaScript in Themes section.
- Hook into app core and set hookable app’s parameters.
Here is a minimalist example of functions.js file that refreshes the app’s content when user clicks the refresh button (#my-refresh-button) and updates a feedback area (#my-feedback) when refreshing ends:
define(['jquery','core/theme-app'],function($,App){

      $('#my-refresh-button').click(function(e){
            e.preventDefault();
            App.refresh(function(){
                  $('#my-feedback').html('Content updated successfully :)').show();
            });
      });

});
The best practice with functions.js is the same as with the WordPress themes’ functions.php : if possible don’t declare all your app Javascript in functions.js, prefer Javascript sub-modules that you add to your theme via the functions.js dependencies :
For example, develop your functionality in [your_theme]/js/my-module.js and add this module to your theme by requiring it in functions.js like so :
define( [ 'jquery','core/theme-app', 'theme/js/my-module' ], function ( $, App, MyModule ) {
      MyModule.myFunction();
});
Javascript Hooks
You’re probably familiar with WordPress (PHP) Hooks that allow to hook into the core of WordPress from plugins or themes.
WP-AppKit theme API uses hooks too to allow interaction with app core from themes.
The principle behind WP-AppKit app’s hooks is very similar to WordPress hooks except that they’re not implemented in PHP but in Javascript.
Most of the treatments and customization you will do in WP-AppKit themes (in functions.js for example) use those Javascript hooks.
Hooks can be filters or actions : you can use them from themes through App.filter() and App.action().
Internally, those methods use the WP-AppKit Javascript Hooks module implementation that you can find in app/core/lib/hooks.js.
App.filter( filter_name, filter_callback, priority )
Allows to hook into a core variable or setting to modify default app’s behavior.
Here is an example using the “template” filter to define your own custom template for a given category:
//In functions.js for example:
define( [ 'core/theme-app', 'core/theme-theme-tpl-tags' ], function( App, TemplateTags ) {

    App.filter( 'template', function( default_template, current_screen ) {

        if( TemplateTags.isCategory( 'my-category', current_screen ) ) {
            //Use the '[your-theme]/archive-my-category.html' template:
            default_template = 'archive-my-category'; //Don't need .html here.
        }

        return default_template;
    } );

} );
In this example, the core variable that the “template” filters allows to modify is “default_template”.
We change it to “archive-my-category” template and return it, then the core takes this new template value into account to render the current screen.
Filters examples: launch-route, default-route, template, template-args.
- filter_name: string: Name of the filter (for example 'template-args') to hook into.
- filter_callback: function: Callback function that receives the data to modify as first argument, followed by other arguments depending on which filter is called. The callback must return the modified version of the first argument.
- priority: int: (Optional, default 10): Sets the order in which the functions associated with the filter are executed. Lower numbers correspond with earlier execution. (Same principle as WordPress hooks priorities)
App.action( action_name, action_callback, priority )
Allows to hook into the core at key moments of the app processing to do your own actions.
The main purpose of actions is to allow hooking into core treatments in a synchronous way, meaning that you can be sure that the core is waiting for your action to be finished to pursue its course of action. This is different from events that are asynchronous.
WP-AppKit action hooks provide a jQuery deferred object as last argument of each callback functions called, so that synchronous actions can be handled.
Usage example using the ‘pre-start-router’ action to do some treatments before the app router is started:
App.action( 'pre-start-router', function( launch_route, app_stats, $deferred ) {
    //Do something before router is started, and resolve $deferred when finished:
    MyAsynchronousProcess( { success: function() {
        //Resolve $deferred so that core process can go on:
        $deferred.resolve();
    } } );
} );
Actions examples : ‘pre-start-router’,’screen-transition’, ‘components-fetched’
- action_name: string: Name of the action (for example 'screen-transition') to hook into.
- action_callback: function: Callback function that receives arguments depending on which action is called. The callback is passed a jQuery deferred object that can be used for actions that are handled synchronously by the core: in this case $deferred.resolve() must be called when the hooked function finishes its process.
- priority: int: (Optional, default 10): Sets the order in which the functions associated with the action are executed. Lower numbers correspond with earlier execution. (Same principle as WordPress hooks priorities)
Template Tags
Used in themes templates, Template Tags allow to retrieve info about the current screen and to make conditional treatments such as isSingle(), isCategory()… From templates, you access them using the TemplateTags object (eg. TemplateTags.isSingle()).
They can also be used in functions.js.
TemplateTags.getCurrentScreen()
Retrieves infos about the current displayed screen.
Returns JSON object containing:
- screen_type: list, single, comments, page.
- fragment: unique screen URL ID (what’s after # in URL).
- component_id: component slug ID, if displaying a component screen (list, page).
- item_id: current post ID (the same as the WordPress post.ID ), if displaying single content (post,page).
- label: label of the screen : for lists it is the component label (as set in WordPress Back Office), for post/page it is the post/page title.
- data: contains more specific data depending on which screen type is displayed.
data property examples:
for post list screens, data contains:
- query: query vars used to retrieve current screen content (taxonomy, terms…).
- total: if list, the total number of posts in the list.
- ids : if list, IDs of posts displayed in the list.
for single post screens, data contains:
- post: JSON Object containing post data
getCurrentScreen() example:
var current_screen = TemplateTags.getCurrentScreen();
if( current_screen.screen_type == 'single' ){
    //do something only if displaying a post detail.
}
Retrieving current screen information is a very common need so this function has an alias in the ThemeApp module: App.getCurrentScreen(). This way you can retrieve screen information from any context or JS module in your theme where ThemeApp is available, without having to add the TemplateTags module as a dependency.
TemplateTags.getCurrentScreenObject() or App.getCurrentScreenObject()
Retrieves useful data corresponding to the object that is currently displayed.
If you’re familiar with WordPress development, this getCurrentScreenObject() is some kind of equivalent of WordPress’s get_queried_object().
For example, if you’re displaying a post screen (single), TemplateTags.getCurrentScreenObject() will return the displayed post data as a JSON Object.
Retrieving current screen object is a very common need so the function also has an alias in the ThemeApp Module : App.getCurrentScreenObject(). This way it can be called in functions.js or any theme JS module of your own without having to require TemplateTags as a dependency.
JSON Object depending on current screen:
- for lists: object containing: title (list title), posts (list of posts), ids (=post ids), total, component_id, query
- for single: post object: id, post_type, date, title, content, excerpt, thumbnail, author, nb_comments, slug, permalink
- for comments: object containing: post (post we retrieve the comments for) and comments (list of comments for this post)
- for pages: page object: id, post_type, date, title, content, excerpt, thumbnail, author, nb_comments, slug, permalink, tree_data, component (page's component object)
- for custom pages: object containing: id, route, title (if custom page data contains a 'title' property), data (custom page data), template.
- for custom components: object containing: component_id, title, route, data, template
- for all: field 'screen_type': can be: 'list', 'single', 'comments', 'page', 'custom-page', 'custom-component'
TemplateTags.getPreviousScreen()
Retrieves infos about the previously displayed screen, according to app’s history.
Returns a JSON object with the exact same structure as TemplateTags.getCurrentScreen().
For example, in the single.html template, if you want to retrieve the title of the list you come from :
<% var previous_list = TemplateTags.getPreviousScreen() %>
<div class="my-breadcrumb">
<%= previous_list.label %> > <%= post.title %>
</div>
TemplateTags.getPreviousScreenLink()
Retrieves the link to the previously displayed screen, according to app’s history.
If the current screen is a single (ie. post detail), it gets the link to the list screen this single belongs to.
Example :
<a href="<%= TemplateTags.getPreviousScreenLink() %>">Back to previous screen</a>
TemplateTags.getPostLink(post_id, global)
Returns the url to a given post. Url in WP-AppKit are in fact fragments (what’s after # in urls) : for example : “#single/posts/[your-post-id]”
For exemple to retrieve a post link in the archive.html template, or in the comments.html template, to go back to the post screen, you can use :
<a href="<%= TemplateTags.getPostLink(post.id) %>" ><%= post.title %></a>
In functions.js, you can also navigate to a post using :
App.navigate( TemplateTags.getPostLink(your_post_ID) );
- post_id : int : Wordpress ID of the post
- global : string : Optional : set a specific global if you created a custom component in WP-AppKit with its own global. Otherwise it will default to "posts".
String : The url fragment of the given post screen. For example if you retrieve a link for the post with ID=12 : TemplateTags.getPostLink(12) will return : "#single/posts/12".
TemplateTags.getComponentLink( component_slug )
Gets the url fragment of the given component.
- component_slug: string: Slug of the component to retrieve, as set when creating the component in App edition on WordPress side.
string: Url fragment of the component (#component-[component_slug]) if component exists, empty string if not.
TemplateTags.getCommentsLink( post_id )
Retrieves the url (fragment) of the comments screen that displays the comments for the given post.
NOTE : It is better to use ThemeApp.displayPostComments() than to use this function, as ThemeApp.displayPostComments() allows to handle success and error callback.
Using TplTags.getCommentsLink() directly, you won’t be able to handle errors on comments screens display.
- post_id : Wordpress ID of the post you want to retrieve the comments for.
String : the url fragment corresponding to the comments screen, for example, if post ID=12 : "#comments-12".
TemplateTags.getPageLink( page_id, component_id, screen )
Get the link to a given page.
Example of a link that navigates to the next sibling page :
<% var next_page = TemplateTags.getNextPage(); %>
<a href="<%= TemplateTags.getPageLink( next_page.id ) %>">Next Page</a>
- page_id : int : WordPress ID of the page
- component_id : string (Optional) : The component the page belongs to. Will try to guess from screen if empty.
- screen : object screen (Optional) : The screen to check if no component_id is specified. Will try to guess from the current screen if not there.
url fragment : string : example #page/[page-component]/[page-ID]
TemplateTags.getPreviousPage( screen )
Get previous sibling page of the given page.
Can be used only for pages that come from a “WordPress Page” component where “Include sub pages” is checked.
See https://github.com/uncatcrea/wpak-theme-bootstrap/blob/master/page.html for an example.
- screen : JSON object (Optional) : use only if you want data from a different screen than the current one.
JSON object : previous page object, null if none
TemplateTags.getNextPage( screen )
Get next sibling page of the given page.
Can be used only for pages that come from a “WordPress Page” component where “Include sub pages” is checked.
See https://github.com/uncatcrea/wpak-theme-bootstrap/blob/master/page.html for an example.
- screen : JSON object (Optional) : use only if you want data from a different screen than the current one.
JSON object : next page object, null if none
TemplateTags.getPageChildren( screen )
Get children pages of the given page.
Can be used only for pages that come from a “WordPress Page” component where “Include sub pages” is checked.
See https://github.com/uncatcrea/wpak-theme-bootstrap/blob/master/page.html for an example.
- screen : JSON object (Optional) : use only if you want data from a different screen than the current one.
Array of JSON page objects : children pages
TemplateTags.getPageSiblings( screen )
Get siblings pages of the given page.
Can be used only for pages that come from a “WordPress Page” component where “Include sub pages” is checked.
See https://github.com/uncatcrea/wpak-theme-bootstrap/blob/master/page.html for an example.
- screen : JSON object (Optional) : use only if you want data from a different screen than the current one.
Array of JSON page objects : siblings pages
TemplateTags.getPageParent( screen )
Get parent page of the given page.
Can be used only for pages that come from a “WordPress Page” component where “Include sub pages” is checked.
See https://github.com/uncatcrea/wpak-theme-bootstrap/blob/master/page.html for an example.
- screen : JSON object (Optional) : use only if you want data from a different screen than the current one.
JSON object : parent page object, null if none.
App.getPageDepth( screen )
Get depth of the page in the page tree of the corresponding “Page component”.
Can be used only for pages that come from a “WordPress Page” component where “Include sub pages” is checked.
See https://github.com/uncatcrea/wpak-theme-bootstrap/blob/master/page.html for an example.
- screen : JSON object (Optional) : use only if you want data from a different screen than the current one.
int : depth of the page. (0 if mother page, 1 if first level children page, etc...)
TemplateTags.isSingle( post_id, screen )
- post_id : int : Optional : WordPress post ID : pass an ID to check if you are displaying the sreen corresponding to the given post.
- screen : object (see TemplateTags.getCurrentScreen() ) : Optional : use only if you want to check a different screen than the current one
Boolean : true if the current screen corresponds to the post with ID=post_id.
If no post_id is passed, it will return true if you are displaying a single.
Note : this will return false for a page : use TemplateTags.isPage( page_id ).
TemplateTags.isPage( page_id, screen )
- page_id : int : Optional : Wordpress page ID : pass an ID to check if you are displaying the sreen corresponding to the given page.
- screen : object (see TemplateTags.getCurrentScreen() ) : Optional : use only if you want to check a different screen than the current one
Boolean : true if the current screen corresponds to the page with ID=page_id.
If no page_id is passed, it will return true if you are displaying a page screen.
Note : this will return false for a "single" screen : use TemplateTags.isSingle( post_id ).
TemplateTags.isPostType( post_type, post_id, screen )
Checks if the current screen is a single for a specific post type.
This can be used to check if you are displaying a certain type of your WordPress Custom Post Types.
- post_type : string : the post type you want to check.
- post_id : int : Optional : Wordpress post ID : if you also want to check if this is a specific post.
- screen : object (see TemplateTags.getCurrentScreen() ) : Optional : use only if you want to know the post type of a different screen than the current one
Boolean : true if the current screen corresponds to the given post_type and optionally post_id.
TemplateTags.isTaxonomy( taxonomy, terms, screen )
Checks if a screen is a list of posts filtered by a given WordPress taxonomy. This can occur when you create an App having a “Post list” component filtered by a custom taxonomy in the WordPress Back Office.
For example, to check if you are displaying of list of posts filtered on any term of the WordPress taxonomy “my-taxonomy” : use TemplateTags.isTaxonomy( ‘my-taxonomy’ ), in the archive.html template or in functions.js.
To check if you are displaying the list of posts that have the “my-taxonomy” terms “my-term” and “my-other-term”, use : TemplateTags.isTaxonomy( ‘my-taxonomy’, [‘my-term’, ‘my-other-term’] ).
- taxonomy : string : WordPress taxonomy slug to check
- terms : string | array : Optional : Taxonomy terms slug(s) to check
- screen : object (see TemplateTags.getCurrentScreen() ) : Optional : use only if you want to check a different screen than the current one
Boolean : true if the screen corresponds to the given taxonomy list (and specific terms if you passed some).
TemplateTags.isCategory( categories, screen )
Checks if a screen is a list of posts filtered by a given WordPress category. This can occur when you create an App having a “Post list” component filtered by a category in the WordPress Back Office.
For example, to check if you are displaying a list of posts filtered on any term of any WordPress category : use TemplateTags.isCategory(), in the archive.html template or in functions.js.
To check if you are displaying the list of posts that have the category terms “my-category” and “my-other-category”, use : TemplateTags.isCategory([‘my-category’, ‘my-other-category’]).
Note : TemplateTags.isCategory( [‘my-category’, ‘my-other-category’] ) is equivalent to TemplateTags.isTaxonomy( ‘category’, [‘my-category’, ‘my-other-category’] )
- categories : string | array : Optional : Category terms slug(s) to check
- screen : object (see TemplateTags.getCurrentScreen() ) : Optional : use only if you want to check a different screen than the current one
Boolean : true if the screen correponds to the given category(s)
TemplateTags.isTag( tags, screen )
This is the same as TemplateTags.isCategory() but for WordPress Tags (“post_tag” taxonomy).
Note : TemplateTags.isTag( [‘my-tag’, ‘my-other-tag’] ) is equivalent to TemplateTags.isTaxonomy( ‘post_tag’, [‘my-tag’, ‘my-other-tag’] )
- tags : string | array : Optional : Tag(s) (Wordpress "post_tag" taxonomy) slug(s) to check
- screen : object (see TemplateTags.getCurrentScreen() ) : Optional : use only if you want to check a different screen than the current one
Boolean : true if the screen correponds to the given tag(s)
TemplateTags.isScreen( screen_fragment, screen )
Checks if the current screen corresponds to the given screen fragment.
For example, to display a custom block only for the single corresponding to the post with WordPress ID=123 : in the single.html template :
<% if( TemplateTags.isScreen( 'single/posts/123' ) ) { %>
      <div>
            I will show up only for the post with ID=123
      </div>
<% } %>
- screen_fragment : string : The url fragment to check (without the # chararcter)
- screen : object : Optional : use only if you want to check a different screen than current one
TemplateTags.isDefaultScreen( screen_to_check )
Checks if the given or current screen is the default screen or not.
screen_to_check: optional: screen object: screen we want to test. If not given, the current screen will be used (see TemplateTags.getCurrentScreen() for screen object format details).
Bool: True if the screen is the default one.
TemplateTags.getAppStats(stat)
Retrieves stats infos about the app : app open count, last open date, app version.
Example, in any template :
<% var stats = TemplateTags.getAppStats() %>
<span>Current version is <%= stats.version %> and the last time you opened this app was on <%= stats.last_open_date %>.</span>
- stat : can be empty to retrieve all stats in a JSON object, or use one of the following string to retrieve a specific stat : "count_open", "last_open_date", "version", "version_diff".
For example, TemplateTags.getAppStats('version') will retrieve only the app version, as a string.
- count_open : int : number of times the app was open by the user
- last_open_date : string (yyyy-mm-dd hh:mm:ss) : date of the last time the app was open by the user
- version : string : current app version, as set in Wordpress Back Office in "Phonegap config.xml data" version field.
- version_diff : JSON object containing "current_version", "last_version" (different of current_version if you just updated the app) and "diff" : equals 0 if current_version = last version, +1 if current_version > last version, -1 if current_version < last version.
TemplateTags.getThemePath()
Retrieves the path to the current theme.
For example, to link a CSS file in the head.html template :
<link rel="stylesheet" href="<%= TemplateTags.getThemePath() %>/css/my_styles.css">
String : Path to the current theme
TemplateTags.getComponent( component_slug )
Retrieves the given component data.
The way to go to retrieve component data for components that are not added to the app navigation.
See the components section for more details about this.
- component_slug : string : component slug as defined when creating the component in the WordPress Back Office
JSON Object containing component data :
- data : JSON Object : contains all the data (content) coming from the WordPress side : this is where you want to look to retrieve your component data. In most cases you don't have to use the following other properties.
- global : string : the internal global array ('posts', 'page', etc) where the possible components items are stored.
- id : string : slug of the component as defined when creating the component on WP side
- label : string : component label as defined when creating the component on WP side
- type : string : internal type of the component
- view_data : the data prepared to be passed to the screen view, if the component is linked to a core view.
TemplateTags.componentExists( component_slug )
Check if the given component is included in the app.
- component_slug: string: Slug of the component to retrieve, as set when creating the component in App edition on WordPress side.
boolean: true if the component is found in the app, false otherwise.
Refreshing Content
App.refresh ( cb_ok, cb_error )
Launches app refresh: gets updated content (components, posts, menu items) from the server and updates app’s local storage accordingly.
You’ll probably want to do some treatment in your theme when refresh starts and ends (like display/hide a loading spinner for example).
There are 2 ways to achieve that: using refresh callbacks (cb_ok, cb_error) or refresh events (refresh:start, refresh:end).
You can choose one of those ways depending on your implementation but you should not use them both at the same time (we would recommend using the events version for more flexibility).
For example, the 2 snippets below would be equivalent (in functions.js):
With callbacks:
$("#app-layout").on("touchend","#my-refresh-button", function(){
      //Call refresh with callbacks
      App.refresh(
            function() { //Success callback (cb_ok)
                  //Hide loading spinner
                  //Display success message
            },
            function( error ) { //Error callback (cb_error)
                  //Hide loading spinner
                  //Display error message based on error.message
            }
      );
});
With events:
App.on( 'refresh:start', function() {
      //Display loading spinner
} );

App.on( 'refresh:end', function( result ) {
      //Hide loading spinner
      if ( result.ok ) {
            //Display success message
      } else {
            //Display error message based on result.message
      }
} );

$("#app-layout").on("touchend","#my-refresh-button", function(){
      //Call refresh without callbacks:
      App.refresh();
});
- cb_ok : (Optional, not needed if using refresh:start and refresh:end events) : callback function : called when refresh process ends, if refresh went ok.
- cb_error : (Optional, not needed if using refresh:start and refresh:end events) : callback function : called if an error occured during refresh. Receives an error object as argument, containing error.message and error.data.
App.isRefreshing()
To know if there is an ongoing refresh process.
True if the app is currently refreshing.
App.setParam('refresh-at-app-launch', false);
App param. Boolean (default true). Use in functions.js to choose if the app refreshes at app launch.
For example, if you display a custom page when your app version changes, you don’t want your app content to refresh immediately at app launch :
App.filter( 'launch-route', function( launch_route, stats ) {

    if( stats.version_diff.diff > 0 ){ //The app has been updated!
        //Display a custom page for the occasion :
        launch_route = TemplateTags.getPageLink(your_update_page_id,'new-version-page-component');
        //And avoid refreshing the app in this specific case :
        App.setParam('refresh-at-app-launch',false);
    }

    //Return the modified launch route :
    return launch_route;
} );
App.setParam('go-to-default-route-after-refresh',false);
App param. Boolean (default true). Use in functions.js to choose if the app navigates automatically to the default route after a content refresh.
App.on ( 'refresh:start', function() { ... } )
Event that is triggered when the app start refreshing its content : typically this happens at app launch and when the user clicks the “refresh” button of your app theme.
Example : add a class to your refresh button (to make it spin via CSS for example) :
App.on( 'refresh:start', function() {
      $( '#my-refresh-button' ).addClass( 'refreshing' );
} );
App.on( 'refresh:end', function( result ) { ... } )
Event triggered when the app’s content refresh process is finished.
Example that removes a CSS class on the refresh button and display a success message when content refresh ends :
App.on( 'refresh:end', function( result ) {
      $( '#my-refresh-button' ).removeClass( 'refreshing' );
      if ( result.ok ) {
            $( '#my-feedback' ).html( 'Content updated successfully :)' ).show();
      }
} );
- result : JSON Object : contains :
- ok : boolean : true if no error occurred.
- message : string : Error message if an error occurred during refresh (for example no network connection), empty if no error.
- data : JSON Object : Error object if an error occurred, empty if no error.
Retrieve content
WP-AppKit app content is composed of posts and pages (and possibly other custom item structure of your own if you used custom components).
Those posts and pages are retrieved from the JSON webservice answer and stored locally (Local Storage) so that they’re fully available offline.
Internally, posts and pages are stored in a JSON Object named “globals”, property of the core App Object. By default this “globals” object contains 2 collections : globals.posts (contains all post types except pages) and globals.pages (contains only pages).
You don’t really have to care about this when you build your theme templates as posts and pages are served to templates in a transparent way. But maybe at some point you’ll need to retrieve posts on JS side (eg functions.js). This can be done using App.getItems() and App.getItem().
App.getItems( items_ids, global_key, result_type )
Retrieves a list of items (posts or pages for example) from local storage.
Example of a function based on App.getItems() that can be used in a theme (functions.js) to retrieve the “nb_posts” last posts in local storage:
function getLastPosts( nb_posts ) {

        //Get all posts in local storage (Backbone collection)
        var all_post_models = App.getItems();

        //Sort collection by date
        all_post_models.comparator = 'date';
        all_post_models.sort();

        //Get the last 3 and reverse order to order by date desc
        var last_post_models = all_post_models.last( nb_posts ).reverse();

        //Retrieve JSON post objects out of Backbone models
        var last_posts = _.map(
                last_post_models,
                function( model ){ return model.toJSON(); }
         );

        return last_posts;

}
- items_ids {array} WordPress IDs of the items (posts, pages) to retrieve
- global_key {string} (Optional) global to retrieve the items from: 'posts' (default) or 'pages'.
- result_type {string} 'slice' to retrieve a Backbone Collection (default), 'array' to retrieve an array of JSONified items.
{Backbone Collection | Array} Items list corresponding to given IDs
App.getItem( item_id, global_key )
Retrieves an item (post, page for example) from local storage.
- item_id {int} Post ID of the post to retrieve
- global_key {string} (Optional) global to retrieve the item from: 'posts' (default) or 'pages'.
{JSON Object | null} item (post or page) object if found, null if no post found with the given item_id.
App.getComponents()
Retrieves all app components.
Useful to check if a specific component type is present in the app.
To retrieve only one component, use TemplateTags.getComponent( component_slug ).
array: Array of all app components (each component as a JSON objects)
Routing
Each screen in a WP AppKit app corresponds to a specific url fragment identifier (url fragments are what’s after “#” in urls). When you navigate to a given fragment (let’s say #component-last-posts), the app checks if the fragment matches one of its internal routing rules, and if so, routes you to the corresponding screen (here, #component-last-posts will lead to the list of your last posts).
If the fragment is empty (as it is the case at app launch) or wrong (doesn’t match any internal route), the app follows its “default-route“, which is by default the fist element of your app navigation, that you defined in WordPress back office. The default route is also the one we come back to after a content refresh.
From WP AppKit themes you can hook into the app routing system to display a specific screen of your choice at app launch, after a refresh, and even more specifically when the app is launched for the first time or when the app has a version upgrade.
App.filter( 'launch-route', function( launch_route, stats ) { ... } );
Used in functions.js, this filter allows to go to a specific screen of your choosing at app launch.
Note : by default, apps automatically refresh their content at app launch. And, after a refresh, the app is redirected to the “default-route“.
So if you set a “launch-route” and feel like it is not working properly it is certainly due to the fact that when your app is launched :
- first, your “launch-route” is triggered
- then the app triggers a content refresh
- when the refresh is finished the “default-route” is triggered! So you end up on the “default-route” screen instead of the “launch-route” screen…
So to be able to use a customized “launch-route” properly, you may want to :
- either disable the refresh at app launch, setting the refresh-at-app-launch app parameter to false,
- or set a “default-route” = “launch-route” (using the default-route filter).
For example, launch a specific page the first time the user opens the app, and another page when the user updates his/her app :
App.filter( 'launch-route', function( launch_route, stats ) {

    if( stats.count_open == 1 ){ //First app launch
        //Display a custom page :
        launch_route = TemplateTags.getPageLink(your_welcome_page_id,'your-welcome-page-component-slug');
    }

    if( stats.version_diff.diff > 0 ){ //The app has been updated!
        //Display a custom page for the occasion :
        launch_route = TemplateTags.getPageLink(your_update_page_id,'new-version-page-component');
    }

    //Return the modified launch route :
    return launch_route;
} );
The filter callback receives 2 arguments :
- launch_route : string : the fragment the app is going to navigate to at app launch. Change this fragment and return it to modify the launch route.
- stats : JSON object : contains the app open count, last open date and app version info (see getAppStats() )
The modified launch_route
App.filter( 'default-route', function( default_route, stats, is_app_launch ) { ... } );
Used in functions.js, this filter allows to modify the app “default-route”.
By default, the default route is the fist element of your app navigation, that you defined in WordPress back office.
The app navigates to the default route :
- at app launch (by defaults, “launch-route” = “default-route”),
- after app content refresh,
- if one tries to navigate to a wrong url fragment.
App.filter( 'default-route', function( default_route, stats, is_app_launch ) {

    if( !is_app_launch ){ //App launch, as opposed to app refresh
        //Display a custom page :
        default_route= TemplateTags.getPageLink(your_custom_page_id,'your-custom-page-component-slug');
    }

    //Return the modified default route :
    return default_route;
} );
The filter callback receives 3 args :
- default_route : string : the default route fragment that you can modify to change the app default route.
- stats : JSON object : contains the app open count, last open date and app version info (see getAppStats() )
- is_app_launch : boolean : true if the app is launching. Sometimes you'll want to change the default route only at app launch, or, on the contrary, anytime but not at app launch.
The modified default_route.
TemplateTags.getDefaultRouteLink()
Gets the link to the current default route.
<a href="<%= TemplateTags.getDefaultRouteLink() %>">Go to app welcome screen</a>
string : default route fragment
App.action( 'pre-start-router', function( launch_route, stats, $deferred ) { ... } );
App action hook. Use in functions.js to do something before the app starts its routing logic.
Here is an example that uses ‘pre-start-router’ to check user authentication at app launch, before the routing engine starts:
//First, don't refresh content at app launch as we check user permissions before showing any content:
App.setParam( 'refresh-at-app-launch', false );

/**
* Check user authentication before launching app router, so that no content is displayed
* before authentication check
*/
App.action( 'pre-start-router', function ( launch_route, app_stats, $deferred ) {

	Auth.checkUserAuthenticationFromRemote(
		function () {
			//User is still logged in ok, with right membership level.
			$deferred.resolve();
		},
		function () {
			//User not logged in anymore, certainly because its membership level expired.
			//Log out has already been triggered internally.
			$deferred.resolve();
		}
	);

} );
Note that ‘pre-start-router’ is a JS action hook. JS actions hooks are synchronous, so you have to call $deferred.resolve() when your treatment is finished to tell the core it can go on with app launch process.
The callback receives 2 arguments that you can use to decide what to do in the action hook:
- launch_route : string : the fragment the app is going to navigate to at app launch.
- stats : JSON object : contains the app open count, last open date and app version info (see getAppStats() )
- $deferred: jQuery deferred object : must be resolved when the treatment is finished to tell the core it can resume its process and launch routing.
App.filter( 'redirect', function( redirect, queried_screen, current_screen ) { ... } );
When nativating to a screen, allows to redirect to another screen instead.
Example that redirects the user to the login page when he/she tries to access a post and does not have the right capability :
App.filter( 'redirect', function( redirect, queried_screen ) {
      if ( queried_screen.screen_type == 'single'
           && !Auth.currentUserCan( 'premium_capability' )
      ) {
            App.navigate( 'login-page' );
            redirect = true;
      }
      return redirect;
} );
- redirect: boolean (default false): set to true if you want to redirect (after calling App.navigate('your-redirect-route') ).
- queried_screen: screen object: the screen we are about to navigate to.
- current_screen: screen object: the screen we are currently on (before starting navigation to an other screen).
Return true to redirect (after calling App.navigate('your-redirect-route') )
App.on( 'info:app-ready', function( event ){ ... } );
App core event : triggers when the app is ready : app content is loaded and routing has started.
Example (in functions.js) to display a custom page when the user opens the app for the 10th time :
App.on( 'info:app-ready', function( event ) {
      if( event.core_data.stats.count_open == 10 ){
            App.showCustomPage( 'my-template-for-10th-opening', { my_custom_data_for_this_page } );
      }
} );
- event : core event JSON object : event.core_data.stats contains app Stats data (App opening count, Last opening date, App version etc...) : see TemplateTags.getAppStats()
App.on( 'info:app-first-launch', function( event ) { ... } )
App core event : triggers when the app is launched for the first time.
Example (in functions.js) to display a custom page when the user opens the app for the fist time :
App.on( 'info:app-first-launch', function( event ) {
      App.showCustomPage( 'my-template-for-first-opening', { my_custom_data_for_this_page } );
} );
- event : core event JSON object : event.data.stats contains app Stats data (App opening count, Last opening date, App version etc...) : see TemplateTags.getAppStats()
App.on( 'info:app-version-changed', function( event ){ ... } );
App core event : triggers when the app changed its version.
Example (in functions.js) to display a custom page when the user just updated the app :
App.on( 'info:app-version-changed', function( event ) {
      var stats = event.data.stats;
      if( stats.version_diff.diff > 0 ){ //The app has been updated!
            App.showCustomPage( 'my-template-for-version-change', {
                  new_version: stats.version,
                  old_version: stats.version_diff.last_version,
                  other_custom_data_for_this_page : 'other-custom-data'
            } );
      }
} );
- event : core event JSON object : event.data.stats contains app Stats data (App opening count, Last opening date, App version etc...) : see TemplateTags.getAppStats()
App.addCustomRoute( fragment, template, data )
Allows to create a custom route that will display a custom screen using the given custom template.
This is the way to go to create custom app screens that don’t correspond directly to WordPress pages or posts.
Example :
//In app's theme (functions.js)

/**
  The following allows to create a custom screen on app side only
  (meaning it does not correspond to an existing WordPress page or post).
  In this example, the page is accessed at the "url" #my-page-route and
  uses the template 'my-page-template' to render. Last arguments allows to pass
  custom data to the template.
*/
App.addCustomRoute( 'my-page-route', 'my-page-template', { some_data : 'for the template' } );

/**
  And if you want to pass dynamic data to the template, you can use the
  'template_args' filter :
*/
App.filter( 'template-args', function( template_args, view_type, view_template ) {
	if( view_template == 'my-page-template' ) {
		template_args.my_custom_arg = { my: custom_dynamic_value };
	}
	return template_args;
} );
- fragment : string : url fragment for your custom screen
- template : string : file name of the (custom) template you want to use (without the final ".html")
- data : JSON object (Optional) : data passed to the template
App.showCustomPage( template, template_data )
Display a custom page that is not a WordPress page but a page created dynamically on app side.
When you call this function from your functions.js, it displays a page rendered with the template and the data you provided.
ShowCustomPage() is made for “one shot” app screens that you want to trigger dynamically on a specific occasion. To define a more permanent custom page associated to a given custom route, use App.addCustomRoute().
For example, to display a custom page when clicking a link :
In your template :
<a id="my-custom-page" href="#">My custom page</a>
In functions.js :
$( '#my-custom-page' ).click( function( e ) {
      e.preventDefault();
      App.showCustomPage( 'my-custom-page-template', {
            my_title: 'The custom page title',
            my_content: 'My page content'
      } );
} );
In your custom template : my-custom-page-template.html :
<div id="my-custom-page">
      <h1><%= data.my_title %></h1>
      <div class="my-content">
            <%= data.my_content %>
      </div>
</div>
- template : string : the template to be used to render the custom page : use any existing or custom template of your own.
- template_data : JSON object : the data that will be passed to the template : all JSON data that you provide here is then accessible in your template under the "data" global var.
Navigation
Navigation in WP-AppKit apps is based on url fragment identifiers (url fragments are what’s after “#” in urls).
In single page apps, those fragment identifiers are also referred to as “routes” (See “Routing” for more detailed info about this).
To simplify things, reading this doc you can consider that “fragment identifier” = “route” = “link” = “(internal app) url”.
Here are the default fragment formats corresponding to the default WP-AppKit screen types:
- List (component “Post list”) : #component-[slug-component]
- Single (item of a “Post list”) : #single/posts/[post-ID]
- Page (component “Page”) : #page/[slug-component]/[page-ID]
- Comments : #comments/[post-ID]
- Custom pages (created with App.addCustomRoute() ): #your-custom-fragment (in this case you may notice that internally the app core redirects in fact the browser to #custom-page, but you don’t have to worry about this, just use #your-custom-fragment to navigate to your custom page).
From templates it is better not to write those fragments manually but to retrieve them using the following template tags : TemplateTags.getPostLink(), TemplateTags.getCommentsLink(), TemplateTags.getPreviousScreenLink(), TemplateTags.getPageLink().
For example :
//In a template : HTML link to a single post:
<a href="<%= TemplateTags.getPostLink(123) %>" >The post title</a>

//This would render:
<a href="#single/posts/123">The post title</a>
//In functions.js:
App.navigate( TemplateTags.getPostLink( post_id ) );
App.navigate( "#single/posts/[post-ID]" );
Note : for now there’s no template tag that allows to retrieve a link for a list component screen : if you need to create a link to a component screen, you can do it manually with href=”#component-[slug-your-component]”.
App.on( 'screen:showed', function( current_screen, current_view ) { ... } );
Event that is triggered after a screen has finished rendering, meaning the screen’s DOM is all set (rendered from your theme’s templates).
This event is where you will :
- make some internal theme’s processing when reaching a specific screen (like store some UI or User state to Local Storage)
- possibly bind Javascript events on dynamic parts of the DOM that were just rendered, but a jQuery( “#app-layout” ).on( “your_event”, “.your_class”, function( e ) { … } ) pattern will be better in most cases (see notes below).
Note: 2 cases where screen:showed should not be used in most cases:
- Dynamics parts of the screen are HTML defined in all templates except for layout.html : as explained in the Layout Areas section, the layout.html template defines the static part of the app’s DOM. So, to bind JS events on DOM elements defined in layout.html, you don’t need to wait for screen:showed and you should do it directly in function.js with a standard jQuery( ‘.your_class’ ).your_event( function( e ) { … } ).
- To bind JS events on dynamic parts (coming from templates like archive.html, single.html etc), the best way is to use the jQuery.on() method on a static parent element (and not jQuery.live() that is deprecated !). The most convenient static parent DOM element that you can use to bind your events is div#app-layout because you can be sure it will always be there, not modified by the app core. This gives us patterns like :
//In functions.js :
jQuery( "#app-layout" ).on( "your_event", ".your_dynamic_element_class", function( e ) {
      //Your treatment when your_event is triggered on .your_dynamic_element_class element
} ).
If you really need to bind events to DOM on screen:showed, they should be unbound in screen:leave.
Example :
screen:showed event example that allows to go back to the previous scroll position when coming back to a post list from a post detail (single) :
App.on( 'screen:showed', function( current_screen ) {
      if ( current_screen.screen_type == 'list' ) {
            //Retrieve previously stored scroll position (see screen:leave event)
            //(use current_screen.fragment as an id for the current screen) :
            var pos = Storage.get( 'scroll-pos', current_screen.fragment );
            if ( pos ) {
                  $( 'body' ).scrollTop( pos );
            } else {
                  scrollTop();
            }
      } else {
            scrollTop();
      }
} );
- current_screen : JSON Object : contains data about the screen that has just been displayed. See TemplateTags.getCurrentScreen() for more details.
- current_view : WP-AppKit extended version of the Backbone View Object, contains info about the data used to render the current screen (template name, static screen or not, etc). Not needed in most cases, useful for debug.
App.on( 'screen:leave', function( current_screen, queried_screen, current_view ) { ... })
Event that is triggered before leaving a screen.
This event is where you will :
- make some internal theme’s processing before leaving a specific screen (like store some UI or User state to Local Storage)
- possibly unbind Javascript events on dynamic parts of the DOM before app core deletes it (see the screen:showed event for more info about that)
Example that stores the current scroll position when leaving a “post list” screen so that we can come back to this position later using screen:showed :
App.on( 'screen:leave', function( current_screen, queried_screen ) {
      if ( current_screen.screen_type == 'list' ) {
            //Memorize scroll position before leaving the screen :
            //(use current_screen.fragment as an id for the current screen) :
            Storage.set( 'scroll-pos', current_screen.fragment, $( 'body' ).scrollTop() );
      }
} );
- current_screen : JSON Object : contains data about the screen you're about to leave. See TemplateTags.getCurrentScreen() for more details.
- queried_screen : JSON Object : contains data about the screen that's about to be displayed (same format as current_screen).
- current_view : WP-AppKit extended version of the Backbone View Object, contains info about the data used to render the current screen (template name, static screen or not, etc). Not needed in most cases, useful for debug.
Back Button
Get more posts in lists
More posts can be displayed in lists when you have a total number of posts in your list that is greater than the number of posts per page (the number of posts per page can be defined in the WP AppKit Settings panel in WordPress back office).
For example, to display a “Get more posts” button in archive.html that will get the following :
<% if( TemplateTags.displayGetMoreLink() ) { %>
      <button class="my-get-more">Get more posts (<%= TemplateTags.getMoreLinkNbLeft() %> left)</button>
<% } %>
And then, in functions.js, you will get the following [number of posts per page] posts of your list by doing something like :
$( '#my-container' ).on( 'click', '.my-get-more', function( e ) {
      e.preventDefault();
      $( this ).attr( 'disabled', 'disabled' ).text( 'Loading...' );
      App.getMoreComponentItems( function() {
            //If something is needed once items are retrieved, do it here.
            $( this ).removeAttr( 'disabled' );
      } );
} );
Note : if the “get more” link is included in the archive.html template (which is recommended), it will be automatically refreshed by App.getMorecomponentItems() (internally, the view is reloaded and the archive template re-computed) : you don’t have to show/hide the “get more” link manually according to the number of remaining posts to be displayed.
TemplateTags.displayGetMoreLink()
Use this in the archive.html template to check if a “Get more posts” link can be displayed.
For example, to display a “Get more posts” button in archive.html :
<% if( TemplateTags.displayGetMoreLink() ) { %>
      <button class="my-get-more">Get more posts (<%= TemplateTags.getMoreLinkNbLeft() %> left)</button>
<% } %>
See the above “Get more posts in lists” for a complete example.
TemplateTags.getMoreLinkNbLeft()
Retrieves the number of remaining posts in the current list. Use this in the archive.html template.
For example, if you have a total of 24 posts in your list and you choose to display 10 posts per page in your WP AppKit Settings panel, TemplateTags.getMoreLinkNbLeft() will return :
- 14 on the first list page
- 4 once you have clicked the “Get more post” link for the first time
- 0 if you re-click “Get more post” (but in this case the “Get more post” link should not appear if you used “if ( TemplateTags.displayGetMoreLink() ) ” to display your link.
<% if( TemplateTags.displayGetMoreLink() ) { %>
      <button class="my-get-more">Get more posts (<%= TemplateTags.getMoreLinkNbLeft() %> left)</button>
<% } %>
See the above “Get more posts in lists” for a complete example.
App.getMoreComponentItems( cb_after, cb_error )
Use this in functions.js to retrieve the [number of posts per page] next posts of a list.
$( '#my-container' ).on( 'click', '.my-get-more', function( e ) {
      e.preventDefault();
      $( this ).attr( 'disabled', 'disabled' ).text( 'Loading...' );
      App.getMoreComponentItems(
            function() {
                  //If something is needed once items are retrieved, do it here.
                  $( this ).removeAttr( 'disabled' );
            },
            function( error ) {
                  //If something is needed when an error occured, do it here.
                  $( this ).removeAttr( 'disabled' );
            }
      );
} );
Note that getMoreComponentItems() reloads the list view and re-computes the archive.html template when it’s finished, so you can let TemplateTags.displayGetMoreLink() and TemplateTags.getMoreLinkNbLeft() do their job to show/hide the “Get More” button after retrieving new posts for the list, don’t need to do it manually.
The cb_after callback is called if items were retrieved successfully. It receives 3 arguments :
- is_last : boolean : true if we reached the last page of pagination
- new_items : array : posts freshly retrieved
- nb_left : int : number of remaining posts in the list (posts we haven't retrieved yet)
But you shouldn't have to use those arguments as TemplateTags.displayGetMoreLink() and TemplateTags.getMoreLinkNbLeft() allow to handle this automatically
The cb_error callback is called in case an error occured. It receives an error event object.
App.getGetMoreLinkDisplay()
Retrieves data about the “Get more posts” link. Useful only if you need to implement your “Get more posts” link manually without using TemplateTags.displayGetMoreLink() and TemplateTags.getMoreLinkNbLeft().
JSON object : "Get more posts" link data containing :
- nb_left : int : number of posts remaining : same as TemplateTags.getMoreLinkNbLeft()
- display : boolean : true if there are still some posts left to retrieve in the list : same as TemplateTags.displayGetMoreLink()
App.filter( 'use-standard-pagination', function( use_standard_pagination, current_component_id, current_screen ) { ... } );
Use this filter to set standard pagination type for the component instead of “infinite scroll” pagination. This is useful for search or custom query components that are not ordered by date desc.
WP-AppKit supports 2 kinds of pagination:
- “Infinite Scroll pagination“: retrieves posts before the last post in the list (by passing its id in “before_id” param).
It avoids post display duplication when getting page>1 and a new post was created in the meantime.
This is the default behaviour for the “Get More Posts” button in WP-AppKit’s post lists.
It is nice but can conflict with some custom queries that are not ordered by date for example. - “Standard pagination“: corresponds to the standard use of “paged” param in WP_Query. This is the post lists pagination logic used by default in WordPress themes.
Return true as a result of this ‘use-standard-pagination’ filter to activate it.
Those 2 pagination types are exclusive per component: you can’t use both at the same time.
If standard pagination is set, infinite scroll pagination is ignored.
An example that sets standard pagination for a “my-custom-component” component:
App.filter( 'use-standard-pagination', function( use_standard_pagination, component_id ) {
    if ( component_id === 'my-custom-component' ) {
        use_standard_pagination = true;
    }
    return use_standard_pagination;
});
- use_standard_pagination: bool: set to true to use standard pagination, false to use "infinite scroll" pagination (default false).
- current_component_id: string: the component we use pagination for.
- current_screen: JSON Object: the screen we're currently on.
Return modified "use_standard_pagination" (true/false) to set pagination type (standard or not).
Transitions
The app’s engine dynamically places main content (lists, singles, comments) in a div.app-screen inside the div#app-content-wrapper, using the corresponding templates (archive.html, single.html, comments.html).
During a screen change, the div#app-content-wrapper is the only one that is modified. The menu (div#app-menu) and any static HTML defined in layout.html remain unaltered. To make any modifications on those areas before or after a screen change using JavaScript, use the app’s events in the functions.js file.
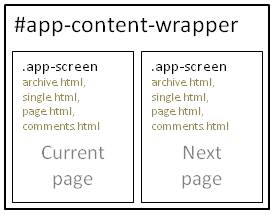
When transitioning from a screen to another (let’s say from a list to a single), here is what happens:
- The engine internally renders the new screen using the appropriate template (here single.html) and puts the result in a new div with .app-screen CSS class.
- At this point, this new div is not attached to the DOM yet, it is just a JavaScript object. We can manipulate it, insert (and animate) it anywhere into the DOM.
- The current screen (soon to be the previous screen) is still here, not changed, still having its .app-screen class and also available to JavaScript to be animated.
- Here, the Theme API allows you to customize the way you make the transition between the current and the next screen by setting the app’s parameter custom-screen-rendering to true. Then you can get the current “transition direction” from ThemeApp.getTransitionDirection() and implement your own transitions (with CSS/Javascript) by hooking to the screen-transition app’s action.
- If you don’t customize the screen transitions, a simple replacement is made by the core using something equivalent to $(‘#app-content-wrapper’).empty().html($next_screen) , after having cleanly closed the current screen view (unbind events, call close on Backbone views).
- If you implement your own transitions, you are in charge of removing the old screen (the div.app-screen containing the ex current screen) from the DOM when the transition ends (and to handle the JavaScript events unbinding on this old screen if necessary).
App.setParam( 'custom-screen-rendering', true );
Set the ‘custom-screen-rendering’ param to true if you want to define your own transitions (with CSS and Javascript) between app screens.
By default, if you don’t specifically set this ‘custom-screen-rendering’ param in your theme, it is set to false: no transitions between screens just a simple jQuery DOM replacement.
App.action( 'screen-transition', function( $wrapper, $current, $next, current_screen, next_screen, $deferred ) { ... $deferred.resolve() } );
Action hook that allows to define custom transitions between screens.
Example that defines custom transitions for basic screen navigation operations:
App.action( 'screen-transition', function(
    $wrapper,
    $current,
    $next,
    current_screen,
    next_screen,
    $deferred ) {

    // Get the direction keyword from current screen and previous screen:
    // By default transition directions can be 'next-screen', 'previous-screen' or 'default'.
    // And themes can define their own custom directions using the 'transition-direction' hook.
    var direction = App.getTransitionDirection( current_screen, next_screen );

    // Launch proper transition
    switch ( direction ) {
        case 'next-screen': // eg. "Archive to single" or "Single to comments"
            my_transition_to_next_screen($wrapper,$current,$next,current_screen,next_screen,$deferred);
            break;
        case 'previous-screen': // eg. "Single to archive" or "Comments to single"
            my_transition_to_previous_screen($wrapper,$current,$next,current_screen,next_screen,$deferred);
            break;
        default: // Unknown direction
            my_transition_default($wrapper,$current,$next,current_screen,next_screen,$deferred);
            break;
    }

});
In the above example, my_transition_to_next_screen(), my_transition_to_previous_screen() and my_transition_default() are functions that you implement yourself in the theme and that actually do the transition between $current and $next with CSS and/or Javascript. For example, in my_transition_to_next_screen() you will slide $next on top of $current, then remove $current from DOM.
Important: those transition functions must call $deferred.resolve() when finished to tell the core that the new screen is rendered.
- $wrapper: jQuery Object corresponding to div#app-content-wrapper, which is the element wrapping $current and $next screens.
- $current: jQuery Object corresponding to the screen (div.app-screen) that we're leaving, to display $next instead.
- $next: jQuery Object corresponding to the new screen (div.app-screen) that we want to display (by replacing $current).
- current_screen: JSON Object: screen object containing information (screen type, screen item id, etc) about the screen we're leaving (see getCurrentScreen() for details about screen objects).
- next_screen: JSON Object: screen object containing information about the new screen we want to display.
- $deferred: jQuery deferred object that must be resolved at the end of the transition animation to tell app core that the new screen has finished rendering.
App.getTransitionDirection( current_screen, next_screen );
Allows to retrieve the transition direction that correspond to the navigation from current_screen to next_screen.
By default there are 3 transition directions:
- next-screen: when going from archive to single (ie. current_screen.screen_type == ‘single’ and next_screen.screen_type == ‘list’), or single to comments.
- previous-screen: when going back to single from archive, or back to single from comments.
- default: when none of the above. For example when displaying a page, when going from single to single, or going from comments directly to archive.
And you can add any custom transition directions that you need, using the ‘transition-direction‘ filter. See the following example that shows how to define a custom transition when displaying comments screens.
- current_screen: JSON Object: screen object containing information (screen type, screen item id, etc) about the screen we're leaving (see getCurrentScreen() for details about screen objects).
- next_screen: JSON Object: screen object containing information about the new screen we want to display .
String: transition direction name: by default 'next-screen', 'previous-screen', 'default'
App.filter( 'transition-direction', function( transition_direction, current_screen, next_screen ) { ... return transition_direction; }
Filter that allows to define your own transitions names, other than the default ones (‘next-screen’, ‘previous-screen’ and ‘default’).
For example if you want to define a custom animation when going from “single screen” to “comments screen” that is different than when going from “archive screen” to “single screen” you first have to declare those new kind of transitions using the “transition-direction” filter:
App.filter( 'transition-direction', function( transition_direction, current_screen, next_screen ) {

    // Single to comments transition
    if ( current_screen.screen_type == 'single' && next_screen.screen_type == 'comments' ) {
        transition_direction = 'single-to-comments';
    }

    // Comments to single transition
    if ( current_screen.screen_type == 'comments' && next_screen.screen_type == 'single' ) {
        transition_direction = 'comments-to-single';
    }

    return transition;

});
Then those new transition directions (‘single-to-comments’ and ‘comments-to-single’) become available as a result of App.getTransitionDirection( current_screen, next_screen ), that you’ll use in the ‘screen-transition’ action to implement the corresponding custom transitions:
App.action( 'screen-transition', function( $wrapper, $current, $next,
                                           current_screen, next_screen,
                                           $deferred ) {

    var direction = App.getTransitionDirection( current_screen, next_screen );

    switch ( direction ) {
        case 'single-to-comments':
            my_transition_single_to_comments($wrapper,$current,$next,current_screen,next_screen,$deferred);
            break;
        case 'previous-screen':
            my_transition_comments_to_single($wrapper,$current,$next,current_screen,next_screen,$deferred);
            break;
    }

});
And my_transition_single_to_comments(), defined further in your theme (in functions.js, or a dedicated JS module) may look like:
function transition_single_to_comments ( $wrapper, $current, $next,
                                         current_screen, next_screen,
                                         $deferred ) {

        // Add comments ($next) to a slideup panel
        $('#slideup-panel #panel-content').empty().append( $next );

	// Slide UP the comments panel
        $('#slideup-panel').velocity({
            top: '0px'
        },{
            duration: 300,
            easing: 'ease-out',
            complete: function () {
                $deferred.resolve(); // Transition has ended, tell the core
            }
        });
}
- transition_direction: string: Transition direction name. Define your own directions by modifying this value according to current_screen and next_screen and return it!
- current_screen: JSON Object: screen object containing information (screen type, screen item id, etc) about the screen we're leaving (see getCurrentScreen() for details about screen objects).
- next_screen: JSON Object: screen object containing information about the new screen that is going to be displayed.
Network states (online/offline)
TemplateTags.getNetworkState(full_info)
Retrieves information about the current network connection.
Can be used in templates as a template tag( TemplateTags.getNetworkState(full_info) ) and in functions.js ( App.getNetworkState(full_info) ) :
Example that you can use in any template to display the current network state :
<% var network_state = TemplateTags.getNetworkState(); %>
<% var network_state_detailed = TemplateTags.getNetworkState(true); %>
<div class="network-info">
       Network connexion : <%= network_state %><br/>
       Detailed connexion info : <%= network_state_detailed %>
</div>
Internally, WP AppKit retrieves network information using the “Network Information” Phonegap plugin (which is included by default in WP AppKit PhoneGap exports).
If the plugin is not available, WP AppKit falls back on the HTML5 API using navigator.onLine .
- full_info : Boolean : Optionnal (Default false) : If false, returns only "online", "offline" or "unknown". If true, returns more detailed information about the network connection.
String : Network connection state.
If full_info is false (default) : returns "online", "offline" or "unknown". Unknown is returned if the app could not retrieve network information from the device.
If full_info is true : returns detailed information about the network connection : return values can be :
- 'Unknown connection'
- 'Ethernet connection'
- 'WiFi connection'
- 'Cell 2G connection'
- 'Cell 3G connection'
- 'Cell 4G connection'
- 'Cell generic connection'
- 'No network connection'
App.on( 'network:online', callback)
This event is fired when the device could connect to the network.
Example of how to use this in functions.js to display a message when internet is back :
App.on( 'network:online', function(event) {
      $( '#feedback' ).html( "Internet connexion ok :)" );
} );
Internally, WP AppKit uses the online event of the “Network Information” Phonegap plugin (which is included by default in WP AppKit PhoneGap exports).
If the plugin is not available, WP AppKit falls back on the HTML5 API using window.ononline.
Callback arguments :
- event : JSON object : contains detailed information about the event.
App.on( 'network:offline', callback)
This event is fired when the device lost connection to the network.
Example of how to use this in functions.js to display a message when internet is lost :
App.on( 'network:offline', function(event) {
      $( '#feedback' ).html( "Internet connexion lost :(" );
} );
Internally, WP AppKit uses the offline event of the “Network Information” Phonegap plugin (which is included by default in WP AppKit PhoneGap exports).
If the plugin is not available, WP AppKit falls back on the HTML5 API using window.onoffline.
Callback arguments :
- event : JSON object : contains detailed information about the event.
Storage
2 kinds of storage are available in WP AppKit themes :
- Temporary storage (non persistent)
- Persistent storage
Both non persistent and persistent storage modules use a “group / key / value” pattern to store data, as explained below :
The Temporary Storage module allows to memorize data for the current app session only. Stored in the current JavaScript context, Temporary Storage data survives app navigation but is lost when the app is closed.
This can be useful to store some UI state of your app that is only related to the current app session and that you don’t mind losing when the app is killed.
To use it in your theme, add the “core/modules/storage” dependency to your functions.js :
define( [ ..., 'core/modules/storage', ... ], function( ..., TempStorage, ... ) {
Here is an example using this Temporary Storage module to memorize scroll position when leaving a list so that we can get back to this scroll position when coming back later from a single. We do this by binding to the screen:leave and screen:showed events (in functions.js for example) :
App.on( 'screen:leave', function( current_screen ) {
   if ( current_screen.screen_type == 'list' ) {
      //Memorize scroll position :
      var list_id = current_screen.fragment;
      TempStorage.set( 'scroll-pos', list_id, $('body').scrollTop() );
   }
});

App.on( 'screen:showed', function( current_screen ) {
   if ( current_screen.screen_type == 'list' ){
      //Retrieve scroll position and scroll to it :
      var list_id = current_screen.fragment;
      var pos = TempStorage.get( 'scroll-pos', list_id );
      if( pos !== null ) {
         $('body').scrollTop( pos );
      }
   }
});
Here, scroll-pos is the storage group. In this group we store a scroll position $(‘body’).scrollTop() per list, using current_screen.fragment as storage key (which is a unique id for the list, see TemplateTags.getCurrentScreen()).
TempStorage.set ( group, key, value )
Store a value in temporary storage.
- group : string : the group (see this as a namespace) where the key / value pair will be stored
- key : string : a string identifier for your data
- value : mixed : data value that you want to memorize
TempStorage.get ( group, key )
Retrieve a value from temporary storage.
- group : string : the group (see this as a namespace) where the key / value pair has been stored
- key (Optionnal) : string : the string identifier used to store the data. If not provided, will return the whole group.
mixed : data that was stored at group:key
null if group:key doesn't exist.
TempStorage.clear ( group )
Delete data that are stored under the given group.
- group : string : all key/values in this group will be deleted from temporary storage
The Persistent Storage module stores data in the app’s Local Storage, which makes the memorized data persistent even if the app is closed or updated.
As with the temporary storage module, data is stored in a “group / key / value” format.
To use it in your theme, add the “core/modules/persistent-storage” dependency to your functions.js :
define( [ ..., 'core/modules/persistent-storage', ... ], function( ..., PersistentStorage, ... ) {
Here is an example that uses the Persistent Storage module to count the number of times a given page has been seen by the app’s user :
App.on( 'screen:showed', function( current_screen ) {

   if ( current_screen.screen_type == 'page' && current_screen.page_id == my_page_id ) {

      //Set a group and a key to store our counter value :
      var storage_group = 'page-open';
      var storage_key = 'page-'+ my_page_id;

      //Get the counter value from Local Storage :
      var count_page_open = PersistentStorage.get( storage_group, storage_key, 0 ); //default count value is 0

      //Increment counter :
      count_page_open += 1;

      //Memorize counter new value :
      PersistentStorage.set( storage_group, storage_key, count_page_open );

   }

});
PersistentStorage.set ( group, key, value )
Store a value in persistent storage.
- group : string : the group (see this as a namespace) where the key / value pair will be stored
- key : string : a string identifier for your data
- value : mixed : data value that you want to memorize
PersistentStorage.get ( group, key, default_value )
Retrieve a value from persistent storage.
- group : string : the group (see this as a namespace) where the key / value pair has been stored
- key (optionnal) : string : the string identifier used to store the data. If not provided, will return the whole group.
- default_value (optionnal) : mixed : value that will be returned if no data is found in storage for group:key. If none provided, null is returned in that case.
PersistentStorage.clear ( group, key )
Delete data that are stored under the given group (and optionally the given key).
- group : string : group you want to delete keys from.
- key (optionnal) : string : specific key to delete. If none, all key/values in the given group will be deleted from persistent storage
User Authentication
In a nutshell, here is how user authentication is handled from the app point of view:
- The app internally maintains a CurrentUser object
- this user can be “not authenticated” (not logged in) or “authenticated” (logged in)
- a user authenticates with his/her login and passwords directly from an HTML form defined in the app’s theme (all sensitive data are encrypted using RSA public key encryption before being sent to server)
- when a user is authenticated, you can access his/her “user permissions” that are made of his/her WordPress roles and capabilities
- the authentication is persistent : memorized in local storage, the user will stay authenticated even if he/she kills and restarts the app
- the user can log out manually, from a logout button somewhere in the theme for example
- or, the app theme can choose to make remote checks to server to see if the user authentication is still valid, and if not, log out will trigger automatically
This section details the JS API that allows to handle user authentication from your app theme.
You can load the authentication module in your theme by requiring it like so (in functions.js or any theme’s js module of your own) :
define( [ 'core/modules/authentication', 'other-dependency', ... ], function( Auth, OtherDependency, ... ) {
      //Your code using Auth :
      //for example Auth.logUserIn( user, pass )
} )
To see an example of a theme implementing the user authentication, you can take a look at the User Login version of the Bootstrap theme.
See also the User Login feature section to learn how to setup your app for authentication by generating a RSA private key.
Auth.logUserIn( login, pass, cb_ok, cb_error )
Logs the given user in from given login/password.
Use this to log a user in from your theme.
Note : all sensible data (password) is encrypted with RSA public key encryption in the process.
Example that logs a user in when we click the login button (#go-login) of a login form containing login and password inputs :
$( '#login-wrapper' ).on( 'click', '#go-login', function( e ) {
      e.preventDefault();
      Auth.logUserIn(
            $('#userlogin').val(), //from form text input#userlogin
            $('#userpass').val() //from form password input#userpass
      );
} );
- login {string} User login
- pass {string} User password
- cb_ok {function} What to do if login went ok (or you can also bind to authentication info events with App.on( 'info' ) to react to login success)
- cb_error {function} What to do if login went wrong (or you can also bind to authentication error events with App.on( 'error' ) to react to login errors)
Auth.logUserOut()
Logs the user out.
Example that logs the user out when clicking a logout button (#logout) :
$( '#login-wrapper' ).on( 'click', '#logout', function( e ) {
      e.preventDefault();
      Auth.logUserOut();
} );
Auth.getCurrentUser( field )
Get info about the currently logged in user.
Example that uses the “template-args” filter to make logged in user data available in a custom user page template :
App.filter( 'template-args', function( template_args, view_type, view_template ) {
      if ( view_template == 'user-page' ) { //we are displaying the user page
            var current_user = Auth.getCurrentUser();
            if ( current_user ) {
                  //Make user info available in the user page template :
                  template_args.user = {
                        login: current_user.login,
                        role: current_user.permissions.roles.pop(),
                        capabilities: current_user.permissions.capabilities
                  };
            }
      }
      return template_args;
} );
- field {String} (Optional) to get a specific user data field (can be 'login', 'permissions')
If no field is provided, returns a JSON Object containing :
- login {String}
- permissions {JSON Object}
If field is provided, returns the asked field
If no user is logged in, returns null.
Auth.userIsLoggedIn()
Check if a user is currently logged in.
Note : this only checks if a user is locally logged in into the app : it does not make a remote check to see if his/her connection is still valid on server side :
use Auth.checkUserAuthenticationFromRemote() for that.
{Boolean} Returns true if a user is logged in
Auth.checkUserAuthenticationFromRemote( cb_auth_ok, cb_auth_error )
If a user is logged in, does a remote server check to see if his/her connection is still valid by verifying public key and user secret from server.
If we reached the server and it answered authentication is not ok, Auth.logUserOut() is automatically called internally to trigger logout events.
Example that checks if the user authentication is still valid at each app launch :
App.on( 'info:app-ready', function() {
      Auth.checkUserAuthenticationFromRemote(
            function( current_user ){
                  //The user is still connected ok
            },
            function( error ){
                  //The user has been disconnected, or was not connected.
                  //Logout events are triggered and can be intercepted with App.on( 'info' );
            }
      );
} );
- cb_auth_ok {function} Called if the user is connected ok
- cb_auth_error {function} Called if the user is not connected
Auth.currentUserCan( capability )
Checks if the current user has the given capability.
Can be customized using the “current-user-can” filter (and “wpak_auth_user_permissions” filter on server side).
Example that redirects a user to the login page when he/she tries to access a post and does not have the right capability :
App.filter( 'redirect', function( redirect, queried_screen ) {
      if ( queried_screen.screen_type == 'single'
           && !Auth.currentUserCan( 'premium_capability' )
      ) {
            App.navigate( 'login-page' );
            redirect = true;
      }
      return redirect;
} );
- capability {string} Capability we want to check
{Boolean} True if the user has the given capability in his/her permissions
Auth.currentUserRoleIs( role )
Checks if the current user has the given role.
Can be customized using the “current-user-role” filter (and “wpak_auth_user_permissions” filter on server side)
- role {string} Role we want to check
{Boolean} True if the user has the given role in its permissions
Auth.getActionAuthData( action, control_data_keys, control_data )
Generates authentication control data for any custom webservice action.
This can be used from addons or modules that need to authenticate their webservice calls (used for the Comments module for example).
It generates a control hash based on control_data/user/timestamp/user_secret_key that allows to check on server side that the query comes from the right user and has not been modified.
- action {string} Webservice query action name
- control_data_keys {array} Ordered keys of the data you want to control (order is important for the hash control!)
- control_data {JSON Object} Data you want to control.
{JSON Object} Object containing the authentication data, that can be checked directly with WpakRsaPublicPrivateAuth::check_authenticated_action() on server side
By default the user object on app side retrieved with Auth.getCurrentUser() contains 2 fields: login and permissions.
To attach more data to the user object you can use the “wpak_auth_user_info” filter on PHP side. Here’s an example that adds the user email to the user data sent to the app:
//Put this code in a PHP file inside the "php" folder of your theme
add_filter( 'wpak_auth_user_info', 'add_custom_user_info', 10, 3 );
function add_custom_user_info( $user_info, $user_id, $app_id ) {

	//Add user's display_name and email to the user info sent to the app:
	$user_wp = get_user_by( 'id', $user_id );
	if ( $user_wp ) {
		$user_info['display_name'] = $user_wp->display_name;
		$user_info['email'] = $user_wp->user_email;
		//(We could also retrieve some other user meta data here using WordPress's  get_user_meta() function)
	}

	return $user_info;
}
Then, in your app theme you can access display_name and email under the “info” field of the user object:
//In your app theme's functions.js:
var current_user = Auth.getCurrentUser();
console.log( current_user.info.display_name, current_user.info.email );
And you’ll certainly want to pass your user object to your templates, here’s how to do so:
//In your app theme's functions.js:
App.filter( 'template-args', function( template_args, view_type, view_template ) {
	//Here we suppose that you have a custom template 'user-page.html'
	//but it could be any template 'single', 'archive' etc.
	if ( view_template === 'user-page' ) {
		var current_user = Auth.getCurrentUser();
		if ( current_user ) {
			template_args.user = {
				login: current_user.login,
				display_name: current_user.info.display_name,
				email: current_user.info.email
			};
		}
	}
	return template_args;
} );
Comments
By default, post comments are not embedded in WP-AppKit post data.
Comments are retrieved separately by calling ThemeApp.displayPostComments( post_id ), that calls the WP-AppKit comments endpoint to retrieve comments from the server.
As for v0.4 and User Authentication, comments can also be posted from apps (beta feature).
ThemeApp.displayPostComments
Displays the comments screen for a given post.
Retrieves the post comments from server or from memory if already cached, then navigate to #comments-[post_id].
Using this function allows to use success and error callbacks (cb_ok/cb_error), which you can’t do if you navigates directly to #comments-[post_id] in your theme.
Example:
$( "#container" ).on( "click", ".comments", function( e ) {
	e.preventDefault();

	$('#waiting').show();

	App.displayPostComments(
		$(this).attr( 'data-post-id' ),
		function( comments, post, item_global ) {
			//Do something when comments display is ok
			//We hide the waiting panel in 'screen:showed' to avoid flickering, because
			//at this point, comments are retrieved but not rendered
		},
		function( error ){
			//Do something when comments display fail
			//(note that an app error is triggered automatically)
			$('#waiting').hide();
		}
	);
} );
Note that the cb_ok() callback is called after comments are retrieved, and not after the comments view is rendered (as view rendering must be done later, in router).
If you need to do something after the comments screen is showed, you can use the ‘screen:showed’ event where you’ll test if ( current_screen.screen_type === ‘comments’ ) ).
- post_id {int} Post we want to retrieve the comments for.
- cb_ok {function} What to do if comments are retrieved ok. Receives 3 arguments : comments, post, global (the internal global collection the post belongs to)
- cb_error {function} What to do if an error occurs while retrieving comments. Receives an error event object.
The Comments module works along with User Authentication to allow to post comments from the app.
You can load the comments module in your theme by requiring it in functions.js or any theme’s js module of your own:
define( [ 'core/modules/comments', 'other-dependency', ... ], function( Comments, OtherDependency, ... ) {
      //Your code using Comments:
      //for example Comments.postComment( ... )
} )
Comments.postComment( comment, cb_ok, cb_error )
(beta) Post a comment to server. Use this to submit a comment from your theme.
Note :
- a user must be logged in to comment, this function will fail if no user is logged in, calling the error callback.
- if the server answers that the given user’s connection is not valid (expired for example), logout events are automatically triggered.
Complete example of comment posting :
/**
* On comment form submit, we retrieve comment content and post ID from the
* form and use Comments.postComment() to submit it to the server.
*
* Internally, if the comment query is successful the new comment is automatically added
* to the post comment list, so here we just have to rerender the comment screen,
* to make the new comment appear in the comment list.
*/
$( '#app-content-wrapper' ).on( 'submit', '#comment-form', function( e ) {
    e.preventDefault();

    var $submit_button = $( '#comment-form [type="submit"]' );
    $submit_button.attr( 'disabled', 'disabled' ).text( 'Sending...' );

    var comment = {
        content : $( '#comment-form [name="content"]' ).val(),
        post : $( '#comment-form [name="post"]' ).val()
    };

    Comments.postComment(
        comment,
        function( comment_data ) {
            //Comment created OK!

            //Reset submit button :
            $submit_button.removeAttr( 'disabled' );

            //Empty comment edition :
            $( '#comment-form [name="content"]' ).val('');

            //Re-display current view (comments view)
            //to display the new comment in the list :
            App.rerenderCurrentScreen();

            //Scroll top so that we can see the following feedback message:
            window.scrollTo( 0, 0 );

            //Display a happiness message :
            var message = !comment_data.waiting_approval ?
                          'Comment added successfully :)' : 'Your comment is awaiting moderation';

            $( '#feedback' ).removeClass( 'error' ).html( message ).slideDown();

        },
        function( error ) {
            //Reset submit button :
            $submit_button.removeAttr( 'disabled' ).text( 'Submit comment' );

            //Scroll top so that we can see the feedback message
            //that comes up through theme error handling.
            window.scrollTo( 0, 0 );

            //Error messages display can be handled by
            //App.on( 'error' ) or App.filter( 'theme-event-message' )
        }
    );

} );
- comment {JSON Object} Comment object : must contain at least the following fields :
- content {string} The comment content
- post {int} ID of the post we're commenting on
- cb_ok {function} What to do if comment was posted ok.
- cb_error {function} What to do if comment posting failed.
Events
When the app core reaches some key endpoints in its process (app launch, content refresh, network connection etc), it triggers events that can be intercepted from themes to react accordingly.
Events families are grouped using the “group_prefix:event” format (error:*, info:*, network:*, screen:* etc) and you bind to them from themes using the App.on() method.
Events are asynchronous : the callbacks you bind to them don’t stop the app’s execution, and you can’t return any value from them to be interpreted by the app core. Synchronous/sequential interactions are handled in WP-AppKit using Javascript Hooks and App Parameters logic.
App.on ( app_event, callback )
Attach an event handler function for the given app event.
App.on() is used intensively in functions.js : this is the main way for themes to intercept app core processes and react to them .
An example that reacts to the ‘refresh:start’ event :
//In functions.js :
App.on('refresh:start',function(){
      $('#my-refresh-button').addClass('refreshing');
});
- app_event : String : app event (like 'refresh:start', 'screen:showed' ...)
- callback : Function : function to call when the event is triggered. See each event documentation detail to know the arguments passed to this callback.
Error and info events (error:* and info:*) can be used in a specific way in themes:
You can either bind to them one by one like any other event:
App.on( 'error:synchro:ajax', function( error ) {
      $( '#my-feedback' ).addClass( 'error' ).html( error.message ).show();
} );
But as there are many different error events, you certainly don’t want to bind to all of them manually. To avoid that you can use the generic ‘error’ event:
App.on( 'error', function( error ) {

      //And if you want to target a specific error :
      if ( error.event == 'synchro:ajax' ) {
            //Show something special when app synchronization fails
      }

      $( '#my-feedback' ).addClass( 'error' ).html( error.message ).show();
} );
And the same applies to info events:
App.on( 'info:app-ready', function( info ) {
      //My action when app is ready
} );
is equivalent to:
App.on( 'info', function( info ) {
      if ( info.event == 'app-ready' ) {
            //My action when the app is ready
      }
} );
error and info argument passed to events callbacks have the same format: a JSON Object containing:
- event: String: event name with no group prefix: ‘synchro-ajax’, ‘app-ready’ …
- type: String: ‘error’ or ‘info’
- subtype: String: specific error type (alias of core_data.type). Not used for infos.
- message: String: error or info message. See “theme-event-message” filter to learn how to customize those event messages.
- core_data: JSON Object:
- for errors: error object (see below)
- for infos: JSON data depending on the info event
Error objects passed through error.core_data contain:
- type: String: error type (‘ajax’, ‘web-service’, ‘not-found’, ‘wrong-data’, etc)
- where: String: function or code location where the error occured
- message: String: error message (from core)
- data: JSON Object: data depending on the error
App.filter( 'theme-event-message', function( message, event_data, event ) { ... return message; }
This filter allows to customize event messages.
By default, WP-AppKit defines only 2 error messages:
- “Remote connection to website failed” for any unsuccessful ajax query (ie event.subtype == ‘ajax’)
- “Oops, an error occured…” for any other error event
And 1 info message:
- “The application couldn’t retrieve any content, please check your internet connection!” (info:no-content)
You can change those default messages and add other messages for any other event by using the “theme-event-message” filter.
Here is an example where we customize the message displayed when an AJAX query fails (for example when trying to refresh app content while being offline):
App.filter( 'theme-event-message', function( message, event_data, event ) {

	if ( event_data.type == 'error' && event_data.subtype == 'ajax' ) {
		message = 'My custom message in case a remote AJAX call failed.';
	}

	return message;
} );
- message: string: Message to customize and return
- event_data: JSON Object containing (See Error and Info events for details):
- type ("error"/"info" )
- subtype ("ajax", "web-service", "not-found" ... )
- message
- core_data
- event: string: event name ("synchro:ajax" ... )
App.filter( 'stop-theme-event', function( stop, theme_event_data, event ) { ... return stop; } );
Use this filter to avoid an event from triggering in the theme.
Useful to deactivate some error events display in your theme for exemple.
- stop: boolean: Whether to stop the event or not. Default false.
- theme_event_data: JSON Object: Theme event data object (contains "event", "type", "subtype", "message", "core_data")
- event: String: Original (internal) event name
All error events have error.type = ‘error’.
Error events subtypes (error.subtype) are referenced in the following table.
| Event name | Event Subtype | Description | Data passed to event (error.core_data.data) |
|---|---|---|---|
| Synchronization web service | |||
| synchro:ajax | ajax | Ajax query failed | jQuery ajax error |
| synchro:wrong-format | web-service | Wrong web service answer format | Web service answer |
| synchro:wrong-status | web-service | Wrong web service answer status | Web service answer |
| synchro:ws-return-error | web-service | Web service returned an error | Web service answer (error detail in data.result) |
| synchro:wrong-answer | web-service | Expected web service data not found | Web service answer |
| synchro:no-component | web-service | No component found for the app | Web service answer |
| Fetch post comments | |||
| comments:ajax | ajax | Ajax query failed | jQuery ajax error |
| comments:post-not-found | not-found | Asked comments for a non existing post | none |
| Get more component items | |||
| getmore:ajax | ajax | Ajax query failed | jQuery ajax error |
| getmore:ws-return-error | web-service | Web service “component” returned an error | none |
| getmore:wrong-component-id | not-found | Wrong component id | none |
| getmore:global-not-found | not-found | Web service returned data for a non existent global | none |
| “Live Query” web service | |||
| live-query:ajax | ajax | Ajax query failed | jQuery ajax error |
| live-query:ws-return-error | web-service | Web service returned an error | none |
| live-query:no-auto-interpret-action-found | not-found | Could not auto interpret Live Query web service answer | none |
| live-query:update-global-items-error | mixed | Error while updating local component items from Live Query’s answer | result object |
| live-query:update-component-error | mixed | Error while updating local component from Live Query’s answer | result object |
| User authentication | |||
| auth:ajax-failed:* | authentication-error | Ajax query failed | jQuery ajax error |
| auth:no-result | authentication-error | Wrong authentication web service answer | none |
| auth:web-service-error | authentication-error | Authentication web service returned an error | none |
| auth:no-auth-error | authentication-error | Authentication web service returned an unknown error | none |
| auth:empty-user auth:wrong-user auth:wrong-pass auth:user-banned auth:wrong-data (*) auth:wrong-hmac (*) auth:wrong-query-time (*) auth:php-openssl-not-found (*) auth:empty-public-key (*) auth:wrong-public-key auth:wrong-auth-data (*) auth:wrong-decryption (*) auth:wrong-secret (*) auth:no-hash auth:user-not-authenticated auth:user-connection-expired (*) only if debug mode is on, otherwise = ‘auth:auth-error’ |
authentication-error | Authentication failed | none |
All info events have info.type = ‘info’.
Info events have no subtype (info.subtype is an empty string).
| Event name | Description | Data passed to event (info.core_data) |
|---|---|---|
| App launch | ||
| app-ready | App core and app theme are loaded. App router is launched. | App stat object: count_open, last_open_date, last_sync, version, version_diff |
| app-first-launch | First time the app is launched! | App stat object: count_open, last_open_date, last_sync, version, version_diff |
| app-version-changed | First app launch after an app version change | App stat object: count_open, last_open_date, last_sync, version, version_diff |
| no-content | The app could not load any content from remote server and has none in Local Storage yet. | none |
| Get more component items | ||
| component:get-more | “Get more” action was successful | new_items, is_last, nb_left, new_ids, global, component |
| User Authentication | ||
| auth:user-login | A user logged in successfully | User and permissions data |
| auth:user-logout | A user logged out successfully | User, permissions and logout type data |
| Debug panel | ||
| debug-panel:render | The debug panel has finished rendering | Debug panel view object |
Those are general core events that are not triggered as info or error, so they don’t have corresponding type / subtype.
They may be merged into the info events in a future version (in a transparent way for theme users).
| Event name | Description | Data passed to event |
|---|---|---|
| Refresh | ||
| refresh:start | App refresh started | none |
| refresh:end | App refresh ended | Result Object: ok, message (if error), data (if error: error object formatted as error event data) |
| Screen | ||
| screen:showed | An app screen just finished to render | current_screen, current_view |
| screen:leave | App refresh ended | current_screen (the screen we leave), queried_screen (the screen we go to), current_view |
| Menu | ||
| menu:rendered | The menu just finished rendering (using menu.html) | current_screen, menu view object |
| Network | ||
| network:online | App just found network | none |
| network:offline | App just lost network connexion | none |
Parameters
Misc.
Obsolete
While in beta stage, we authorize ourselves to make some changes that can break backward compatibility.
Here we keep track of some functions that are now obsolete, meaning they don’t exist anymore and should not be used.