One Signal: new add-on for WP-AppKit

Today, the WP-AppKit’s add-ons family welcomes a new member: One Signal for Wp-AppKit.

One Signal is a service that allows to send notifications from any device (including web notifications) in an easy way.

Why Should I Consider Notifications For My App?

Work doesn’t stop after your app has been downloaded. Keeping users active is a challenge. Notifications are a proven tool to build up customer loyalty. Sending useful tips and news through notifications is a great way to make your users coming back to your app and demonstrate it is relevant to them.

Setting Up Notifications Can Be Daunting

Unfortunatly, notifications configuration can be tricky. This is where services such as One Signal comes in. One Signal offers one configuration for all services (Android, Apple, web), meaning you will be able to send notifications to all devices using the same interface. It also adds features such as unified statistics and segmentation. It even proposes a plugin for WordPress.

At WP-AppKit, we felt that building an add-on for One Signal matches our mission that is to offer new ways to build apps in a friendly way.

Ready to send great notifications? Buy One Signal for WP-AppKit.

Now, let’s go for a round of questions that will summarize what the add-on does.

Add-ons for WP-AppKit?

Add-ons are WordPress plugins you install to get specific features for your apps. You’ll find all our add-ons here and you can even build your own 😉

OK, so what does this add-on exactly?

Once configured, it allows users to subscribe to notifications. You will be able to send notifications directly from the One Signal interface or its WordPress plugin.

Can I use deeplinks to send users to a specific content?

Yes, you will be able to use WP-AppKit’s deeplink.

I use WP-AppKit to build PWA, can I offer notifications with this add-on?

Yes, the add-on is compatible with WP-AppKit’s based PWA

Will I be able to use the One Signal WordPress plugin?

Again, yes. We’ve worked to let you use the One Signal WordPress plugin. Please see documentation for more information.

Is there documentation for the add-on?

Yes, as usual, you’ll have all the documentation you need: https://uncategorized-creations.com/wp-appkit/doc/addons/onesignal/. Also, remember that the add-on comes with one year of support and updates.

What platforms do you support?

We support Android. iOS became more and more complex and expensive to support over the year. Therefore, we only support Android at the moment.

Ready to send great notifications? Buy One Signal for WP-AppKit.

Custom data endpoint using liveQuery webservice

WP-AppKit’s liveQuery webservice allows to make any custom data query from the app to the server.

Here is an example that shows how to use the liveQuery webservice to send data from the app to the server, handle this data on server side and send feedback data back to the app:

On app side:

//In functions.js or custom js module in your app theme:
//Send data to the server using the "liveQuery" webservice:
// "my_data" can for example be a JSON Object comming from a form submission in the app
function sendMyDataToServer( my_data ) {
	
	//Define your custom query, that you will retrieve on server side
	//using the 'wpak_live_query' hook:
	var query_args = {
		my_action: 'my_livequery_action',
		my_data: my_data
	};

	//Define query options:
	var options = {
		auto_interpret_result: false, //This is to tell WP-AppKit that you're doing your own custom query
		success: function( answer ) { //The liveQuery webservice call went ok
			if ( answer.my_result.ok === 1 ) {
				//Everything went ok. Display some success feedback to the user.
				console.log( 'LiveQuery action went well! Here\'s some feedback: ', answer.my_result.my_feedback_data );
			} else {
				//An error occured in the server's liveQuery handler.
				//Display an error feedback to the user.
				console.log( 'LiveQuery action error: ', answer.my_result.error );
			}
		},
		error: function( error ) {
			//This is if the web service ajax call failed (no network)
			//Display an error feedback to the user.
			console.log( 'LiveQuery ajax failed', error );
		}
	};

	//Send our custom query to the server using liveQuery webservice:
	App.liveQuery( query_args, options );
}

On server side:

//Handle on PHP side the liveQuery call made in the app:
//(To put in a php file created in WP-AppKit theme's "php" folder)
add_filter( 'wpak_live_query', 'handle_my_live_query', 10, 2 );
function handle_my_live_query( $service_answer, $query_params ) {
	//$query_params contains what was passed in liveQuery's "query_args"
	
	//Check that the 'my_action' action set on app side is called:
	if ( isset( $query_params['my_action'] ) && $query_params['my_action'] === 'my_livequery_action' ) {
		
		//Prepare your custom answer:
		$result = array( 'ok' => 0, 'error' => '', 'my_feedback_data' => '' );
		
		//Check passed data:
		if ( !empty( $query_params['my_data'] ) ) {
			
			$sent_data = $query_params['my_data'];
			
			//Check sent data, consume it and send feedback to the app:
			if ( some_check_on_my_data( $sent_data )  ) {
				
				//Do what you need with $sent_data...

				//If everything went ok, set webservice answer to ok = 1:
				$result['ok'] = 1;
				
				//You can add any custom feedback data to the $result array sent
				//back to the app:
				$result['my_feedback_data'] = 'Everything went well :)';
				
			} else {
				$result['error'] = 'my-error';
			}
			
		} else {
			$result['error'] = 'no-data';
		}
		
		//Add your result to the web service answer:
		$service_answer['my_result'] = $result;
	}
	
	return $service_answer;
}

This can also be used for example to send data from a form submission on app side, and save this data on server side.

Taxonomy Term List Tutorial

Taxonomy Term Lists

Many users have been asking how to add a list of taxonomy terms to their app and display the corresponding post lists. In this tutorial we’ll see how to achieve that and, by extension, how you can implement any post search based on taxonomies.

Along with the main taxonomy terms topic, this tutorial is also a good way to dive into the following key notions of WP-AppKit theme customization:

  • Create a custom page template
  • Create an app component dedicated to post search
  • Customize app history and screen transitions management

If you’re ready, let’s see how to implement this nice feature 🙂

List Taxonomy Terms

First we’re going to build the page that will display the list of our taxonomy terms.

For this example we will use a taxonomy “Category” that has 3 terms “Blog”, “Snippets” and “Uncategorized” but the same would apply to any custom taxonomy and any number of terms of your own.

WordPress Side

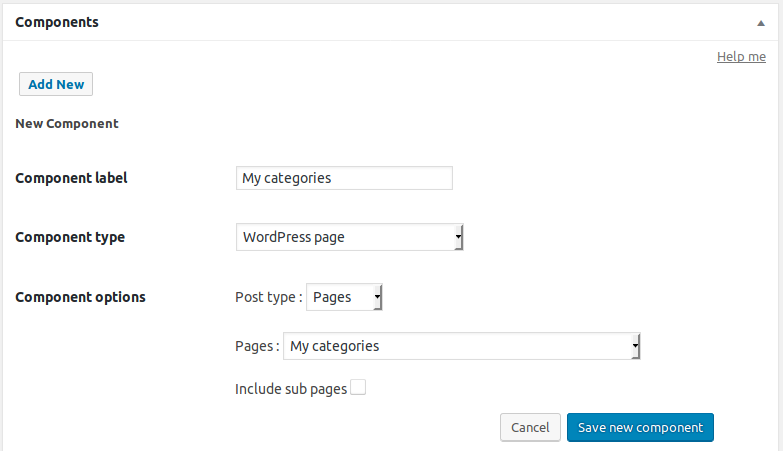
Create a new WordPress page “My categories” (or any custom taxonomy name of yours) and publish it. You don’t need to set content for it (except if you need this content in the app) as it is not meant to be displayed on site’s Front-End, just in the app.

Then add this page to your app, as a component of type “WordPress page”.

"My categories" page component

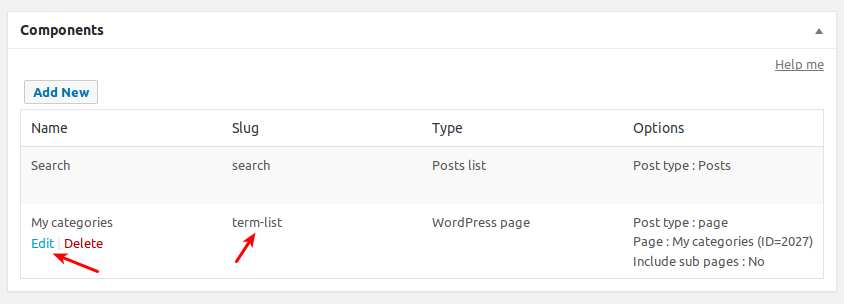
One important thing : for the code in this tutorial to work, the page component’s slug must be “term-list”, so that we can target it in the app. To set the component’s slug, find it in the components list, click the “Edit” link and edit the “Component slug” field:

Also add this component to your app’s menu so that you can navigate to it in the app.

Now if you preview your app, you can see that your page is there, but it does not display any term list yet. Let’s see how to attach term list info to the page’s data sent to the app.

App Side

Add Terms to the Page

In your WP-AppKit app theme (here we’ll use “Q for Android” theme, located in /wp-content/themes-wp-appkit/q-android, but you should work on your own copy of this theme), go to the “php” folder (or create it if it does not exist) and add a new php file “my-taxonomy-terms.php” that contains:

<?php

add_filter( 'wpak_page_data', 'wpak_add_page_taxonomy_terms', 10, 3 );
function wpak_add_page_taxonomy_terms( $post_data, $post, $component ) {
    
    //When sending data for our "term list" page component
    if ( $component->slug === 'term-list' ) {

        //Retrieve the terms for the taxonomy 'category'
        //(Set the slug of any custom taxonomy of yours)
        $terms = get_terms( ['taxonomy'=>'category'] ); 

        //Add term list to our page's data:
        $post_data['terms'] = !empty( $terms ) && !is_wp_error( $terms ) ? $terms : [];
        
    }
    
    return $post_data;
}

Taxonomy terms are now added to the page’s data, so that we can retrieve and display them on app side.

Add a Custom Template for the Term List Page

Now let’s create a custom page template in the app to display the list of terms:
Create a “page-my-taxonomy-terms.html” file in your app theme folder (/wp-content/themes-wp-appkit/q-android/page-my-taxonomy-terms.html) with the following content:

<div id="content" class="content single-template">

    <div class="post-title">
        <h1>
            <%= post.title %>
        </h1>
    </div>
            
    <div id="single-content" class="single-content">

            <% if ( post.terms && post.terms.length ) { %>
                <ul>
                <% _.each( post.terms, function( term ){ %>
                    <li><a href="#" data-term-slug="<%= term.slug %>" class="terms-to-posts q-theme-prevent-navigation"><%= term.name %></a></li>
                <% }); %>
                </ul>
            <% } %>

    </div>
        
</div>

And tell your app to use this template for your component with slug “term-list”, by adding the following to your app theme’s functions.js:

First set our term list component ID so that we can refer to it in different parts of the Javascript code to come:

var term_list_component_id = 'term-list';

Then connect our custom “page-my-taxonomy-terms.html” template:

App.filter( 'template', function( template, current_screen ) {
    if ( current_screen.component_id === term_list_component_id ) {
        template = 'page-my-taxonomy-terms';
    }
    return template;
} );

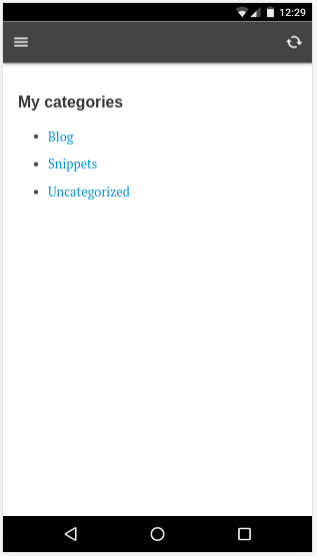
Alright, now you should see your term list displayed in the app.

"My categories" term list screen

But nothing happens when you click on terms… we should definitely do something about it.

Display the Post List Corresponding To a Chosen Term

When you click on a term in the list, you’ll want to display the posts that correspond to this term. To achieve that, we’ll implement a search query to the server so that it can send us the posts that are linked to this terms, which we can then display as any other post list in the app.

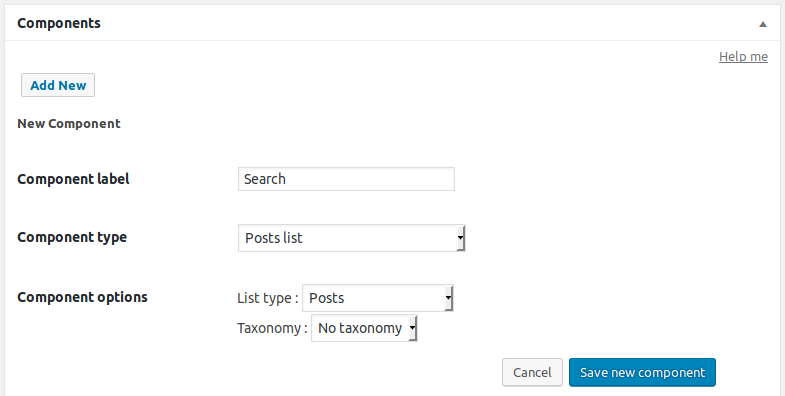
First, add a new component “Search” to your app of type “Post list” with the slug “search“. You can choose “No taxonomy” in the taxonomy field as we will set the taxonomy using hooks in a moment. Don’t add this component to your app navigation, it is just meant to handle our search query, not to be displayed in app’s menu.

Search component

Then call this component’s search when we click on a term in the list, by adding the following to your functions.js file:

//Init current search
var current_search = { category: '' }; //Replace 'category' by your own custom taxonomy if needed

//Handle click on a term link:
$('#app-layout').on('click','.terms-to-posts',function(e){

    e.preventDefault();

    //Set taxonomy term slug form clicked link:
    current_search.category = $(this).data('term-slug');

    //Activate refresh button while we load data from server
    $("#refresh-button").removeClass("refresh-off").addClass("refresh-on");
    
    //Update our "search" component with our new category value:
    App.refreshComponent({
        component_id: 'search',
        success: function( answer, update_results ) {

            //Component updated ok. Navigate to it:
            App.navigate('component-search');

            //Deactivate refresh button:
            $("#refresh-button").removeClass("refresh-on").addClass("refresh-off");

        },
        error: function( error ) {
            //Maybe do something if filtering went wrong.
            //Note that "No network" error events are triggered automatically by core
            
            //Deactivate refresh button:
            $("#refresh-button").removeClass("refresh-on").addClass("refresh-off");
        }
    });

});

And for this to work, we need to add our “current_search” data (ie the taxonomy term that we want to search on) to the the web service that performs the search:

//Add our search params to web services that retrieve our search post list.
App.filter( 'web-service-params', function( web_service_params, type ) {

    var current_component_id = App.getCurrentComponentId();

    //If we are refreshing the "search" component (or asking "Get more posts" on it):
    if( web_service_params.wpak_component_slug === 'search' || ( type === 'get-more-of-component' && current_component_id === 'search' ) ) {

        //Add search params to the data sent to web service:
        web_service_params.search_filters = current_search;
        //Those params will be retrieved with WpakWebServiceContext::getClientAppParam( 'search_filters' )
        //on server side.
    }

    return web_service_params;
} );

Finally we need to interpret this search on server side, by adding the following to the same “my-taxonomy-terms.php” php file that we started earlier:

/**
 * Add search params sent by the app to the search component's query.
 */
add_filter( 'wpak_posts_list_query_args', 'wpak_search_component_query', 10, 2 );
function wpak_search_component_query( $query_args, $component ) {

    $search_filters = WpakWebServiceContext::getClientAppParam( 'search_filters' );
    if ( !empty( $search_filters ) ) {

        if ( $component->slug === 'search' ) {

            $tax_query = [];

            //Build our search taxonomy query
            //(Replace 'category' by your own custom taxonomy)
            if ( !empty( $search_filters[ 'category' ] ) ) {
                $tax_query[] = [               
                    'taxonomy' => 'category',
                    'field' => 'slug',
                    'terms' => $search_filters[ 'category' ]
                ];
            }

            if ( !empty( $tax_query ) ) {
                $query_args[ 'tax_query' ] = $tax_query;
            }
        }
        
    }

    return $query_args;
}

Ok, that was a bit of coding, but if you’re still alive click on a term in your app and you should see the corresponding post list display!

Last Adjustment: Fix History

You may have noticed that when you display your post list corresponding to a term, there’s no back button to come back to the term list. This is because the app does not know yet that your post list screen is a “child” (speaking from the app history perspective) of the term list screen. Here’s how to fix that (in functions.js):

//Adjust app history for our search screen:
App.filter( 'make-history', function( history_action, history_stack, queried_screen, current_screen, previous_screen ) {

    //If coming from our "term list" screen and going to the "search" screen, consider it as a "push" in app history:
    if( current_screen.component_id === term_list_component_id && queried_screen.component_id === 'search' ) {
        history_action = 'push';
    }

    return history_action;
});

//Adjust app screen transition for our search screen:
App.filter( 'transition-direction', function ( direction, current_screen, queried_screen ) {
    //If coming from "term list" screen and going to a "search" screen, consider it as a "next screen" transition:
    if ( current_screen.component_id === term_list_component_id && queried_screen.component_id === 'search' ) {
        direction = 'next-screen';
    } 
    //If coming back from "search" screen to the "term list" screen, consider it as a "previous screen" transition:
    else if ( current_screen.component_id === 'search' && queried_screen.component_id == term_list_component_id ) {
        direction = 'previous-screen';
    }
    return direction;
} );

And that’s it, we have now a working example of how to display the terms corresponding to a taxonomy and the posts that correspond to each term.

Post list with back button

You can find this same code implemented in the “Q for Android” theme here.

Going Further

One taxonomy is not enough? Or you need to filter your result post list on other criteria? You can build any more advanced search feature on the basis explained in this tutorial. Here are the steps that you can follow to do so:

  • Modify the term list template (page-my-taxonomy-terms.html) to change for example your term list into a select box displayed in a form, along with other taxonomies you want to filter on.
  • Then in functions.js, replace the “link click” binding by a “form submit” binding, and set the “current_search” object according to the filters data submitted in the form.
  • Finally in the “my-taxonomy-terms.php” php file, adjust the “$tax_query” array to your needs.

We hope this tutorial will help you build great taxonomy (and more!) based searches.
Happy app coding, and don’t hesitate to drop a comment for any question or feedback.

WP-AppKit 1.5.2: Add-ons for PWA

WP-AppKit gets a new version! This time we focused on enabling our add-ons API for Progressive Web Applications (PWA). You can be sure we are going to use this new sweetness soon 🙂 We are committed to expand our PWA support as at the heart of the WP-AppKit project, there’s the belief that mobile should be web first.

For Android mobile app makers, WP-AppKit 1.5.2 drops support for CrossWalk. This marvelous tool allowed us to support old devices that had sometimes very old and clunky web view versions, without any hope to get updated one day. The magic was done by embedding a fresh webview in the app itself. It means it came at a cost: the app’s weight was heavy (~20Mb). We believe the Android’s world has evolved enough (tip: you should look at PWA) to stop enabling Crosswalk by default. To be noted that we’re not alone, the project’s members stopped a year ago to develop it. If you need to reactivate it for your app, you can still do it using this snippet.

As usual, you’ll be notified by the WordPress update system when the new version is out (you can also get it here).

Enjoy this new version and happy coding!

Re-activate Crosswalk

WP-AppKit version 1.5.2 has dropped support for CrossWalk. If you need to re-activate it for your app you can add the following to any php file in the php directory of your WP-AppKit theme (for example wp-content/themes-wp-appkit/q-android/php/reactivate-crosswalk.php):

add_filter( 'wpak_crosswalk_activated', '__return_true' );


Exit the app with back button on home screen

On Android, when you’re on your home/default app screen, you may want to exit the app when you hit the device’s back button.

Here’s a snippet to add to your theme’s functions.js that allows to do that:

document.addEventListener("backbutton", onBackKeyDown, false);
function onBackKeyDown() {
    //Retrieve app's history
    var history = App.getHistory();

    //Check that there's only one screen in history (the current one):
    if ( history.length === 1 ) {
        //Check that this element is the default (home) screen:
        var history_screen = history[0];
        if ( TemplateTags.getDefaultRouteLink().replace('#','') === history_screen.fragment ) {
            //Only one element in history and this element is default screen: exit app on back button:
            navigator.app.exitApp();
            return;
        }
    }

    //History has at least one previous element: just go back to it:
    navigator.app.backHistory();
}


Add Social Sharing To Your Apps

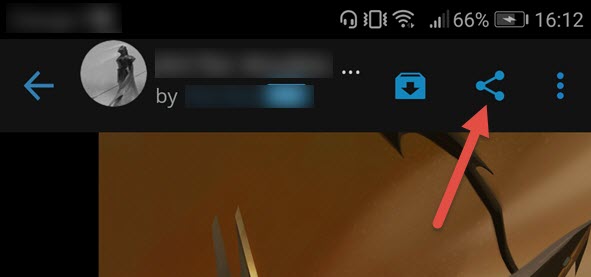
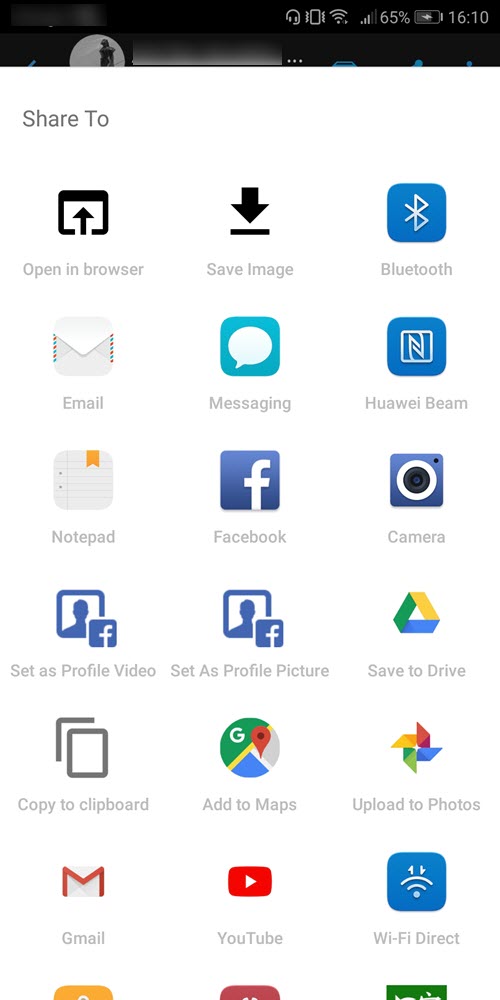
Native sharing centers are available both on iOS and Android. If you are wondering what is a native sharing center, it is what appears when you click on sharing icons in apps.

Usually, clicking on a sharing icon opens a standard panel with standard sharing actions: email, Facebook, open in a browser…

Apps can add their own sharing methods to these panels. For example, if you have installed Slack or Whatsapp, you will be able to share links and photos with these apps using the native share capabilities. The native sharing user experience is very smooth – compared to the usual web sharing – as the user is already connected with his/her account.

In this tutorial, we are going to learn how to leverage the native sharing centers in our apps.

Add Social Sharing Cordova Plugin

First we have to add the capability to call the native sharing center using a Cordova plugin. We are going to use the Social Sharing plugin done by Eddy Verbruggen.

To add this plugin to your app:

  • Edit your app by clicking it in the applications list
  • Go to the PhoneGap Build box
  • Go to the PhoneGap configuration
  • Paste the following tag in the Plugins text area:
    <plugin name=”cordova-plugin-x-socialsharing” source=”npm” />.
    Depending on which PhoneGap Build cli version you are using, you may have to force the socialsharing plugin version: if you have an error when building the app, try to force version like so:
    <plugin name=”cordova-plugin-x-socialsharing” source=”npm” spec=”5.4.1″ />

From now the sharing plugin will be included in your app when compiling and you will have access to the JavaScript API it provides.

Add Sharing Button To Your App

We are going to add a simple share button to the single template of the default Q theme. It will call the native sharing center with pre-defined parameters.

Note: instead of a link, we recommend that you use the default iOS and Android icons as users already know them. You will easily find SVG version of each (eg. here’s one for Android and this one for iOS).

Add Share Button To Single Template

  • In your theme’s folder, open single.html
  • Add the following tag in the single-content div
<div id="single-content" class="single-content">

   <button id="share-button" class="share-button">Share</button>
        
   <%= post.content %>

</div

Store Post Title And URL

To share a post from the app, we use the shareWithOptions() function provided by the Social Sharing plugin. This function expects parameters such as a message, an URL back to the post… In this example, we are going to share the post title and its original URL (ie. the URL to the article on the website). These parameters will be stored as custom attributes of the share button when a post is displayed.

  • Open functions.js in your theme’s folder
  • Go to the screen:showed event
  • First, we have to grab the current screen object
App.on( 'screen:showed',function( current_screen,view ){

   var currentScreenObject = App.getCurrentScreenObject();
  • Now we can get the permalink and title values to set our custom attributes when a post is displayed (still in screen:showed event) :
if (current_screen.screen_type == "single" || current_screen.screen_type=="page") {
            
   $( '#share-button' ).attr( 'data-url', currentScreenObject.permalink );
   $( '#share-button' ).attr( 'data-title', currentScreenObject.title );
   //Comment the following if you don't need to share post featured image:
   $( '#share-button' ).attr( 'data-thumbnail', currentScreenObject.thumbnail && currentScreenObject.thumbnail.src ? currentScreenObject.thumbnail.src : '' );
  • As we don’t want to keep these values, we can clean them when leaving the screen, adding the following line to the screen:leave event (only useful if you place the share button outside post content: in top navigation bar for example)
if ( current_screen.screen_type == 'single' ) {
            
   // Unset data necessary for sharing
   $( '#share-button' ).attr( 'data-url', '' ).attr( 'data-title', '' ).attr( 'data-thumbnail', '' );

Add Sharing Function

Add the following function at the end of your functions.js code (but still inside the main file’s function(), so before the final “});” )

// Finger releases the share button
function shareButtonTapOff( e ) {

    e.preventDefault();

    // Get data to be shared

    var shareUrl = null;
    if ( $( this ).attr( 'data-url' ) != '' ) {
        shareUrl = $( this ).attr( 'data-url' );
    }
                
    var shareMessage = "I've just discovered a great article and I think it may interest you";
    if ( shareUrl != null ) {
        shareMessage += ": " + shareUrl;
    } else {
        shareMessage += '.';
    }
        
    var shareSubject = null;
    if ( $( this ).attr( 'data-title' ) != '' ) {
        shareSubject = $( this ).attr( 'data-title' );
    }

    var shareThumbnail = null;
    //Comment the following if you don't need to share post featured image:
    if ( $( this ).attr( 'data-thumbnail' ) != '' ) {
        shareThumbnail = $( this ).attr( 'data-thumbnail' );
    }

    // Launch OS sharing center (and check if the necessary Phonegap plugin is available - https://github.com/EddyVerbruggen/SocialSharing-PhoneGap-Plugin/)
    try {
            
        window.plugins.socialsharing.share(
            shareMessage, // Message
            shareSubject, // Subject
            shareThumbnail, // Image
            shareUrl, // Link
            function( result ) { /*alert( 'Success' );*/ }, // Success feedback
            function( result ) { /*alert( 'Failed' );*/ }  // Error feedback
        );

    } catch( err ) {
        console.log( "Sharing plugin is not available - you're probably in the browser" );
    }
 
}

Trigger The Sharing

Everything is in place, now we need to bind our sharing function to the Share button by adding the following code to functions.js just after the function added in the previous section.

// Share button events
$( "#app-layout" ).on( "touchend", "#share-button", shareButtonTapOff );

And we’re done! Now users can share an article using the native OS sharing center.

Happy coding 🙂

Hooking into app menu items

If you need to customize your menu items, for example attach an icon to each item, you can use the wpak_navigation_items filter.

On PHP side (in a php file in your app theme’s php folder) :

add_filter( 'wpak_navigation_items', 'wpak_add_menu_icons', 10, 2 );
function wpak_add_menu_icons( $menu_items, $app_slug ) {

    //Each menu item correspond to a component.
    // > We target each menu item by its component's slug
    // and add an "icon" entry to each menu item:
    $menu_items["my-item's-component-slug"]["icon"]  = "/my/icon/url";
    $menu_items["my-other-component-slug"]["icon"]  = "/my/other/icon/url";
    
    return $menu_items;
}

Then on your app theme’s side, in menu.html template:

<% _.each( menu_items, function( menu_item ){ %>

            <% //use menu_item.icon to display your icon %>

<% }) %>


Build PWA with WP-AppKit

WP-AppKit 1.5: Progressive Web Applications Support

This is the 5th birthday of WP-AppKit!

Since January 2013, we have been commited to offer an open source solution to create mobile apps using web technologies. For the last 4 years, we relied on Cordova/Phonegap to build hybrid apps but there is a new player in town: progressive web apps (aka PWA). Since 2015, we closely monitored the rise of PWA as at the core of WP-AppKit we create web apps. As PWA are getting more popular, we had a lot of requests from users to be able to build PWA with WP-AppKit. After a long period of test and work, we are proud to announce that you can now publish PWA with WP-AppKit, the same way you already do to create hybrid apps.

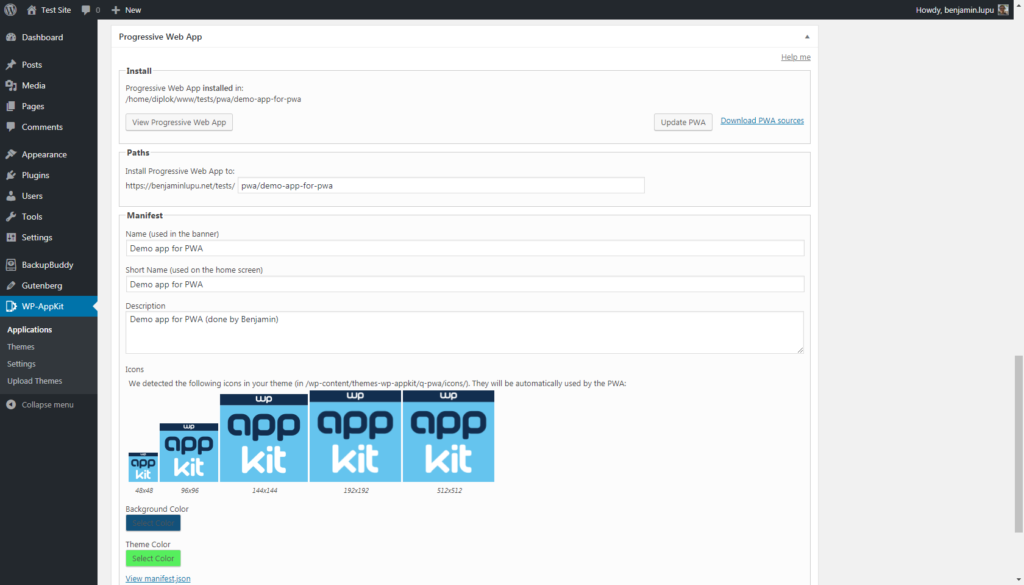
PWA Edit Panel

PWA Edit Panel


Download WP-AppKit on WordPress.org


The idea behind the PWA is to use HTML5 API and JavaScript to create an app like experience on the web.

Here are some facts about PWA:

  • PWA are web apps: progressive web applications are web apps built with JavaScript.
  • PWA are installed on phones: PWA can be installed as classic phone apps. They have an icon and a splashscreen.
  • The web is your app store: PWA are directly available on your web site.
  • PWA works offline: using local storage and service workers, you can use PWA offline.
  • PWA support is great on Android: Android automatically proposes to install PWA. PWA are seen as classic apps.
  • if you wonder about iOS, PWA support is not as advanced as on Android (ie. no offline mode, no notifications…). However, good news are coming as last beta versions of iOS integrates for the first time service workers. We can hope that PWA will be first class citizens on iOS in the following months.

As our mission is to simplify the creation of mobile apps, you’ll see that creating PWA is the same experience as the one you already know when creating mobile apps (even simpler as the compilation step disappears).

As usual, we’ve updated our Doc section and Get Started tutorial and we will surely add more material in the coming weeks.

Happy coding 🙂

Having questions?

FAQ | Tutorials | Documentation

Or

Contact Us