Build your WP-AppKit app with Cordova
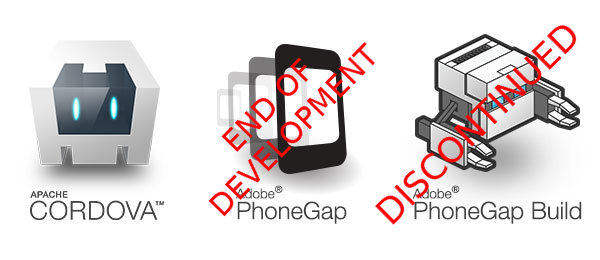
Since October 2020, Adobe has discontinued PhoneGap Build and ended investment in PhoneGap, so PhoneGap Build cannot be used to build WP-AppKit apps anymore. To address this issue, since version 1.6.0 WP-AppKit allows to build apps directly with Cordova tools, or to use the Voltbuilder online service.
Here we will see how to configure Cordova and how to use it to build WP-AppKit Android apps. Cordova first install is not really straight forward and what you are about to read is obviously not exactly a 5 minutes tutorial but the great advantage of building apps with Cordova is that you can do it directly on your local computer without depending on an external online service.
The goal of this tutorial is to build a WP-AppKit app with Cordova, but it can help anyone who wants to build an hybrid app (HTML/CSS/Javascript based) with Cordova as most of the steps described will be the same.
All installation instructions in this tutorial have been tested on linux platform (Ubuntu 18.04). You can find more general information about Cordova installation on the Cordova website : “Get started” and “Android Platform specific configuration“.
Setup Cordova on your local computer
Nodejs and npm
The first requirement to run Cordova is to install nodejs and npm:
sudo apt update
sudo apt install nodejs
sudo apt install npm
Cordova requires that you run last version of nodejs. Some linux distributions (like Ubuntu) install quite old nodejs versions by default. You can check the installed node version by running:
node -v
If the version is inferior to the last LTS version of node (that you can check here, currently v12.19.0 when writing this tutorial), you must update your node version so that Cordova works. The easiest way to do so is to use the “Node Version Manager” nvm:
Install nvm:
curl -o- https://raw.githubusercontent.com/nvm-sh/nvm/v0.36.0/install.sh | bash
Then update node to lastest LTS version
nvm install --lts
Now run “node -v” again and check that the version correspond to the last current LTS node version (currently v12.19.0).
Android SDK
Before installing Cordova itself, install the Android SDK which is required by Cordova to build Android apps.
To do so, first install the last JAVA JDK (find last version install info here):
sudo apt install openjdk-8-jdk-headless
Here we use the “headless” (lighter) version of the jdk because we don’t need graphical interface, but you can install “opendjk-8-jdk” instead if you need a more general SDK version.
Then install Gradle using SDKMAN!:
Install SDKMAN!:
curl -s "https://get.sdkman.io" | bash
source "$HOME/.sdkman/bin/sdkman-init.sh"
Install Gradle:
sdk install gradle 6.7
Finally install the Android SDK itself: here we use the “Command line tools only” version, which is lighter and sufficient to build WP-AppKit apps as we will only use the Cordova command line tools, not the Android Studio graphical interface.
- Download “Command line tools only” version of Android SDK here: https://developer.android.com/studio#command-tools
- Create the following directory on your computer: /home/[your-user]/android-sdk/cmdline-tools/tools/
- Unzip the downloaded SDK in a temporary folder. Go to this temporary folder and copy what is inside the [temporary folder]/cmdline-tools directory into the /home/[your-user]/android-sdk/cmdline-tools/tools/ directory created above.
- Check that you now have the exact following path : /home/[your-user]/android-sdk/cmdline-tools/tools/bin/, with sdkmanager binary in it.
Edit your /home/[your-user]/.bash_profile file and add the Android SDK environment variables like so:
# Android
export ANDROID_HOME=/home/[your-user]/android-sdk
export PATH=$PATH:$ANDROID_HOME/cmdline-tools/tools/bin
export PATH=$PATH:$ANDROID_HOME/platform-tools
export PATH=$PATH:$ANDROID_HOME/cmdline-tools/tools
then load this config with:
source "$HOME/.bash_profile"
We can now use the sdkmanager command to install the required Android packages: “Android Platforms SDK” and “Android SDK build-tools”, like so:
sdkmanager "platform-tools" "platforms;android-28"
sdkmanager "build-tools;30.0.0"
You can choose Android API-Levels (here we use 28) here and Build tools versions here (here we use 30.0.0).
And this is it, the Android SDK is installed and configured, we can now install Cordova.
Install Cordova
Run the following to finally install Cordova:
sudo npm install -g cordova
If you’re still there, well done, you’ve done the hardest part! Now let’s use Cordova to build apps!
Build Apps
Cordova test app
Before trying to build a WP-AppKit app, try to build the default Cordova test app to see if Cordova is installed correctly.
Create a new directory where you will create your Cordova projects. Here we will call it [my-cordova-projects-dir].
cd [my-cordova-projects-dir]
cordova create MyTestApp
(If you encounter a parsing error at this point, it is probably because you need to update your nodejs version: see first step of this tutorial to do so).
cd MyTestApp
cordova platform add android
cordova build
The first build can be a bit long as new libs are downloaded and installed but if everything went well, that’s so cool, you just built your first Android app on your own computer 🙂
You can find the app’s .apk in the directory that’s indicated at the end of the Cordova build log, send it to your phone and install it. This should run the default Cordova “Hello World” app.
Now let’s see how to build WP-AppKit apps.
Build a WP-AppKit app with Cordova
Export your app as a “Cordova template”
On WordPress side, in your WP-AppKit app edition panel, choose the platform “Android – Native – Cordova export”, and configure your app theme and app components as for any WP-AppKit app (see Getting Started).
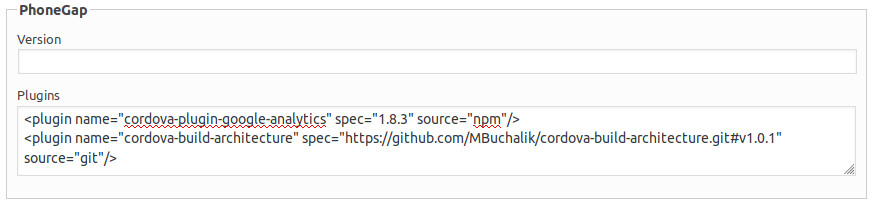
Cordova specific config must be set up in the “Cordova” box (App name, App ID, etc), as detailed in our “Getting Stated – Build native app” section.
Then click the “Cordova app template – Export” button:
This exports the WP-AppKit app sources as a Cordova app template. Cordova app templates are pre-built Cordova projects that you can use to jumpstart another Cordova project.
We are now going to use this Cordova template (zip file “cordova-template-export-[app-slug]-[app-version].zip“) that you just downloaded to create and build our WP-AppKit app’s Cordova project.
Create Cordova project from WP-AppKit Cordova app template
Let’s say that you downloaded the WP-AppKit app Cordova template zip file in the directory [my-downloads]: [my-downloads]/cordova-template-export-[app-slug]-[app-version].zip.
Unzip the Cordova template zip file, with your favorite zip archive manager or with command line (here we unzip into a directory [my-downloads]/template-[app-slug]-[app-version]):
cd [my-downloads]
unzip cordova-template-export-[app-slug]-[app-version].zip -d template-[app-slug]-[app-version]
Then go to the directory where you want to create your WP-AppKit app Cordova project (here we will use the same directory as in the previous section: [my-cordova-projects-dir]) and create the Cordova project that correspond to the WP-AppKit app Cordova template:
cd [my-cordova-projects-dir]
cordova create [app-slug]-[app-version] --template [my-downloads]/template-[app-slug]-[app-version]
This creates the directory [app-slug]-[app-version] containing our WP-AppKit app Cordova project.
Build Cordova app
Go to the newly created Cordova project directory [app-slug]-[app-version] and add Android platform. This will parse the config.xml and import the Cordova plugins required by the WP-AppKit app:
cd [app-slug]-[app-version]
cordova platform add android
At his point if you see some (yellow) warnings in logs, run the following until you don’t have any more warnings:
rm -rfd platforms && rm -rfd plugins && rm package*
cordova platform add android
Then build your app with:
cordova clean && cordova build
Get the resulting .apk from the last line of logs, send it to your phone (via email or your preferred online file storage service for example), install it and enjoy your fully manually built app!