The Joy/Fear Syndrom Of Hybrid Apps Development

Last Thursday I had a really great time at the Lyon (France) WordPress meetup, where I made a presentation about the delights of hybrid mobile apps development and, as a pratical application, gave a demo of WP-AppKit. We built a mobile app connected to WordPress together and it was really nice for people to see that it’s not just theory: you can build a basic WordPress content based mobile app in no time using hybrid technologies and solutions like WP-AppKit.

On the other side, it was again the occasion for me to experience the 2 faces of hybrid development for people who discover it:

  • for one moment you’re allowed to think that with hybrid technologies you’re going to be able to make mobile apps quite easily reusing your knowledge of web technologies,
  • and the next minute you realize that it means in fact learning a quite frightening amount of new Javascript concepts, libraries and/or frameworks.

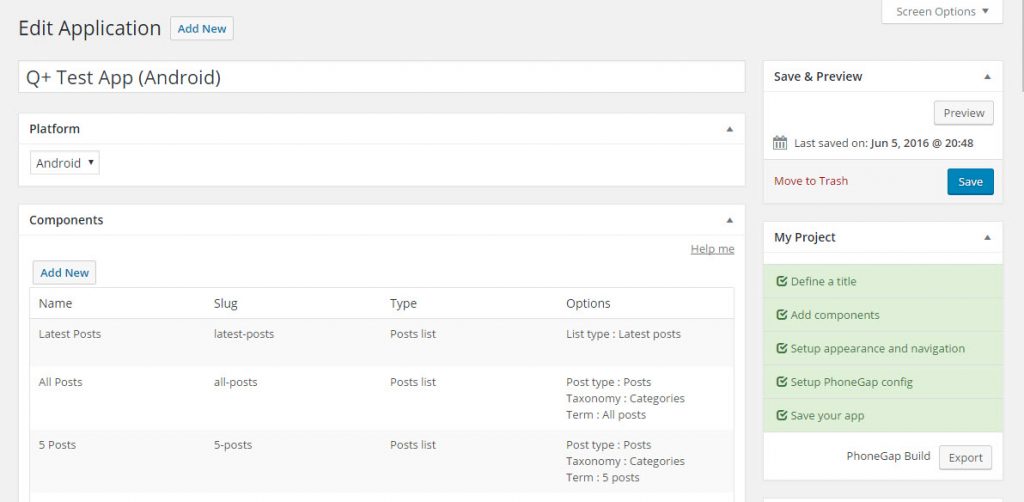
At UncatCrea we like to think that WP-AppKit can really help web developers to climb the learning curve between “standard” web JavaScript (ie. DOM manipulation using jQuery) and larger scale Javascript applications (WebApps, Mobile Apps). We come from this “standard” – mostly WordPress powered – web development and we have developed WP-AppKit so that it can be used by people with this kind of background.

Of course, the core of WP-AppKit apps uses some of those terrifying Javascript libs (BackboneJS/RequireJS) but it has been very important for us that a WordPress user creating an app or developing a WP-AppKit’s theme doesn’t have to take care of them to create apps.

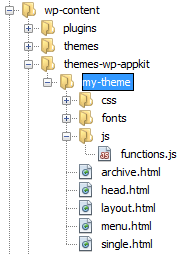
Before building your first WP-AppKit’s theme you’ll have to look into some of the key notions (like managing a RequireJS dependency, binding events on dynamic DOM elements or using the WP-AppKit API) but really, there’s not so much to know before starting to create or customize your app’s theme and we make sure that before leaving beta we’ll have all the doc and tutorials ready to get you covered.

Anyway, it was really nice to talk about all this in Lyon, and we hope we can renew this experience another time. The slides of my presentation can be found here (in French).

In the next months we’ll be at WordCamp London, WordCamp Lyon and WordCamp Europe. We hope to see you there!

2 Days for an Incredible Year

Next Friday and Saturday, the WP-AppKit team will attend the 4th edition of the WordCamp Paris. Benjamin, one of the team member, is part of the organization (as he did last year) and other team members have long been attendees of the previous editions. As usual, it should be a beautiful event meeting WordPress enthousiasts. This year, we have to choose among more than 30 talks! We’re also proud to have Benjamin give a talk on WordPress as a mobile back office (Something we believe in as you may have guessed).

For us, it has been a tremendous year as we have successed to grow our idea to a fully working plugin, even it’s a side project. We intend to celebrate that during these 2 days.

The coming year will surely have its own challenges – and the first one is probably to be accepted on the repo – but they’ll wait Monday.

For the moment, we want to enjoy the unique atmosphere of the WordPress family community 🙂

Ah… One last thing: thank you to all of you for the feedback and the encouragements. It was heartwarming.

See ya… and dont’ forget to follow the #wcparis hashtag.

[EDIT] This WordCamp Paris 2015 has been huge! It has been 2 days of enthusiasm, exchanges and bursts of laughter. As mentioned, Benjamin gave a talk on using WordPress as a mobile back office. It went well. (The video will be published on WordCamp TV.) Several people were interested by WP-AppKit and we’ve decided to do a quick demo the next day. Well, it was not so quick (3 hours) and we had a lot of feedback. We wanted to thank all the people who attended the demo, it was heartwarming.

Of course, the WordCamp was not only about WP-AppKit and we must say that the 34 speakers were awesome. We really enjoy learning about technical, business and design. We can’t wait to resume our work and to release the plugin on WordPress.org.

Display WordPress Custom Fields in Your App

By default, WP-AppKit’s web services provide basic info about WordPress posts and custom post types:

  • Title
  • Content
  • Excerpt
  • Featured Image
  • Author
More info here: https://uncategorized-creations.com/wp-appkit/doc/#317-single-html.

However, it’s very common to use post custom fields to add metada to your content (eg. SEO description). To avoid any performance issue, we don’t include custom fields in the default data returned by the web services.

This article shows you how you may add custom fields to data returned by the WP-AppKit web services and display their values in your app’s theme.

On the WordPress Side

To add custom fields data, you use the wpak_post_data hook. It allows to modify the post related data sent to the app. It can be used inside the theme’s php folder or in a plugin. In our example, we use the php folder.

  • First, if the php folder doesn’t exist in the theme’s folder, create it.
  • Then add create the handle_my_post_metadata.php file inside it.

Below the code of handle_my_post_metadata.php file where we use the wpak_post_data hook to add the my_meta custom field to the data returned to the app.

add_filter( 'wpak_post_data', 'add_meta_to_my_app_posts', 10, 3 );
function add_meta_to_my_app_posts ( $post_data, $post, $component ) {
    //Add our meta to the application post data :
    $post_data['my_meta'] = get_post_meta( $post->ID, 'my_meta', true);
    return $post_data; //Return the modified $post_data
}

If you use the Advanced Custom Fields (ACF) plugin and if my_meta is an ACF field, you can get it like this:

$post_data['my_meta'] = get_field('my_meta'); //Post ID not necessary here

It’s even possible to only return data only for a given post type or component type, using $post or $component arguments.

if( $post->post_type == 'my-post-type' ) { //add custom field here }

if( $component->slug == 'my-component' ) { //add custom field here }

On the App Side

As soon as you’ve added a custom field to the web services feedback, it is available on the app side. It means you can access it from the templates of the app’s theme. More specifically, it’s added to the post JSON object. You can use post.my_meta as you already use post.title .

Below an example of you find in archive.html or single.html.

<h1><%= post.title %> - <%= post.my_meta %></h1>

If the custom field’s value is a PHP array, it is a JavaScript array on the app side. You can get the custom field’s value as shown below.

<ul>
      <% _.each( post.my_meta, function( item ) { %>
            <li><%= item %></li>
      <% } ); %>
</ul>

If the custom field’s value is a PHP object, it is a JSON object on the app side and you get its value as shown below (considering that you want to get the my_property property value).

<%= post.my_meta.my_property %>

Tip: If you’re not sure of the data’s nature, you can check what’s inside the post object with a simple console.log

<% console.log('My post : ", post) %>

 Happy coding 🙂

Use the Debug Mode

You’ve probably noticed the Debug Mode dropdown list in your app’s settings panel? Do you wonder what is it used for? This week, we’ll explain the mysterious ways of the debug mode.


THe Debug Mode List

THe Debug Mode List

Debug mode adds new messages to the browser’s console. Among other things, you’ll be able to see:

  • if contents (posts, pages, navigation…) are retrieved from the local storage or from the server
  • states of the app’s parameters and options
  • details of loaded screens
  • errors (Ajax, templates, URL routing…)
An example of debug mode messages

An example of debug mode messages

Debug mode can have 3 values:

  • On
  • Off
  • Same as WordPress WP_DEBUG

The first 2 values are obvious. The third one means that the debug mode will be activated if the WP_DEBUG constant is set to true in the wp-config.php file.

When activated, the debug mode doesn’t change the normal app’s behavior. It just provides information in the browser’s console. We  recommend that you deactivate it when done with your development.

After you’ve exported your PhoneGap project, you can still turn on (or off) the debug mode in the config.js file. Search for debug_mode : in it.

The following line will turn on the debug mode:

debug_mode : 'on',

And this one will turn it off:

debug_mode : 'off',

It allows to test an exported app before it gets compiled.

Happy Coding!

Create Links to Screens in App’s Themes

WP-AppKit’s themes have a menu template. This menu is configured in your app’s WordPress panel. But you might want to create a link or a button to display a specific screen in your app outside the “official” app’s menu. So how can we do that?

The menu builder and theme's menu side by side

The menu builder and theme’s menu side by side

As most webapps, WP-AppKit’s themes are a single HTML page. Screens are parts of this page and navigation is handled with JavaScript. Even if we chose to present them as separate templates to ease your work, you have to know that all templates are merged later in a single page.

In single page apps, navigation is handled with fragment identifiers (aka. anchors, see more at http://en.wikipedia.org/wiki/Fragment_identifier and http://backbonejs.org/#Router). If you wonder what’s a fragment identifier, it’s an optional part of the URL beginning with the # sign.

http://www.mysupernicedomain.com/lorem/ipsum/index.html#fragmentidentifier

The main difference between classic web URL and the WP-AppKit’s links is that there is nothing before the # sign. The # sign is also followed by keywords (eg. component).

<a href="#component-cats">Articles about cats</a>

At the moment, fragment formats for WP-AppKit’s themes are:

Home Screen #
Component (ie. post list, a single page, a page tree…) #component-[component-slug-defined-in-wordpress]
Post Detail #single/posts/[wordpress-post-id]
Post Comments #comments/[wordpress-comment-id]
A page #page/[component-slug-to-which-the-page-belongs]/[page-wordpress-id]

You can also use the nice TemplateTags object in your templates or in the functions.js.

Get a post link TemplateTags.getPostLink(post_id,’posts’)
Get a page link TemplateTags.getPageLink(page_id,component_slug)
Get comments link for a post TemplateTags.getCommentsLink(post_id)
Get the previous screen link TemplateTags.getPreviousScreenLink()

A last word to say is that there is no 404 error in an app. If your link is wrong, it defaults to the home screen.

Happy Coding!

Compiling An App Using WP-AppKit And PhoneGap Build

So you have your first app’s theme ready and you’d like to turn it into a real app? For that, you have to build an app. Intimidating, isn’t it? For newbies, it can be quite a challenge to understand how to do it. This tutorial aims to show you how to use PhoneGap Build to ease the pain of compiling your first app.

If you are a bit more technical, you have to know that WP-AppKit’s apps are just regular PhoneGap’s apps and that you can compile them using the CLI.

 PhoneGap Build

PhoneGap Build is an online service provided by Adobe. It allows to compile apps online. It means that you’ll upload your PhoneGap’s project (i.e. a ZIP file) on PhoneGap Build and you’ll get in return a file ready to be deployed on your phone. The great thing about PhoneGap Build is that you don’t have to install anything locally to compile your apps. PhoneGap Build has free and paid plans (you’ll find them on the PhoneGap Build’s homepage; search for Choose your plan). This tutorial can be done with a free plan. All you need is an Adobe ID or a GitHub account to be able to sign in to the service.

The PhoneGap Build’s website: https://build.phonegap.com/.

The FAQ section is a good start to understand what is/isn’t PhoneGap Build: https://build.phonegap.com/faq.

Only An Android App?

Yes, this tutorial “only” shows you how to compile an Android app. Compiling for iOS requires that you subscribe to the Apple Developer Program and configure an iOS Development Certificate, which can not be said to be really straight forward and could be the subject for a whole tutorial by itself. However, if you already have an iOS Development Certificate, you can build your iOS app following the same steps as described below.

 Configuring the PhoneGap Project

First step is to export your PhoneGap project in WordPress.

Open your application Edit Panel.

Edit Panel


You should already have configured your app (components, navigation and theme). If not, you may want to look at our tutorial on how to build your first WP-AppKit’s theme.

Ensure that you have chosen Android as your target platform.

Platform Metabox

A PhoneGap project requires a config file named config.xml. This is where you define your app’s name, description, version, authors and optionally the PhoneGap’s plugins required by the app.

WP-AppKit builds this config.xml for you based on the information you provide in the PhoneGap Build metabox of your app’s Edit Panel.

The PhoneGap Build metabox has 3 field groups:

  • Application: anything regarding the app’configuration itself
  • Author: anything regarding who publish the app
  • PhoneGap: PhoneGap and PhoneGap plugins configuration

Application

Name Displayed in app stores and on devices.
Description Displayed in app stores.
ID Must be unique. Using the reverse-domain name style (e.g. com.yourcompany.yourapp) ensures to be compatible with all platforms.
Version Used by app stores. The major.minor.patch style version number is usually used (e.g. 1.0.1).
VersionCode Android only. See http://developer.android.com/tools/publishing/versioning.html for more info.
Build Tool Gradle by default. Most of the time you want to let this value.
Icons and Splashscreens By default, WP-AppKit includes its own icons and splashscreens set. To include yours, uncheck Use default WP-AppKit Icons and Splashscreens checkbox and provide yours.

Author

Name Used by app stores.
Website Used by app stores.
Email Used by app stores.

PhoneGap

Version Optional. Let empty if you want to use the latest version.
Plugins Allows to set the Cordova plugins we want to build our app with, using the tags defined in the PhoneGap Build documentation. Please be aware that WP-AppKit includes by default the following plugins: In App Browser, Network Information, Whitelist, Splashscreen, Device and Status Bar.

Don’t forget to save the config.xml data by clicking the Update button of your app’s Edit Panel.

Config.xml is powerful, if you want to know more about it, check this link: http://docs.phonegap.com/phonegap-build/configuring/.

Now that we have our PhoneGap config.xml set up, we can export our app as a PhoneGap ready ZIP file.

Exporting the PhoneGap Project

Search for the My Project metabox in your Edit Panel and click the Export button.

My Project Metabox

  • This creates a ZIP file in your wp-content/uploads/wpak-export directory and launches its download. (Please note that the wp-content/uploads/wpak-export directory must be writable by your server for the export to work.)

You should now have a ZIP file named phonegap-export-[your-app-name]-[date].zip on your computer. It contains the PhoneGap project sources of your app that we will upload to the PhoneGap Build shortly.

Building The App

First of all, you need to create a PhoneGap Build account. PhoneGap Build has both free and paid subscription plans: the free plan allows to build an unlimited number of open source apps (i.e. apps that PhoneGap Build pulls from your public GitHub repository) and one private app (apps that have their source code hosted in a private GitHub repository or are created by uploading a ZIP file containing the sources and assets of a PhoneGap project directly to PhoneGap Build).

In this example, we take the shorter way which is to create a private app uploading a ZIP file directly to PhoneGap Build, using a free registration and no Github account. But the exact same process can be used to build an app by pulling it from a Github account. To do so, you would upload the ZIP file content to your Github repository and connect PhoneGap Build to it.

The private app that we are going to create in this tutorial can be deleted and replaced by any “real” app that you may build later.

Once you have created your account, you should be redirected to the following screen.

PhoneGap Build Step 1

  • Check that you are in the Private tab and click Upload a .zip file.
  • Provide the ZIP export phonegap-export-[your-app-name].zip generated earlier in this tutorial.

You should see your Phonegap Build app project.

Click the Ready to build button. It launches the PhoneGap Build compilation process. Wait for one minute or two and you should see the android robot becoming blue: your app is ready!

PhoneGap Build Step 2

You just have to click on the blue robot to download the install file (.apk) of your app 🙂

PhoneGap Build Step 3

Installing The App

To install your app on your Android device, you will first have to allow the installation of apps that don’t come from Google Play. On your device, go to Settings > Security and check the Unknown sources checkbox.

Android Security Panel

You can now use one of the following methods to transfer the install file on your phone:

  • USB connection
  • Bluetooth connection
  • Email sent to yourself with the install file attached
  • Or simply scan the QR code provided by PhoneGap Build

Finally, open the install file (.apk) to install, run your app, sit in your armchair and enjoy reading your WordPress contents on your mobile! (Don’t forget to test the offline mode as we’re very proud of it.)

Have something to say about this article? Great! Comments are there for that. Please remember that comments are moderared. SPAM or off-topics comments won’t be published.

Build Your First WP-AppKit’s Theme

Before starting, download and install the plugin WP-AppKit. You can find it on GitHub.

For this tutorial, we’ll create a very basic theme named “my-theme” based on the Twitter Bootstrap frontend framework.

You can see it in action right here at the end of this tutorial.

You can also download the theme’s sources directly here (ZIP file 115Ko) or build the theme step by step with the help of the tutorial below.

We are not going into any details of the underlying principles of WP-AppKit themes and apps in this tutorial. To know more or to dive directly into your own theme development, the WP-AppKit Theme documentation is your best bet.

Setting Up Theme Directory and Template Files

Create a new directory “my-theme” under the “wp-content/themes-wp-appkit” directory.

In this new directory (“wp-content/themes-wp-appkit/my-theme”), create the following template files (empty for now, but required):

  • my-theme/archive.html
  • my-theme/head.html
  • my-theme/layout.html
  • my-theme/menu.html
  • my-theme/single.html

Create a “js” sub-directory: “my-theme/js”, and a file named “functions.js” inside it (“my-theme/js/functions.js”). It’s also an empty file for now, but it is required too.

Finally create “css” and “fonts” sub-folders. They’re optional but we’ll use them in this tutorial.

You should now have come to this :

wp_appkit_tutorial_files_start


Theme’s Styles and JavaScript

Download the Twitter Bootstrap resources either by getting the last and up to date version from here, or by downloading  the ones we used when building this tutorial (Bootstrap v3.2.0, ZIP file 112Ko).

Copy Twitter Bootstrap CSS, fonts and JavaScript in your theme folder in the corresponding “my-theme/css”, “my-theme/fonts” and “my-theme/js” sub-folders.

If you downloaded Bootstrap from the Bootstrap website:  note that we don’t need all the files that the default Bootstrap download includes. Here are the only files this tutorial requires :

  • css/bootstrap.min.css
  • css/bootstrap-theme.min.css
  • fonts/glyphicons-halflings-regular.*
  • js / bootstrap.min.js

Your theme should now have the following files :

appkit_tutorial_files_bootstrap


To link the Bootstrap CSS files in our theme, open the “my-theme/head.html” template and insert :

<link rel="stylesheet" href="<%= theme_path %>/css/bootstrap.min.css">
<link rel="stylesheet" href="<%= theme_path %>/css/bootstrap-theme.min.css">

While we’re in our head.html template, also add the content-type meta and a mobile oriented viewport meta, which gives us :

<meta http-equiv="Content-Type" content="text/html; charset=UTF-8" />
<meta name="viewport" content="width=device-width, initial-scale=1.0, maximum-scale=1.0, user-scalable=no">
<link rel="stylesheet" href="<%= theme_path %>/css/bootstrap.min.css">
<link rel="stylesheet" href="<%= theme_path %>/css/bootstrap-theme.min.css">

To plug  the Bootstrap JavaScript file to our theme, open the “functions.js” file and insert :

define(['theme/js/bootstrap.min'],function(){
     //Nothing for now, this is just to include the bootstrap.min.js file in our theme.
});

It may be surprising that we don’t include Javascript files in the head.html template along with CSS files, please see the JavaScript in themes section of the documentation to see why this is the right way to add JavaScript resources to WP-AppKit themes.

Theme Layout

Copy the following HTML code into the “layout.html” template file :

<nav class="navbar navbar-default navbar-fixed-top" role="navigation">
    <div class="navbar-header" >
        <button type="button" class="navbar-toggle collapsed" data-toggle="collapse" data-target="#navbar-collapse">
            <span class="sr-only">Toggle navigation</span>
            <span class="icon-bar"></span>
            <span class="icon-bar"></span>
            <span class="icon-bar"></span>
        </button>
        <span class="navbar-brand"><a href="#"><%= app_title %></a></span>
    </div>
    <div class="collapse navbar-collapse" id="navbar-collapse">
        <%= menu %>
    </div>
</nav>
<div class="container" style="padding-top: 45px;"><%= content %></div>

This HTML structure is the standard way of including a “fixed to top navbar with hamburger menu button” with Twitter Bootstrap. You’ll notice 3 WP-AppKit template tags here :

  • <%= app_title %> : displays the app title as defined in the WordPress admin.
  • <%= menu %> : automatically displays the content of the “menu.html” template (see below).
  • <%= content %> : automatically displays the current screen content, using the “archive.html” template if a post list is displayed or the “single.html” template if a post is displayed.

You can find details about this template tags in the documentation.

App Navigation Menu

The “menu.html” template is used to render the app’s navigation.  Copy the following HTML code into “menu.html” :

<ul class="nav navbar-nav">
    <% if( menu_items.length ){ %>
        <% _.each( menu_items, function( menu_item ){ %>
            <li>
                <a href="<%= menu_item.link %>">
                    <%= menu_item.label %> 
                    <span class="glyphicon glyphicon-chevron-right pull-right visible-xs"></span>
                </a>
            </li>
        <% }) %>
    <% } %>
</ul>

Here, we loop on the menu_items WP-AppKit’s object to display each menu item as a <li> list element.

The JavaScript template engine (code inside <% … %> that you see in templates) used in WP-AppKit is the underscore.js : more info about that here.

Post Lists

Post lists (posts for a WordPress category for example) are displayed using the “archive.html” template. Copy the following into your “archive.html” :

<h1><%= list_title %></h1>
    
<% if(posts.length){ %>

    <ul class="media-list">
        <% _.each( posts, function( post ){ %>
            <div class="media">
                <% if( post.thumbnail.src && post.thumbnail.src.length ){ %>
                    <img class="media-object pull-left" src="<%= post.thumbnail.src %>" style="width: 87px; height: 58px;">
                <% } %>	
                <div class="media-body">
                    <h4 class="media-heading">
                        <a href="<%= TemplateTags.getPostLink(post.id) %>" class="pull-left"><%= post.title %></a>
                        &nbsp;<small class="small"><%= TemplateTags.formatDate(post.date,'d/m/Y') %></small>
                    </h4>
                    <p><%= post.excerpt %></p>
                </div>
            </div>
        <% }); %>
    </ul>
		
<% }else{ %>
        <p>No post found!</p>
<% } %>

<%= list_title %> displays the current list title (name of the category for example).

We loop on the posts WP-AppKit’s object to display each post as a Bootstrap media object list item.

You can see that each post has the following properties (among others not used here): thumbnail, title, date and excerpt.

We use the TemplateTags WP-AppKit’s module to get post links and format post dates.

Post Detail

Post details are displayed using the “single.html” template. Copy the following code into your “single.html“:

<h1><%= post.title %></h1>
<%= TemplateTags.formatDate(post.date,'d/m/Y') %>
<div id="single-content">
    <% if(  post.thumbnail && post.thumbnail.src && post.thumbnail.src.length ){ %>
        <img src="<%= post.thumbnail.src %>" />
    <% } %>
    <%= post.content %>
</div>

The post WP-AppKit’s object has the exact same properties as in the “archive.html” template. Here we display post title, date, thumbnail (if the post has one) and content.

Ok, This Is It, Let’s See Our Theme In Action, Shall We?

You can now create an app in WordPress.

  • Go to “WP-AppKit > Applications”
  • Click “Add new”
  • Set a title (only used in WordPress admin, not in the app) : here we name it “WP AppKit Tutorial”
  • Set a platform (Android/iOS) even if it has no influence here since we won’t deploy it on a device in this tutorial
  • In the “Theme” box, set “Application Title” (“WP AppKit Tutorial” again in this example) and choose your “My theme” theme in the themes’ list :

appkit_tutorial_edit_title_theme

  • Publish your app by clicking the blue “Publish” button
  • Now, add components (ie content) to the app : in the “App Components” box, click “Add new” to set some “Posts list” components based on your WordPress categories (or any taxonomies you may have) :

appkit_tutorial_add_component

  • And finally, add those components to your app navigation by clicking “Add new component to navigation” in the “App Navigation” box :

appkit_tutorial_add_to_navigation

  • In the “App Simulation” box, click “View application in browser” :

appkit_tutorial_view_appt

Your app should launch! For a more “close to mobile reality” experience, resize your browser to a mobile size (manually or better : using your browser mobile device emulator).


To go further

The best way to go if you want to make your own WP-AppKit themes is to read the documentation and have a look to the Nihao default themes.

Or, you could just start to play along rewriting the templates of this tutorial with your own HTML structure and your own CSS/Javascript. To do so, you may need 2 more things :

1 – Add your own CSS stylesheet :

For example, to extend all our posts images to full width :

  • Add a “my-styles.css” file to my-theme/css, that contains :
    #single-content img{ 
        /* See the single.html template where we displayed our post content 
           inside a <div id="single-content"> so that we can target it in CSS */
        width: 100%;
        height: auto;
    }
  • Link this new CSS file to your theme : append the following to your head.html template :
    <link rel="stylesheet" href="<%= theme_path %>/css/my-styles.css">

 2 – Add your own javascript to the functions.js :

For example, let’s close the navigation menu when we click a link inside it, and scroll to top at each screen change :

Replace your my-theme/js/functions.js content by :

define(['jquery', 'core/theme-app', 'theme/js/bootstrap.min'],function($, App){
    
	//See https://uncategorized-creations.com/wp-appkit/doc/#237-functions-js to 
	//learn more about what you can do in this functions.js file.
	
	/**
	 * Close menu when we click a link inside it.
	 * The menu can be dynamically refreshed, so we use "on" on 
	 * parent div (which is always here):
	 */
	$( '#navbar-collapse' ).on( 'click', 'a', function() {
		closeMenu();
	} );
	
	/**
	 * Scroll to top each time a new screen is showed in the app.
	 * 'screen:showed' is an AppKit event that allows to intercept 
	 * change of screen in the app (list to post detail for example).
	 */
	App.on( 'screen:showed', function( current_screen, view ) {
		scrollTop();
	} );
	
	/**
	 * Close the bootstrap navbar manually
	 */
	function closeMenu() {
		var navbar_toggle_button = $( ".navbar-toggle" ).eq( 0 );
		if ( !navbar_toggle_button.hasClass( 'collapsed' ) ) {
			navbar_toggle_button.click();
		}
	}
	
	/**
	 * Get back to the top of the screen
	 */
	function scrollTop() {
		window.scrollTo( 0, 0 );
	}
	
});

On the first line, we add the “jquery” and “core/app-theme” dependencies and say that we are going to access them through “$” and “App”.

Then, we write “normal” jquery DOM manipulation and use the AppKit “screen:showed” event to intercept app screen changes.

Wrapping Things Up

You should now understand the basic principles behind WP-AppKit Themes. To learn more, check the  javascript in AppKit themes documentation section.

To test the basic sample AppKit theme “my-theme” built in this tutorial : download it here (ZIP file 115Ko) and unzip it to your “wp-content/plugins/wp-app-kit/app/themes” directory. Have something to say about this article? Great! Comments are there for that. Please remember that comments are moderared. SPAM or off-topics comments won’t be published.

WP-AppKit's Banner 2

WP-AppKit: A Technical Introduction

With WP-AppKit you set your app content from the WordPress backoffice and generate the corresponding mobile application sources formated as a PhoneGap project package. Doing so, App Kit addresses two very different technical issues:

  • Exposing WordPress through web services.
  • Building a PhoneGap mobile application.

The WordPress Plugin

A WordPress plugin is made of PHP, using the WordPress API. Here are the main technical concerns for WP-AppKit from a WordPress plugin development point of view:

  • Content displayed in your app is your WordPress content (i.e. posts, pages, custom post types), grouped/filtered with WordPress taxonomies. The App Kit plugin doesn’t add (or retrieve) any app specific contents or meta: it has no influence at all on your content. However, in future versions we’ll certainly add some content meta (linked to geolocation for example) and handle some third party plugins compatibility, allowing to easily display content from those plugins in apps.
  • You create your app and configure it from the WordPress backoffice choosing from the WordPress content you want to see in the app. Each app has an edit panel in the backoffice where you drag ‘n’ drop your WordPress content into app components and navigation, and choose your app theme.

App Components

  • On one WordPress instance, you can create as many apps as you want: one app per platform (Android, iOS…), one app per content theme… The plugin implements apps as WordPress custom post types, which allows you to integrate app management seamlessly in the WordPress backoffice UI.

App List Panel

  • WordPress exposes app content through web services. Each app created with the plugin has its own set of JSON web services allowing the app to synchronize with the chosen WordPress content. The plugin web services implementation is specific to WP-AppKit: it is not RESTful as the app must be able to retrieve all of its content (of different natures) at once, so that we can handle offline consumption.
  • Web services are secured. Web services URLs have a “token” part. Only apps that can compute this token have access to the web service information. The token computation is fully customizable using hooks so that you can implement your own web service security.
  • App simulation in a web browser. The plugin allows you to run your apps directly in the web browser, enabling you to test and develop your app themes easily. By default, WP-AppKit app doesn’t include any specific PhoneGap JavaScript libraries, so it can be run in any browser and you don’t have to wait for the app to be deployed on the phone device to test it.

Preview In Browser

  • You generate and export the PhoneGap project sources for your app directly from WordPress. Once an app is built and tested in the browser, you set its PhoneGap specific settings (that will generate the PhoneGap config.xml) from the app edition, and clicking the “Export” button generates a zip directly submittable to the PhoneGap Build.

Export PhoneGap Project

  • Key plugin core processes, entities and web services are hookable. So you can easily customize content sent to the app, customize web services security and even create your own app components.

PhoneGap Mobile Apps

A PhoneGap mobile app is a native encapsulation of a web app. Before the PhoneGap compilation, our mobile app is “simply” a web app, built with JavaScript and rendered as HTML through CSS styling.

WP-AppKit apps fundamentally aim to retrieve WordPress data and to display it in a mobile app fashion.

On one side the data model (posts, lists, navigation items…) is handled in JavaScript. On the other side the data renders using HTML/CSS (and JavaScript too). There are many tools to address this well known MVC problematic in JavaScript based web apps today. Some of them are even real “all-in-one” mobile web app frameworks. We could name Sencha Touch or jQuery Mobile that provide a full set of mobile-oriented features and UI elements. Those tools are great and powerful, but our feeling using them is that you often get to a point where you feel a bit locked in with a technology.

From the start, WP-AppKit’s purpose has been to allow web developers and designers (and especially WordPress ones) to make their own app using technologies they know.

So we didn’t go with one of those “all-in-one” frameworks, we chose to keep core and UI concerns separate using specific low-level tools that just served our needs: make an app connected to WordPress and let frontend developers use their own skills and favorite mobile UI rendering libraries (Topcoat, Bootstrap… or hand made) to build their app leaning on a “WordPress-like” app theme logic.

A Backbone Core.

Backbone Site

Backbone.js Models and Collections structure our app contents (posts, post lists, navigation items…) in a very flexible and robust way. Corresponding Backbone Views handle app components rendering. Navigation within our single page app is handled by the Backbone’s Router.

Module Dependencies

Require Site

App core modules follow the Asynchronous Module Definition (AMD) pattern. RequireJS handles module dependencies and allows us to load them and other JavaScript libraries in a graceful and optimized way. The very useful Text loader RequireJS plugin is used to implement the theme templates logic, which is the key of our app core and app theme layer separation.

Theme Templates

Underscore Site

Theme templates are HTML files where dynamic parts are rendered using the Underscore.js template engine. Underscore.js already being required by Backbone, it doesn’t create a new dependency, as would have Mustache or Handlebars. And we feel that its templating syntax is really close to “normal” JavaScript. It should be easy to jump in for frontend developers.

Ajax And DOM Manipulation

jQuery is used at different app levels for DOM manipulation, and AJAX calls to web services.

And that’s all that is technically imposed on you by App Kit core.

All rendering using CSS and JavaScript libraries to style and animate your theme’s HTML templates is yours to decide. You will rely on the WP-AppKit Theme API to follow and react to what’s happening in the app. You can use frontend frameworks such as Bootstrap, Foundation, Topcoat… or make it yourself with your own CSS / JavaScript resources. Of course we have some default themes coming out of the box with WP-AppKit, but we hope you’ll try and have fun making your own 🙂

Phonegap Compilation

Once your app components, navigation and theme are set up in the WordPress backoffice, tested in your web browser and exported as a PhoneGap project ZIP package, it’s time to make a native app out of it. This is where the WP-AppKit plugin role ends and where the PhoneGap compilation adventure begins.

There is two ways to build native apps:

  • Install the PhoneGap environment (which relies on node.js) on your local system and use the PhoneGap Command Line Interface (CLI) to build your app.
  • Use the very convenient PhoneGap Build that allows you to build apps directly in the cloud by uploading your ZIP export or connecting it to your GitHub repository.
PhoneGap Build

The PhoneGap Build Online Interface

The result of a PhoneGap compilation is a file (.apk for Android and .ipa for iOS) that you can install directly on your phone and submit to app stores.

Of course, a PhoneGap app can be more than a classic website encapsulated in a native container: it allows you to access built-in phone features such as camera or geolocation to enhance user experience and make the most out of our smartphone’s abilities. For now, by default, WP-AppKit doesn’t include pre-build tools or modules related to those specific PhoneGap phone features APIs. But, when building your theme, nothing prevents you from using the PhoneGap APIs to interpret your user location or take pictures from your app. Embedding a built-in phone features management (using Phonegap API in the background) in the core of the WP-AppKit plugin is for sure one of the main concerns on our minds for the future.

This article has been carefully edited by our friend Jenny Beaumont. A thousand thanks Jenny! All mistakes are ours.

Have something to say about this article? Great! Comments are there for that. Please remember that comments are moderared. SPAM or off-topics comments won’t be published.

WP-AppKit's Banner 2

Using the PHP Folder in Your Theme

You’re right. There is a PHP folder in your theme’s folder, which can be troubling at first sight. Why? Because in principle no PHP can be executed in a PhoneGap based app, only HTML, CSS and JavaScript. So what is this folder used for?

The mysterious theme's PHP folder.

The mysterious theme’s PHP folder.

The PHP folder lets you hook the data sent from WordPress to your app.

For example, Q themes (i.e. the sample themes bundled with WP-AppKit) add the WordPress image caption value to post’s thumbnail data to be able to display it from the app.

All the PHP files contained in this folder are included before web services answer back to the app. Typically, you’ll use web service hooks such as wpak_post_content_format, wpak_post_excerpt, wpak_post_data etc…

Let’s say you want to add the mention “Today monkeys are green” at the end of all articles (displayed in apps). You’ll add to the PHP folder a PHP file with the following code:

add_filter( 'wpak_post_content_format', 'wpak_message_from_monkeys', 10, 2 );
function wpak_message_from_monkeys( $content, $post ){
	$content .= "<p>Today monkeys are green.</p>";
	return $content;
}

 Et voilà!

Monkeys Are Green

You have to remember that the PHP folder is related to the theme and NOT to the app. It means that if several apps use the same theme, whatever is done with the PHP folder will be done for all of them. Also don’t put app specific processing in there!

Happy coding!

WordPress As A Mobile CMS

WordPress is now a major player in the CMS field. This position is often explained with the WordPress baseline: democratize publishing. It is recognized that WordPress is an affordable solution to build an online presence. Its ecosystem (themes, plugins, hosted services…) is growing everyday and it even grows outside the strictly publishing business. It is not far from becoming a very reliable e-commerce solution or a even becoming a player in the LMS field. It is used by individuals and big brands alike. So let’s see how it address the “new” mobile world.

From Woo Commerce (eCommerce) to Woo Sensei (Learning Management System), Woo Themes pushes the natural boundaries of WordPress.

From Woo Commerce (eCommerce) to Woo Sensei (Learning Management System), Woo Themes pushes the natural boundaries of WordPress.

Mobile Themes

Building responsive websites with WordPress themes is now fairly common. You can also choose to have a specific mobile theme thanks to plugins such as WPTouch. So as soon as you use WordPress as a CMS, you may have a mobile online presence without too many problems. (Also, remember that your content has to be prepared for mobile consumption.)

But these are web solutions. We still build websites hosted on servers, which will be accessed with mobile browsers (meaning that you must have a connection to do so). We address the screen sizes problem. We can even have touch-enabled themes. But this is not the equivalent of an app residing on the phone itself.

The famous Smashing Magazine has deployed a very sophisticated responsive website.

The famous Smashing Magazine has deployed a very sophisticated responsive website.

 Mobile Publishing

If you want to publish on the go, you can use dedicated (free) apps available for iOS and Android.

WordPress mobile apps

These are native apps providing writing, reading and moderation functionalities. (They connect to your site through the XML-RPC WordPress interface.) These apps provide an adapted backend for publishing. They are not meant to be customized and released on app stores for users to read your content. (However they’re open source :-))

In recent versions the WordPress admin has also became responsive (meaning it plays nicely with various screen sizes).

WordPress admin when seen with a smartphone.

WordPress admin when seen with a smartphone.

 Connecting WordPress To Mobile Apps?

If you have decided to build an app and if WordPress is your CMS, you probably wish to capitalize on it to provide content to your app.

WordPress has been open to third party publishing for a long time thanks to its XML-RPC interface. This interface allows tools such as Microsoft Word to publish WordPress posts.

Some app builder solutions (e.g. Good Barber) draw on that functionality to bring WordPress content in apps through dedicated connectors.

Good Barber's WordPress Connector

However, JSON is often favored to XML-RPC when building web services for mobile and you will find numerous plugins bringing JSON to WordPress. There’s even an official project to bring it to the core of WordPress.

So we see that feeding an app with WordPress is perfectly feasible. In fact, there’s a lot of apps whose backends are WordPress installations. But at the moment, there is no real out the box solutions, or even a boilerplate, for that matter. It means that as soon as you’ll want to build something specific for you or your customers, you’ll have to get your hands dirty to create web services. You will also have to create the app which will be able to consume those web services (whatever technologies you use for that).

This is why here at UncatCrea, we try to develop a project that will be specifically done for WordPress. If you want to know a bit more about it: What is WP-AppKit?

Of course WP-AppKit is not the only project that aims to bring a WordPress based solution to build apps. It is interesting to see that a lot of them use WordPress and PhoneGap. Last year (2013) we saw the first articles about connecting these technologies and at the beginning of this year (2014), the first commercial offer has appeared: AppPresser. A quick review of the solution at its launch (Feb. 2014) here.

This article has been carefully edited by our friend Jenny Beaumont. A thousand thanks Jenny! All mistakes are ours.

Have something to say about this article? Great! Comments are there for that. Please remember that comments are moderared. SPAM or off-topics comments won’t be published.

WP-AppKit's Banner 2

Having questions?

FAQ | Tutorials | Documentation

Or

Contact Us