Custom Post Data

Post Metadata

To add a meta (stored as a WordPress post meta, here a meta called pdf) to your post data (in a variable called pdf_url):

<?php
// In a PHP file created under your theme's 'php' folder
function add_meta_to_my_app_posts ( $post_data, $post, $component ) {

    //Standard WordPress post meta:
    $post_data['pdf_url'] = get_post_meta( $post->ID, 'pdf', true );

    //Advanced Custom field meta example:
    $post_data['my_acf_meta'] = get_field( 'my_acf_meta' ); //Post ID not necessary here
    
    return $post_data ;

}

add_filter( 'wpak_post_data', 'add_meta_to_my_app_posts', 10, 3);

Then, on app side, to display your post meta in your template:

<!-- In single.html or archive.html template -->
<a href="<%= post.my_pdf %>">Download the pdf for <%= post.title %></a>

<!-- If your "my_acf_meta" is an array -->
<ul>
      <% _.each( post.my_acf_meta, function( item ) { %>
            <li><%= item %></li>
      <% } ); %>
</ul>

Post Featured Image Sizes

To add a different image size (like thumbnail) to your post data (in a variable called archive_img):

<?php
// In a PHP file created under your theme's 'php' folder
function add_thumbnail_size( $post_data, $post, $component ) {
    $post_featured_img_id = get_post_thumbnail_id( $post->ID );
    $post_data['archive_img'] = ''; // Empty default value to be consistent with WP-AppKit 'thumbnail' data

	if ( !empty( $post_featured_img_id ) ) {
		$featured_img_src = wp_get_attachment_image_src( $post_featured_img_id, 'thumbnail' );
		if( !empty( $featured_img_src ) ) {
            $post_data['archive_img'] = array(
                'src' => $featured_img_src[0],
                'width' => $featured_img_src[1],
                'height' => $featured_img_src[2],
            );
		}
	}

    return $post_data;
}

add_filter( 'wpak_post_data', 'add_thumbnail_size', 10, 3 );

Then you can use this new image format in your archive.html app template: replace post.thumbnail.src by post.archive_img.src.

Taxonomy Terms

To add the terms of a given taxonomy (my_taxonomy) to your post data (in a variable called my_terms):

<?php
// In a PHP file created under your theme's 'php' folder
function add_terms_to_my_app_posts ( $post_data, $post, $component ) {
	
	// Get the post terms
	$terms = wp_get_post_terms( $post->ID, 'my_taxonomy' );
	
	// Filter app data (it's better not to include
	// every useless WordPress data into the webservice as this will overload it)
	$terms_in_app = array();
	foreach( $terms as $term ) {
		$terms_in_app[] = array( 'slug' => $term->slug, 'name' => $term->name ); // Put here only the data you need
	}
	
	$post_data['my_terms'] = $terms_in_app;
	
	return $post_data; // Return the modified $post_data
}

add_filter( 'wpak_post_data', 'add_terms_to_my_app_posts', 10, 3 );

Comments

To add post comments to your post data instead of retrieving them dynamically (in a variable called comments):

<?php
// In a PHP file created under your theme's 'php' folder
function add_comments_to_post( $post_data, $post ) {
        $post_data['comments'] = my_get_post_comments( $post->ID );
        return $post_data;
}

add_filter( 'wpak_post_data', 'add_comments_to_post', 10, 2 );


function my_get_post_comments( $post_id, $offset = 0 ) {
	$query_args = array(
		'post_id' => $post_id,
		'status' => 'approve',
		'number' => 10, // Here I include only 10 comments
		'offset' => $offset
	);

	return get_comments( $query_args );
}

To Know More

Time To Say Good Bye To 2016

This is the last week of 2016. Mathieu, Lionel and I are going to get some well earned rest with our families during the coming week. (Yes, it means that support will be on low mode too :-).)

We close our last support ticket last Friday and a new user has been able to release his app on Google Play. Small or big projects, we are always thrilled to see what WP-AppKit allows you to do.

I must say it has been a tremendous year for us. We’ve been able to release 2 major versions of WP-AppKit. My favorite one is probably the 0.5 which came with the new Q starter themes. Q themes aims to provide iOS and Android themes which allow users to start their apps right away after WP-AppKit installation. We also rebuilt our website from scratch, notably to provide a better Doc section and new series of tutorials. As usual, we also attended WordCamps and WordPress meetups. (This is what’s great about WordPress: its community rocks! In 2017, find your event to meet people and share knowledge.) A special thanks to WordCamp Paris and Geneva people. BTW we hope to see you at WordCamp Europe in Paris next June.

We want to thank everyone who follows us on Twitter, Facebook, GitHub or has subscribed to our mailing list. We’ve received a lot of encouragement and it means a lot for us as we spend more and more free time on the project.

It worked fluently, thank you for the awesome work!

John I. on Support

Be sure that I always dance alone in front of my computer when I receive this kind of message on support 😉

We wish you and your families the best for this end of 2016 and the coming year!

We Were at WordCamp Geneva and Guess What?

The last 2 days, the UncatCrea team gathered in Swiss during the WordCamp Geneva. It has been an occasion to celebrate 2016 and talk about the next steps for WP-AppKit. I also gave a workshop about building a mobile app connected to WordPress with WP-AppKit. The video is not yet on WordPress TV (I’ll edit this post when it will be published.) In the meantime, you can find below the workshop presentation.

WordCamp Geneva has been great. It was hold in the beautiful Geneva’s natural history museum where we met the only living two headed turtle 😉 Beyond this curious beast, it was a moment to discuss and share, and I wanted to thank all the organizers, volunteers and speakers for this event.

As said above, it was also one of the rare moment when Mathieu, Lionel and me met in person. We had fun and we also did our homework. As any other project, we regularly discuss about what’s next. One of the things that had changed a lot this year is that we had a lot more support. We understand it is important for our users to get quality support and we have to think about a way to maintain the same level of support as our user base grows. Of course, we’re no different from other open source projects in that regard. So we’ll probably announce new exciting things at the beginning of 2017. We also believe that the next version of WP-AppKit will be the first non beta and we hope to be able to release it on WordPress.org. It’s amazing to see this experimental side project becoming more mature as more users build their apps with it.

Make WP-AppKit Compatible With Cache Plugins Like WP-Rocket

Most of WordPress users are aware of performance being important for their SEO, and more importantly for their visitors. The most common practice is to use a cache plugin to ensure their website is as fast as possible. But you might encounter some side effects, especially with WP-AppKit.

WP-AppKit Web Services

One important thing is to first understand how WP-AppKit plugin works to send data to mobile apps.

A WP-AppKit app is interacting with your WordPress website thanks to Web Services. Here is how it’s done:

  • the app calls an URL from WP-AppKit API, for example to initialize app content: http://www.example.com/wp-appkit-api/[app-slug]/[security-token]/synchronization/
  • WordPress answers (if WP-AppKit is installed and activated) with a JSON file containing app data
  • WP-AppKit inserts into this answer specific HTTP headers allowing the interaction between website and app

Now that you understand that, you’ll surely understand the next step: cache plugins side effects.

Cache Plugins Working Principle

When someone (or something) calls an URL on the website, cache plugins intercept this call, let the web server build the corresponding page, and then memorize the result.

As soon as this exact same URL is called again, cache plugins don’t let the web server build the page one more time and directly return the memorized result.

Problems this may cause with WP-AppKit are the following:

  • cache plugins usually add HTML comments at the end of each page, like <!– This page has been optimized by my-cache-plugin –>. When such a plugin adds it at the end of JSON return from WP-AppKit Web Services, this response becomes invalid and the app cannot interpret it anymore.
  • HTTP headers sent when cache plugins return their stored pages don’t contain the ones allowing the app to interact with the website

In order to avoid these issues, you should always add WP-AppKit Web Services URLs to your cache plugin exceptions. You will find it in a setting like “Don’t cache the following pages“.

WP-AppKit Web Services URLs all begin with /wp-appkit-api/ so this is the only thing you’ll have to add into this setting.

An Example Through WP-Rocket

[UPDATE] As of WP-Rocket version 2.9, you don’t need to do this anymore, since the plugin is compatible with WP-AppKit by default now. This chapter remains as it still can be useful to understand what’s needed for other plugins.

In this section, we show you the way to configure one of current major cache plugins: WP-Rocket. This is relatively simple, since the option we need to update is available via an admin screen.

Here is what you need to accomplish:

  1. Go to your admin panel
  2. Click “Settings > WP Rocket”
  3. Go to “Advanced options” tab
  4. Enter the following value into “Never cache the following pages:” field: /wp-appkit-api/.*
WP Rocket options to make WP-AppKit compatible

WP Rocket options to make WP-AppKit compatible

This will result in excluding all URLs beginning with /wp-appkit-api/ from the caching system, and allowing your mobile apps to get your content as expected.

On some cache plugins you must also add /wp-content/plugins/wp-appkit/app/.* to the excluded urls for the preview to work.

Please note that depending on the cache plugin you may use, the way of avoiding these issues could vary, so please feel free to comment on this post and give us your feedback and/or specific cases you may have encountered with some plugins!

Happy app coding 🙂

Display WordPress Galleries In Your Apps With PhotoSwipe

In the previous tutorial we’ve seen how to add image zooming with PhotoSwipe for single images inserted in post content. But what about image galleries? WordPress makes it really easy to create and include image galleries in posts. Let’s see how to display those galleries gracefully in our apps by extending the work that we did in the previous tutorial.

Before starting, please make sure that you’ve followed all the steps of the Image Zooming with PhotoSwipe” tutorial and that it works for you 🙂 We consider here that you have a “Q for Android – PhotoSwipe Demo” theme in the state where we left it in the first tutorial.

The complete “Q for Android – PhotoSwipe Demo” theme corresponding to the result of the 2 PhotoSwipe tutorials (Image and Galleries) can be found here.

Create a WordPress Image Gallery

If you don’t have any gallery in your posts, now is a good time to create one 🙂
To add a gallery to a post, simply click the “Add Media” button in post edition and choose “Create Gallery“:

gallery

For any further information about WordPress Image Galleries, you can see the corresponding Codex section.

Add Full Size Info To Webservice For Gallery Images

Unlike single images, gallery images are not really inserted in post content HTML. Galleries are added to post content via a shortcode

shortcode

and rendered dynamically when displaying the post.

So the PHP code we used for single images won’t work for galleries. We have to add a specific treatment that will hook into the WordPress process of building image galleries, so that we can add the full size’s information to the img tag. To do so we (re)open the “php/prepare-images-for-photoswipe.php” file of our theme and append the following code:

/**
 * Galleries images are inserted dynamically in post content by WordPress when it 
 * builds the post content. We need to add our full size image information at the 
 * moment WordPress is building the gallery's images tags.
 */
add_filter( 'wp_get_attachment_image_attributes', 'prepare_gallery_images_for_photoswipe', 10, 3 );
function prepare_gallery_images_for_photoswipe( $image_attributes, $attachment, $size ) {
	
	//If the image is retrieved for an app, add full width's data attributes to it:
	if ( wpak_is_app() ) {
		$image_src_data = wp_get_attachment_image_src( $attachment->ID, 'full' );
		$image_attributes['data-full-img'] = $image_src_data[0];
		$image_attributes['data-width'] = $image_src_data[1];
		$image_attributes['data-height'] = $image_src_data[2];
	}
	
	return $image_attributes;
}

Update Javascript Code For Galleries

By default, WordPress renders galleries in post content just by displaying the images one after another:

no-gallery-management

Let’s change that so that only the first gallery’s image is displayed (and the other images show when we open the gallery with PhotoSwipe).

In functions.js (after the touchend handler for example), let’s write the following code:

/**
 * Prepare gallery images when a post or a page is displayed in the app:
 * only show first gallery image thumbnail in post content by default.
 * 
 * If you want to display all gallery image thumbnails, just don't add this 'screen:showed' block.
 */
App.on( 'screen:showed', function( current_screen, view ) {
	if ( current_screen.screen_type === "single" || current_screen.screen_type === "page" ) {
		
		//First hide all gallery images
		$( '.gallery .gallery-item' ).hide();
		
		//Then display only the first image of each gallery:
		$( '.gallery .gallery-item:first-child' ).show(); 
		
	}
} );

Finally, let’s open the gallery when taping on its first image.
To do so we pass all the images of the gallery to PhotoSwipe, by updating the touchend handler like follows (add only highlighted lines):

$( "#app-layout" ).on( "touchend", ".single-content img", function() {

	//Don't open image if currently dragging it:
	if ( img_dragging ) {
		return;
	}

	//Detect if the image belongs to a gallery
	var is_gallery = $( this ).closest( '.gallery' ).length !== 0;

	if ( is_gallery ) {
		//Open PhotoSwipe for all images of the gallery:
		open_with_photoswipe( $( this ).closest( '.gallery-item' ).siblings().addBack().find( 'img' ), $( this ).closest( '.gallery-item' ).index() );
	} else {
		//Open PhotoSwipe for the image we just touched:
		open_with_photoswipe( $( this ) );
	}

});

Edit: In previous version of this tutorial, jQuery .andSelf() was used, which has been removed from jQuery as of version 3.0. .addBack() must be used instead as in the updated example above.

And here we go, all images and galleries in post content can now be viewed full size and with nice zooming interactions thanks to PhotoSwipe.

This is just an example of how to plug PhotoSwipe into our app’s images. PhotoSwipe is flexible and has a bunch of interesting options that you can use to go further and enhance your user experience with images.

Happy app coding and don’t hesitate to share your feedback in the comments below 🙂

Add Image Zooming To Your App With PhotoSwipe

Zooming images on mobiles is a great addition to user experience. It allows to get a better look at this product you want to buy. And how many times you wanted to be able to get a closer view of this cool infographics? Here is how to implement that feature in your WP-AppKit theme, using the awesome PhotoSwipe Javascript library.

This tutorial shows you how to add image zooming to the Q for Android default theme, but the same method can be used for any other WP-AppKit theme.

You’ll have to get your hands a bit dirty with PHP and Javascript but it’s worth it! 🙂
Here’s what it will look like in the end:

Prepare Your Theme

First, let’s make a copy of your current Q for Android theme folder (themes-wp-appkit/q-android) to themes-wp-appkit/q-android-photoswipe so that you always keep the original version of Q for Android theme in case of future updates.

theme-copy

Then we give our new theme a proper name by editing the readme.md file of the theme. Here we call it “Q for Android – PhotoSwipe Demo“:

<!--
Theme Name: Q for Android - PhotoSwipe Demo
Description:  A clean and simple Android app news theme featuring: back button, comments, content refresh, custom post types, embeds, infinite list, latest posts, native sharing, network detection, off-canvas menu, offline content, pages, posts, pull to refresh, responsive, status bar, touch, transitions
Version: 1.0.2
...

Finally in your app edition in WordPress Back Office, make sure you choose this new theme and save your app.

choose_theme


Get PhotoSwipe

PhotoSwipe source files can be downloaded from here.
We then put them in a photoswipe folder at the root of our theme.
In this tutorial we use the minified versions of JS files: (photoswipe-ui-default.min.js and photoswipe.min.js).
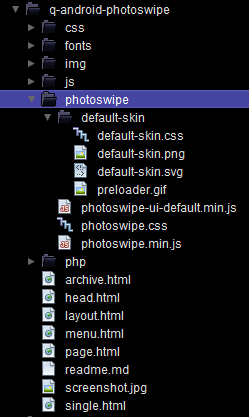
Here is what your theme’s file tree should look like:

q-android-photoswipe

Then we include PhotoSwipe Javascript library into our app by adding it to the theme’s functions.js dependencies:

define([
    'jquery',
    'core/theme-app',
    'core/modules/storage',
    'core/theme-tpl-tags',
    'root/config',
    'theme/js/moment.min',
    'theme/js/velocity.min',
    'theme/photoswipe/photoswipe.min',
    'theme/photoswipe/photoswipe-ui-default.min',
    'theme/js/jquery.fitvids'
    ], function($,App,Storage,TemplateTags,Config,Moment,Velocity,PhotoSwipe,PhotoSwipeUI_Default) {

And also include PhotoSwipe’s CSS files, at the end of head.html template:

<!-- PhotoSwipe Core CSS file -->
<link rel="stylesheet" href="<%= TemplateTags.getThemeAssetUrl('photoswipe/photoswipe.css') %>">
<!-- PhotoSwipe Default UI Skin CSS file (styling of UI - buttons, caption, etc.) -->
<link rel="stylesheet" href="<%= TemplateTags.getThemeAssetUrl('photoswipe/default-skin/default-skin.css') %>">

Add PhotoSwipe HTML Skeleton To Our Theme’s Layout

Photoswipe default rendering UI (called “UI Default”) is based on the following HTML structure, that we have to add in our layout.html template, just before the closing div#app-canvas:

<!-- Root element of PhotoSwipe -->
<div class="pswp" tabindex="-1" role="dialog" aria-hidden="true">

    <div class="pswp__bg"></div>

    <div class="pswp__scroll-wrap">

        <div class="pswp__container">
            <div class="pswp__item"></div>
            <div class="pswp__item"></div>
            <div class="pswp__item"></div>
        </div>

        <div class="pswp__ui pswp__ui--hidden">

            <div class="pswp__top-bar">

                <div class="pswp__counter"></div>

                <button class="pswp__button pswp__button--close" title="Close (Esc)"></button>
                <button class="pswp__button pswp__button--share" title="Share"></button>
                <button class="pswp__button pswp__button--fs" title="Toggle fullscreen"></button>
                <button class="pswp__button pswp__button--zoom" title="Zoom in/out"></button>

                <div class="pswp__preloader">
                    <div class="pswp__preloader__icn">
                      <div class="pswp__preloader__cut">
                        <div class="pswp__preloader__donut"></div>
                      </div>
                    </div>
                </div>
            </div>

            <div class="pswp__share-modal pswp__share-modal--hidden pswp__single-tap">
                <div class="pswp__share-tooltip"></div> 
            </div>

            <button class="pswp__button pswp__button--arrow--left" title="Previous (arrow left)">
            </button>

            <button class="pswp__button pswp__button--arrow--right" title="Next (arrow right)">
            </button>

            <div class="pswp__caption">
                <div class="pswp__caption__center"></div>
            </div>

        </div>
    </div>
</div>

Add Full Size Image Info To Web Service

Images inserted in posts content are automatically resized by WordPress.
So, by default, images sent to the app in web service are the resized versions.
But when zooming an image in the app we want to display the full size version. That’s why we need to add the full size information (url, width and height) to images sent through the webservice.

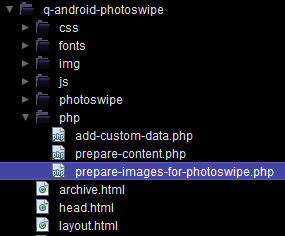
To do so, first create a prepare-images-for-photoswipe.php file in the theme’s php folder:

q-android-photoswipe-php

Then write the following PHP code in it, that will pass url, width and height of full size images through img tag’s data attributes:

/**
 * For every post sent in webservice, find all post images and add the following
 * HTML attributes to them:
 * - "data-full-img" = full size image url
 * - "data-with" = full size widht
 * - "data-height" = full size height
 */
add_filter( 'wpak_post_content_format', 'prepare_images_for_photoswipe', 11,2 );
function prepare_images_for_photoswipe( $content, $post ){

    libxml_use_internal_errors(true);

    // Create a DOM document from the post content
    $dom = new domDocument;
    $dom->loadHTML('<?xml encoding="utf-8" ?>' . $content);

    // Get all images in the post content
    $images = $dom->getElementsByTagName("img");
    foreach( $images as $img ) {
		//Retrieve image attachment ID from img class:
		$classes = $img->getAttribute('class'); 
		if ( preg_match( '/wp-image-(\d+)/', $classes, $matches ) ) {
			$attachment_id = $matches[1];
			//Retrieve full size info and add them to the img as data attributes:
			$image_src_data = wp_get_attachment_image_src( $attachment_id, 'full' );
			$img->setAttribute( 'data-full-img', $image_src_data[0] );
			$img->setAttribute( 'data-width', $image_src_data[1] );
			$img->setAttribute( 'data-height', $image_src_data[2] );
		}
    }

	//Save new post content with modified img tags 
    $content = $dom->saveHTML();
    
    libxml_use_internal_errors(false);

    return $content; // Return modified post content
}

Open Our Images With PhotoSwipe

Now that we’re all set, let’s write the few lines of Javascript that will open our images with PhotoSwipe.
The following code should be put on top of your theme’s functions.js file (just after dependencies declarations).

First memorize PhotoSwipe DOM element (the PhotoSwipe HTML skeleton we inserted previously) and initialize a variable that will contain the PhotoSwipe instance:

var photoswipe_element = $( '.pswp' )[0]; //Memorize PhotoSwipe gallery HTML layout element
var photoswipe_instance = null; //PhotoSwipe JS Object that we will instanciate

Then create the function that will open our images with PhotoSwipe:

/**
 * Opens the given image (or list of images) with PhotoSwipe
 */
function open_with_photoswipe( $images, index ) {

	index = index || 0;

	var photoswipe_items = [];

	//For each image, create the corresponding PhotoSwipe item by retrieving
	//the full size information in data attributes set on server side:
	$images.each( function() {
		var $image = $( this );

		//Retrieve image caption if any:
		var $caption = $( this ).closest('.gallery-item,.wp-caption').find( '.wp-caption-text' );

		//Add PhotoSwipe item corresponding to
		photoswipe_items.push({
			src: $image.data( 'full-img' ), //Data attribute that was added by modifying the webservice earlier
			w: $image.data( 'width' ),
			h: $image.data( 'height' ),
			title: $caption.length ? $caption.text() : ''
		});
	} );

	//Lots of PhotoSwipe options can be found here for customization:
	//http://photoswipe.com/documentation/options.html
	var photoswipe_options = {
		index: index, //start gallery at the image we clicked on (used for image galleries)
		shareEl: false //don't display Share element
	};

	//Open the given images with PhotoSwipe:
	photoswipe_instance = new PhotoSwipe( photoswipe_element, PhotoSwipeUI_Default, photoswipe_items, photoswipe_options);
	photoswipe_instance.init();
}

Note how we retrieve here ( $image.data( ‘full-img’ ) etc… ) the full size’s url, width and height that we previously set by modifying the webservice, so that PhotoSwipe can open the full size image.

And finally tell our app to open our post images with PhotoSwipe when we tap on them:

$( "#app-layout" ).on( "touchend", ".single-content img", function() {
	//Open PhotoSwipe for the image we just touched:
	open_with_photoswipe( $( this ) );
});


Ok! If you try your app at this point, you should see that it works: images now open with PhotoSwipe and you can play with zoom in and out like crazy 🙂

One Last Detail: Handle Touch/Scroll Conflicts

This works quite well, but maybe you’ll notice that if you don’t want to open the image but just swipe on it to scroll your post content, it will still open the image instead of scrolling your content…

We fix that by only open the PhotoSwipe gallery for an image if we’re not “touchmoving” it.
For that we introduce a new “img_dragging” variable in functions.js, like so:

var photoswipe_element = $( '.pswp' )[0];
var photoswipe_instance = null;
var img_dragging = false;

$( "#app-layout" ).on( "touchstart", ".single-content img", function() {
	img_dragging = false; //Reinit image dragging when starting to touch an image
} );

$( "#app-layout" ).on( "touchmove", ".single-content img", function() {
	img_dragging = true; //Activate image dragging when starting to swipe on the image to make post content scroll
});

/**
 * Opens the given image (or list of images) with PhotoSwipe
 */
function open_with_photoswipe( $images ) {
	...

And then update our “touchend” function like so:

$( "#app-layout" ).on( "touchend", ".single-content img", function() {

	//Don't open image if currently dragging it:
	if ( img_dragging ) {
		return;
	}

	//Open PhotoSwipe for the image we just touched:
	open_with_photoswipe( $( this ) );	
});

And that’s it 🙂

Hope you will add wonderful image zooming to your apps!
For any question or feedback you can use the comments below.

Note that what’s presented in this tutorial will only work for single images inserted in post content and won’t handle WordPress image galleries. See our next tutorial where we extend this code to handle WordPress native galleries with PhotoSwipe.

How To Add a Search Box To Your App

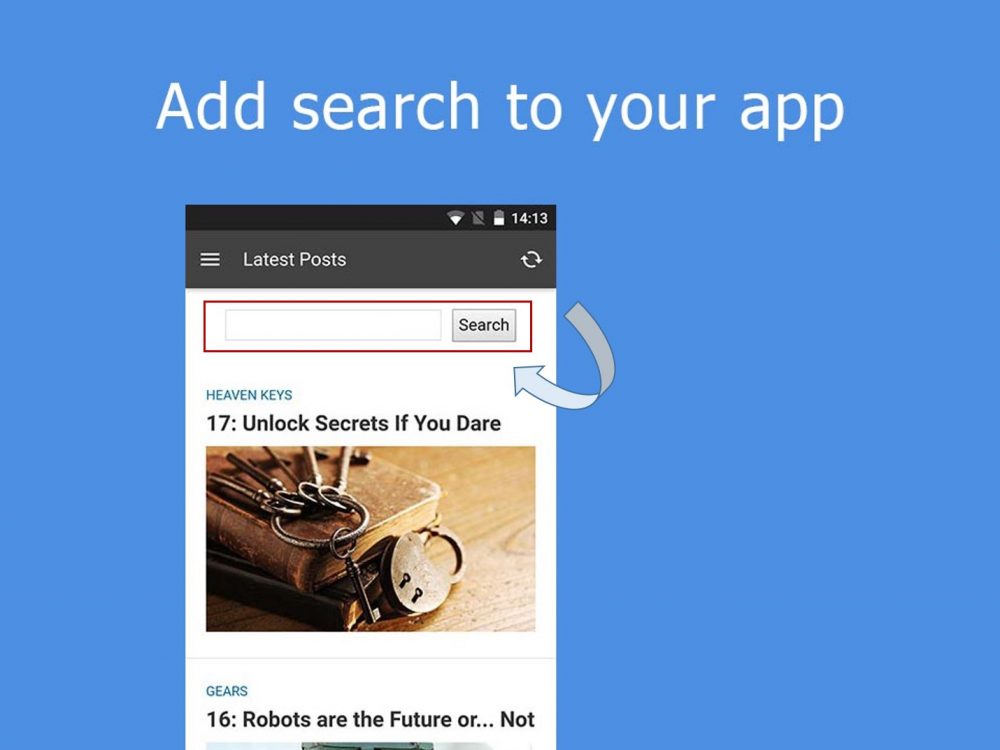
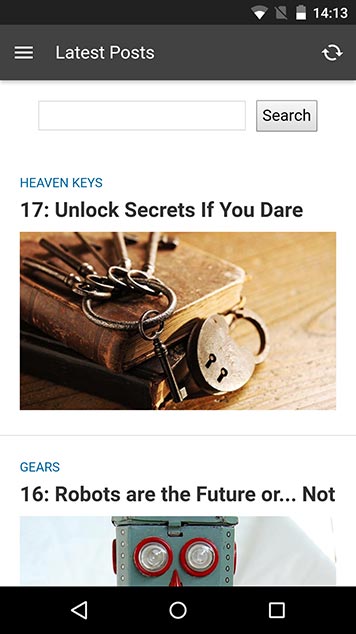
With WordPress, we’re used to have a search box in our themes. But how do we get this feature for our apps? In this tutorial, we’re going to see how to add a search box to our WP-AppKit apps. This search will leverage the WordPress native search. We’ll be able to type keywords in a search field, send the request to the server where WordPress lives and get results in return. It is a basic search but it will help you to understand how to implement that kind of feature in your apps.

Good to know: I am going to use the pre-installed Q for Android theme. (Of course you can use your own theme.) So you may want to duplicate Q for Android in order to modify it safely.

Add a Search Field To The Theme

Our search field will be located at the top of the result lists. So we have to modify the archive template.

Open the archive.html file located at the root of your theme’s folder with your favorite editor, and add the following HTML code:

<div class="search-container">
    <form id="search-form">
            <input value="<%= current_search.search_string %>" id="search-field" class="search-field" type="search" /><button id="search-button" class="search-button">Search</button>
    </form>
</div>

This code simply adds a search input and a search button.

Let’s add also a bit of styling, nothing fancy just the minimum. Open the post-list.css file in the css subfolder of your theme and add the following rules:

/*
 * Search
*/
.search-container {
    padding: 20px 5px 20px 5px;
    text-align: center;
}
.search-field {
    width: 60%;
    height: 30px;
    line-height: 20px;
    font-size: 16px;
    margin-right: 10px;
    padding: 2px;
}
.search-button {
    padding: 4px;
    line-height: 20px;
    font-size: 16px;    
}

Again nothing fancy, just the minimum to get a decent search field.

WP-AppKit Search UI

Good to know: using a search input instead of a text input allows to trigger the search dedicated keyboard on mobile. It also provides a small cross in the field to empty the search field.

Implement Search

Now, let’s get serious. we’re going to develop the search itself (ie. sending a search request to the server and get results in return).

On the App Side

Open the functions.js file in the js subfolder of your theme. You can place the sample code at the end of the file.

First we need to store current search terms using a basic object (it could be a variable):

/**
 * Memorize current search so that it is always available,
 * even after changing screen
 */
var current_search = {
    search_string: ''
};

Then we can send our search request when clicking the search button.

So we bind the function on the button’s click event (and prevent the default behavior),

$( '#app-layout' ).on( 'click', '#search-button', function( e ) {
    e.preventDefault();

} );

Get the search terms we may have in the search field,

$( '#app-layout' ).on( 'click', '#search-button', function( e ) {
    e.preventDefault();

    //Set search params from HTML form:
    current_search.search_string = $('#search-field').val().trim();

} );

And refresh the list to display the search result.

$( '#app-layout' ).on( 'click', '#search-button', function( e ) {
    e.preventDefault();

    //Set search params from HTML form:
    current_search.search_string = $('#search-field').val().trim();

    //Get updated data from server for the current component:
    App.refreshComponent({
        success: function( answer, update_results ) {
            //Server answered with a filtered list of posts. 
            //Reload current screen to see the result:
            App.reloadCurrentScreen();
        },
        error: function( error ) {
            //Maybe do something if filtering went wrong.
            //Note that "No network" error events are triggered automatically by core
        }
    });

} );

We also have to send any search terms we may have to the web service. For that we use the web-service-params filter.

/**
 * Add our search params to web services that retrieve our post list.
 * Applies to "Live Query" web service (that retrieves filtered component's post list)
 * and to "Get More Posts" web service (so that search filters apply to pagination too).
 */
App.filter( 'web-service-params', function( web_service_params ) {

    //If the user provided non empty search params:
    if( current_search.search_string !== '' ) {
        //Add search params to the data sent to web service:
        web_service_params.my_search_filters = current_search;
        //Those params will be retrieved with WpakWebServiceContext::getClientAppParam( 'my_search_filters' )
        //on server side.
    }

    return web_service_params;
} );

Last thing we’ll do on the app’s side is to ensure that search terms are still displaying in the search field after the results come back from the server. For that, we make current_search object available to the archive.html template using the template-args filter.

/**
 * Add 
 * - current search params to the archive template, so that they're available in archive.html.
 */
App.filter( 'template-args', function( template_args, view_type, view_template ) {

    if ( view_type === 'archive' ) {
        template_args.current_search = current_search;
    }

    return template_args;
} );

Then we can use template tags to catch the search terms on the template itself.

<div class="search-container">
    <input value="<%= current_search.search_string %>" id="search-field" class="search-field" type="search" /><button id="search-button" class="search-button">Search</button>
</div>

On the Server Side

At this stage of the tutorial, nothing will happen as we didn’t tell the server how to handle the search requests. We are going to do that by

  • adding a .php file in the php subfolder of your theme (eg. search.php).
  • using the wpak_posts_list_query_args hook to trigger the WordPress search when search terms are sent to the web service.
<?php
/**
 * Basic search & filter on post lists.
 * Shows how to implement a search by string
 * See functions.js in your theme for the client side
 */

/**
 * Add search params sent by the app to the default component's query.
 */
add_filter( 'wpak_posts_list_query_args', 'search_component_query', 10, 2 );
function search_component_query( $query_args, $component ) {
	$my_search_filters = WpakWebServiceContext::getClientAppParam( 'my_search_filters' );
	if ( !empty( $my_search_filters ) ) {
		if ( !empty( $my_search_filters[ 'search_string' ] ) ) {
			$query_args[ 's' ] = $my_search_filters[ 'search_string' ];
		}
		//Note : default WP ordering for searchs is : 
		// ORDER BY wp_posts.post_title LIKE '%search_string%' DESC, wp_posts.post_date DESC 
		//which is not compatible with the default "Get more posts" feature that requires ordering by date.
		//Note: As of WP-AppKit 0.6, if you want to keep WP Search ordering, you can use the 
		//'use-standard-pagination' filter on app side (which will switch back to standard WP pagination),
		//and comment the following line.
		$query_args[ 'orderby' ] = 'date';
		
	}
	return $query_args;
}

Now our search is complete 🙂 Let’s see how it works.

Again, this tutorial shows you how to implement a very basic search feature in your app. There’s many ways to enhance it like checking for no network situations or adding filters.
As usual if you have remarks or questions, you can use the comments below.

How To Integrate AdMod in Your WP-AppKit App

AdMob (by Google) is certainly one of the most used advertising solution for mobile apps. Like AdSense for websites, it allows to display various banner formats in your app. In this tutorial, we’ll see how to add AdMob banners to your WP-AppKit app’s theme.
Sign Up For AdMob And Get The Ad Unit ID

The first step of course is to signup for AdMob. We need Google to know about our app and get an ID we’ll use in our app’s theme.

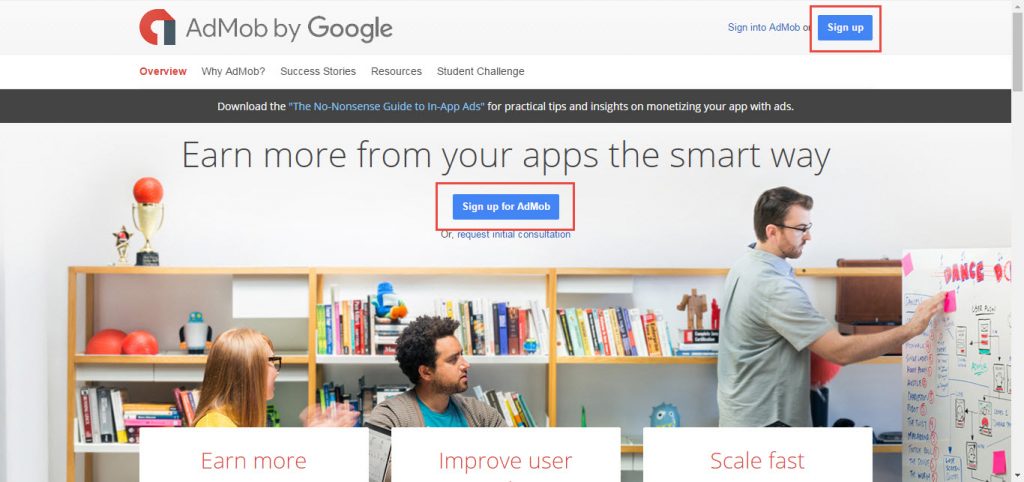
Pick your favorite Google account and click Sign up button. Then follow the steps, it shouldn’t be long.

AdMob Sign Up

AdMob Sign Up

First we’re going to create an app. For this tutorial, we’ll add our app manually but you can also register an app which is already available in app stores.

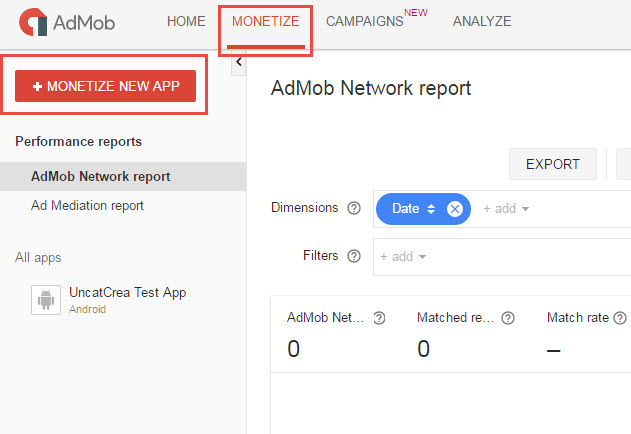
  • Sign in into AdMob
  • Click Monetize tab
  • Click Monetize new app button

Creating an AdMob App

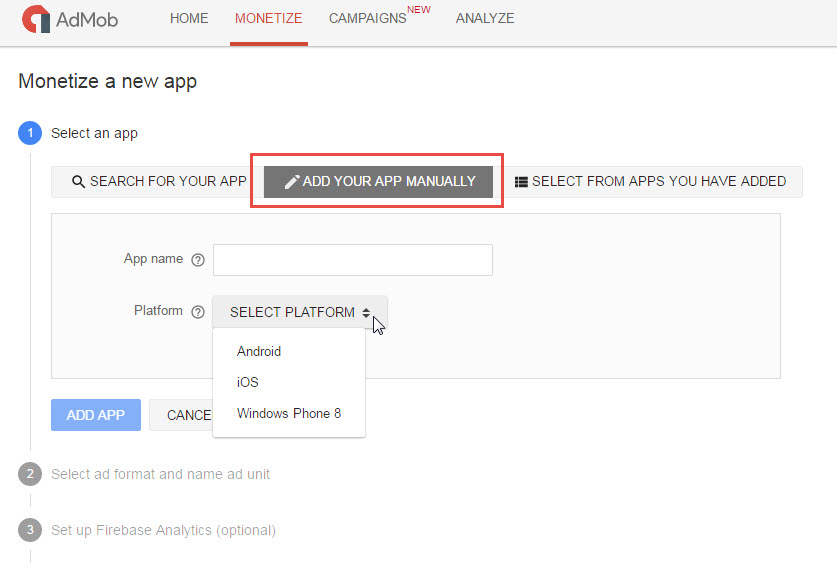
  • Click Add your app manually
  • Fill App name and select your app’s platform (Android for this tutorial)

Create AdMob App Step 1

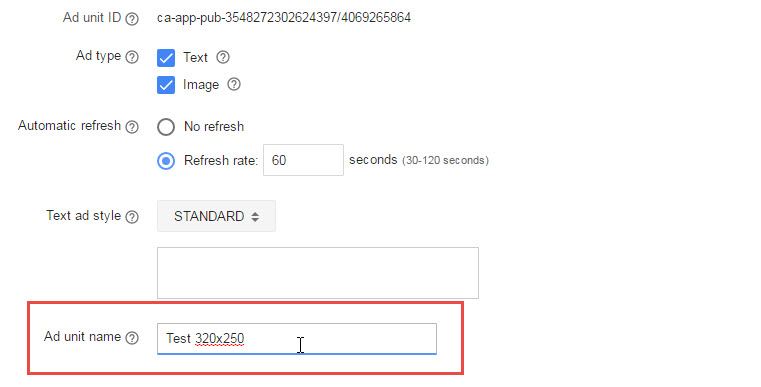
You can then declare ad units which are the banner types you want to have in your app. For the tutorial, we’ll simply create a standard banner.
Create AdMob App Step 2

  • Let default parameters as they are
  • Give a meaningful name (eg. Test 320×250). Note that you can edit that name later

Good to know: app’s name and ad unit’s name are only used in the AdMob backend interface.

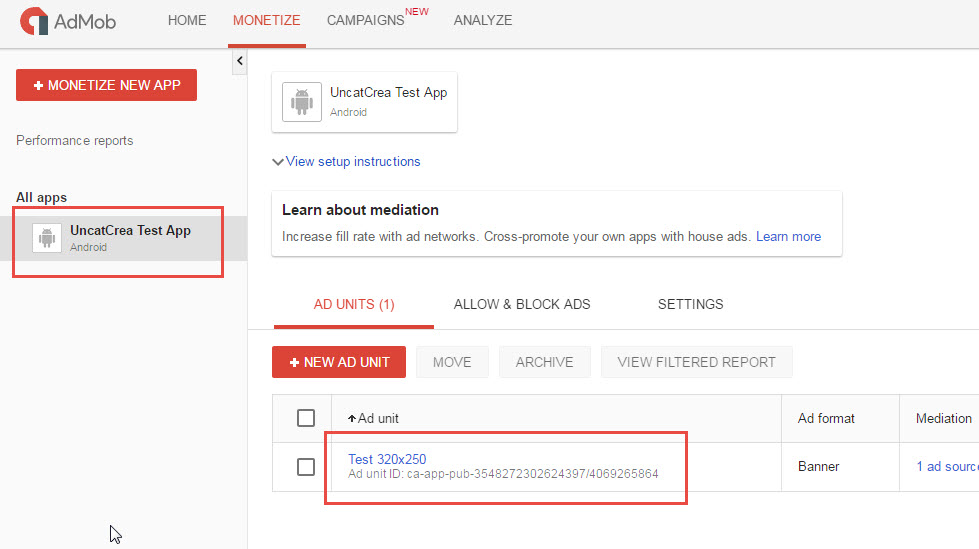
When done, you should see your app and your ad unit in the Monetize tab.

Create Admob App Step 3

Under the ad unit’s name, you’ll see the ad unit’s ID (something like ca-app-pub-8664272302624397/4763345864).

Copy it somewhere (eg. Notepad) as we’ll need it later in this tutorial.

Register the AdMob Pro Cordova Plugin

As usual with Cordova applications (you know that WP-AppKit’s apps are Cordova apps, aren’t you?), we’ll use a plugin to extend the Cordova’s API and be able to call our AdMob’s banners with JavaScript.

Today, we’re going to use a great plugin called AdMob Pro done by created and maintained by Raymond Xie. The plugin is available on GitHub and Raymond also offers a premium support for it. At least give it a star on GitHub, it totally deserves it.

Good to know: in this tutorial, we assume that you use PhoneGap Build to compile your app.
Registering a plugin in your app is pretty straight forward:

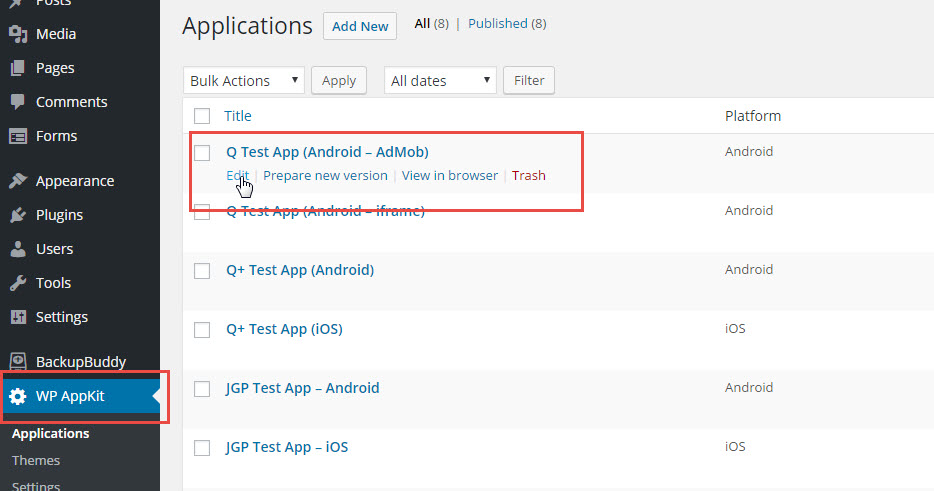
Edit your app’s project (from the Applications panel of the WP-AppKit admin menu)

Editing App 2

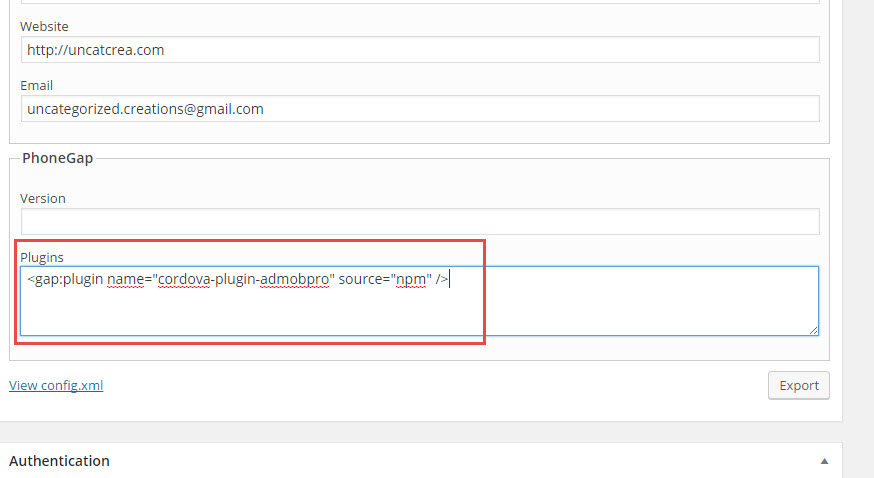
Find the Plugins text field in the PhoneGap Build box. There you can register a plugin per line as XML elements. To register AdMob Pro, copy the following line inthe Plugins field: <gap:plugin name=”cordova-plugin-admobpro” source=”npm” /> .

Register Cordova Plugin

PhoneGap Build will retrieve AdMob Pro from the NPM repository and add it to your app. Doing so, it will extend the Cordova JavaScript API with AdMob Pro specific functions.

EDIT 11/2019:

As mentioned on the AdMob plugin page, you must now provide the PLAY_SERVICES_VERSION and ADMOB_APP_ID settings for the Admob Cordova plugin:

Go to your config.xml file (inside your PhoneGap build zip export) and set the following:

<plugin name="cordova-plugin-admobpro" source="npm">
    <variable name="PLAY_SERVICES_VERSION" value="16.0.0" />
    <variable name="ADMOB_APP_ID" value="ca-app-pub-5790776535xxxxxx~8934xxxxxx" />
</plugin>

Also you should set the PhoneGap version at least “cli-7.0.1” for this to work: add this to config.xml:

<preference name="phonegap-version" value="cli-7.1.0" />


Add AdMob Banners To Your App’s Theme

Last thing we have to do is call the ad unit we have defined earlier in the AdMob admin. We’ll do that in JavaScript using specific AdMob Pro functions.

Before that, a quick pause to say that I am going to add the test banner in a very basic way but be aware that AdMob Pro can a lot more than that and the GitHub plugin’s repository has a great documentation. Be sure to check it to learn its tricks.

You may know that in a WP-AppKit’s theme, all JavaScript goes into functions.js (or in external .js file referenced in functions.js). For this tutorial, we’ll add the banner’s call directly into functions.js.

Good to know: you may notice that we use the Q for Android default WP-AppKit theme but of course, you can use any theme.

So, open functions.js and paste the following piece of code:

/*
* AdMob's tests
*/

if(AdMob) AdMob.createBanner({
    adId: 'ca-app-pub-3548272302624397/4069265864', // Paste the ad unit ID we've have copied earlier
    overlap: false,
    offsetTopBar: false,
    adSize: 'SMART_BANNER',
    position: AdMob.AD_POSITION.BOTTOM_CENTER,
    isTesting: true, // set to true, to receiving test ad for testing purpose
    bgColor: 'black', // color name, or '#RRGGBB'
});

We simply use createBanner() with a set of options:

  • adId corresponds to the ad unit ID we copied earlier in this tutorial
  • position indicates that the banner will appear at the bottom of the screen and centered (of course there’s many other possibilities)
  • isTesting triggers dummy banners for testing purposes (don’t use that option with a released app, it’s only for development and testing phases)

We’re also testing if the AdMob object exists (meaning that the Cordova plugin has been added correctly).

Again, it is a very basic way to use AdMob and you should check the plugin’s documentation and examples to create a lot better AdMob implementation for your app.

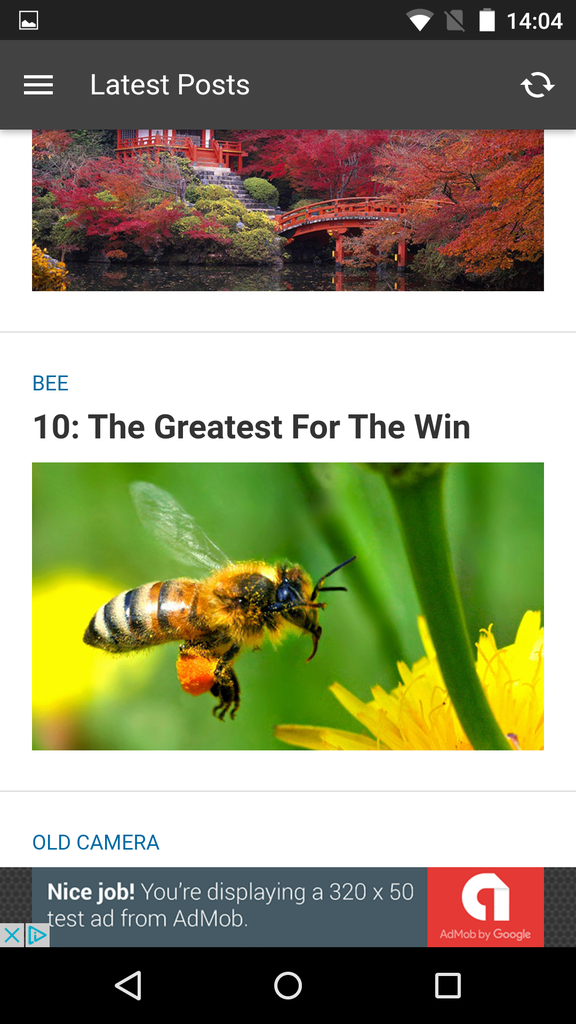
Once you’ve compiled with PhoneGap Build, you should end up with a nice testing banner in your app 🙂

Q Android with AdMob

We’re done now with this tutorial. I hope, it has been useful for you. As usual, if you have any questions, please use the comments below.

WP-AppKit 0.6: Themes Galore

It’s always a pleasure to write the post announcing a new version of WP-AppKit. I tend to think it’s our very own small miracle to deliver several new versions per year. So, yes, version 0.6 is here 🙂 One of our main goals this year is to ease as much as possible theming in WP-AppKit and 0.6 helps a lot in that field.

Ready to see what’s new?

Themes Panel

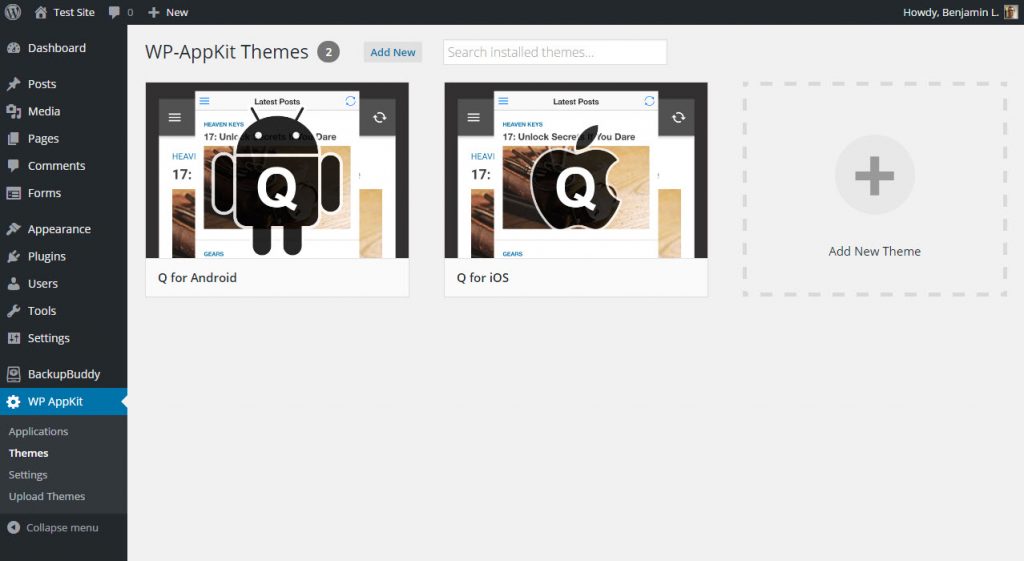
For this version, we wanted to ease themes management and WP-AppKit has now a new Themes panel.

New Theme Panel

This panel lists installed themes as WordPress does.

You will be able to:

  • search for a specific theme
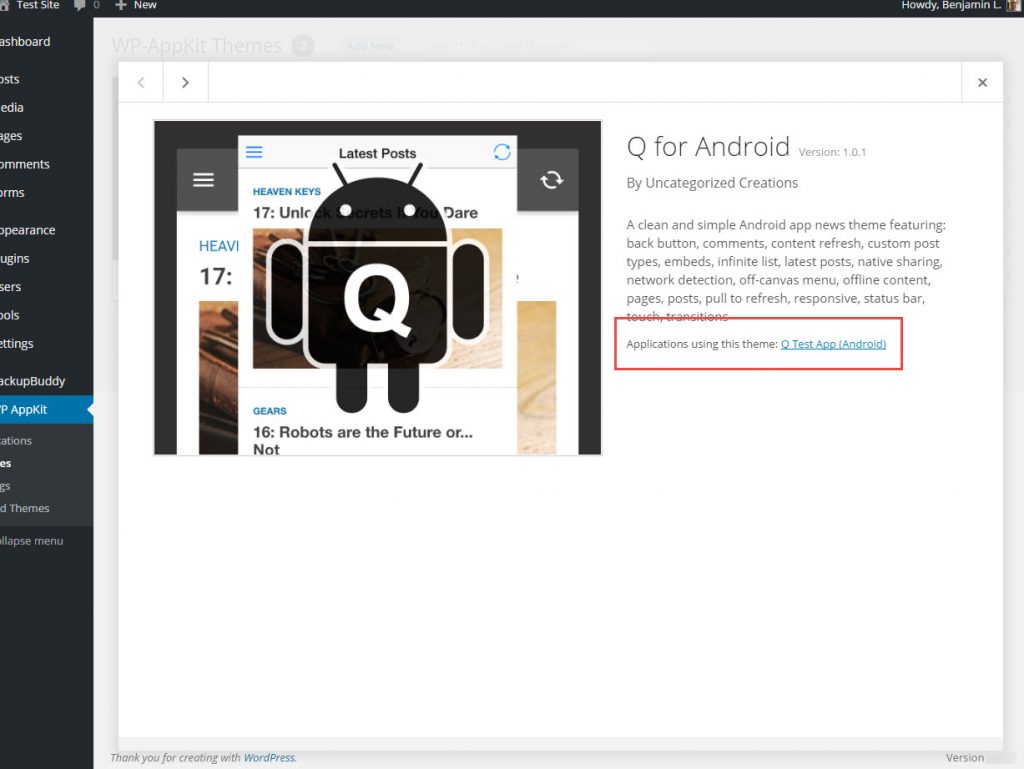
  • access theme’s details and check which applications currently use it
  • add new themes

theme-details

Pre-installed Starter Themes

It has been almost a year we have released the Wpak themes and we felt that we should provide better starter themes as WP-AppKit has changed a lot since. So let’s say goodbye to Wpak themes and meet Q for iOS and Q for Android, our new starter themes.

As you can see it’s a complete redesign.

  • A clean and elegant design.
  • Infinite lists. (WP-AppKit provides them since the beginning. It was a shame that starter themes didn’t implement them.)
  • Nice and smooth transitions.
  • iOS and Android native design (colors, spinners, transitions…). We particularly paid attention to Android and implemented material design (including ripple effects).
  • As usual, starter themes make a good use of WP-AppKit features (eg. offline management).

Icing on the cake, starter themes are now pre-installed with WP-AppKit, you don’t need to install them anymore.

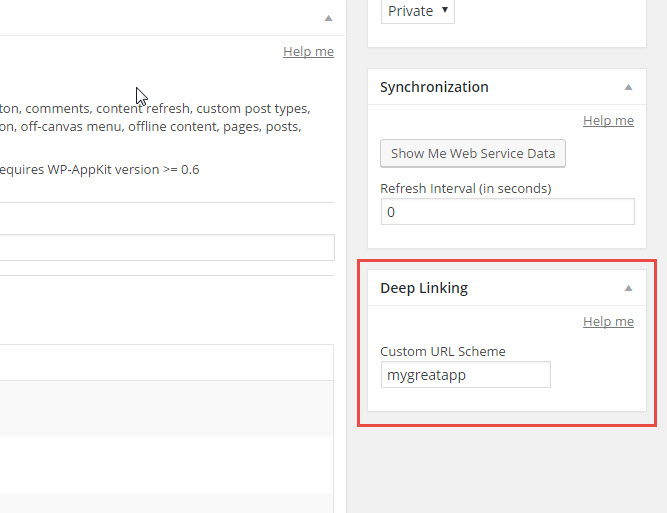
After updating, you’ll maybe notice the new Deep Linking metabox in your application edit panel.

Deep Linking Metabox

You can use it to define the hyperlinks to any screen in your app.

For example, you can have links like mygreatapp://single/posts/123 where mygreatapp is defined in the Custom URL Scheme field. (A very useful feature if you think of notifications.)

Shortcodes

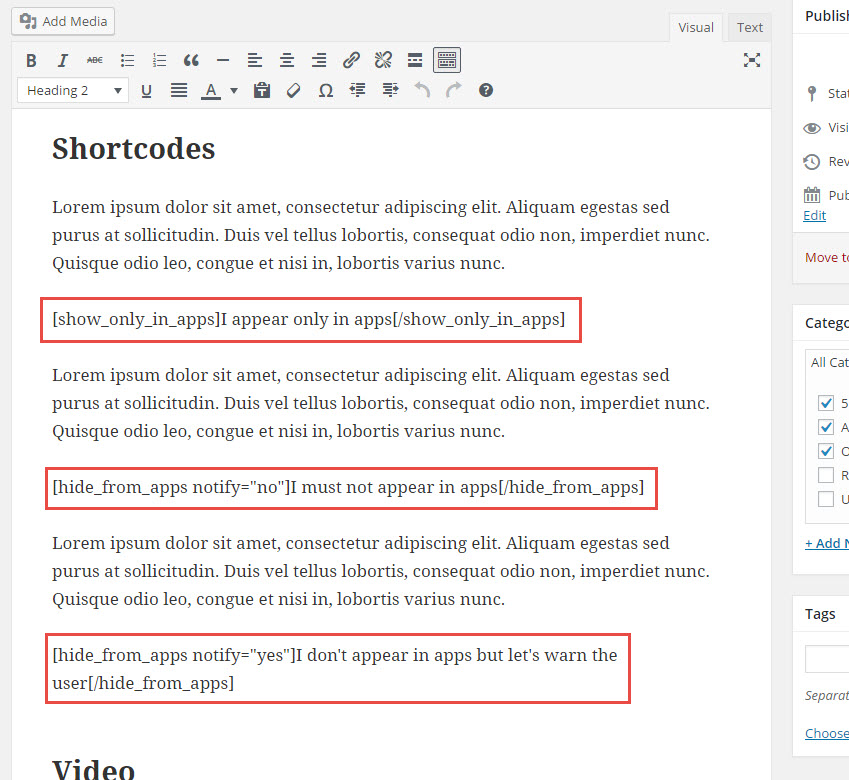
With WP-AppKit, we’ve introduced shortcodes allowing to specify how content should appear in mobile apps. You can now specify that a piece of content:

  • shouldn’t be displayed in apps (think of Flash based embeds or non responsive contents)
  • shows only in apps (useful to provide alternate content for apps)

Shortcodes


That is the main features of this new version but as usual there’s a list of additional fixes and enhancements. Be sure to check the changelog file.

We hope you’ll enjoy all this goodness and create great apps! 🙂

Beautiful Transitions for Your Apps with WP-AppKit

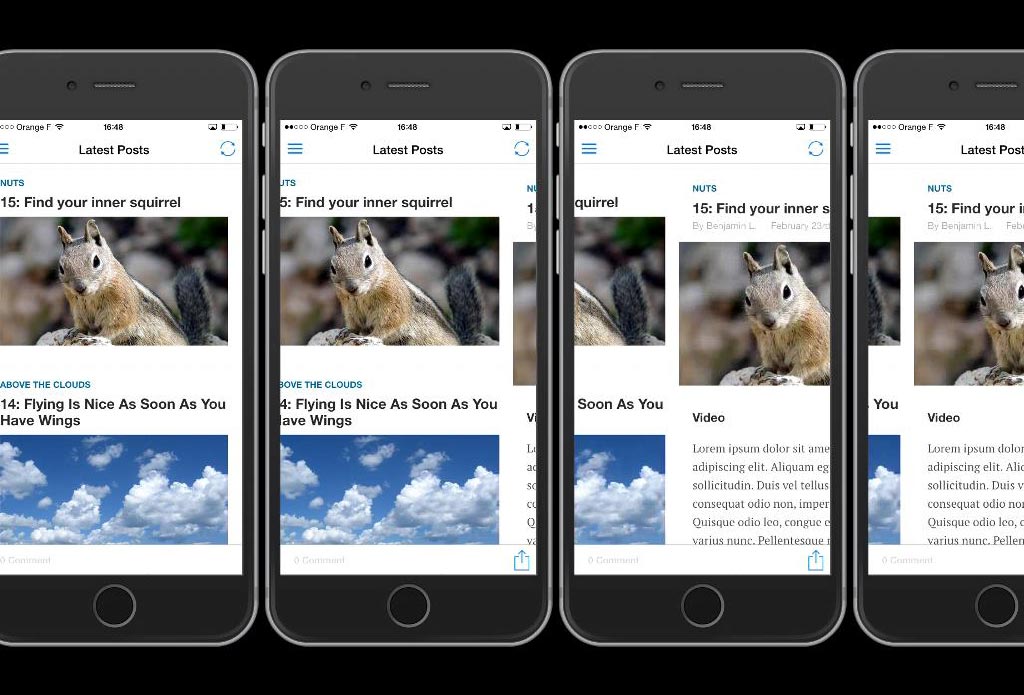
In this tutorial, we are going to create the classic slide animation between a list and a detail (eg. a post).

Slide Transition Demo

We are going to learn how to:

  • activate custom transitions
  • map directions (ie. transition between 2 screens) to animations
  • code transition animations using VelocityJS

If you’re not familiar with WP-AppKit theme structure, I recommend that you read the doc section dealing with it: https://uncategorized-creations.com/wp-appkit/doc/#264-layout-areas.

The Tools

VelocityJS

There are several ways to animate elements in your apps from CSS animations and transitions to JavaScript animations. I use both in my app themes. For screen transitions, I prefer to use JavaScript animations. It gives me more control over animations (what is animated, when the animation ends…).

More specifically, I use the nifty VelocityJS library. If you don’t know it already, I encourage you to discover this incredible toolbox for motion designers.

To use VelocityJS, just download it from GitHub and drop velocity.min.js in the js folder of your theme. Then edit functions.js to make VelocityJS available as shown below (define is at the very beginning of the file).

define([
    'jquery',
    'core/theme-app',
    'core/modules/storage',
    'core/theme-tpl-tags',
    'root/config',
    'theme/js/moment.min',
    'theme/js/velocity.min'
    ], function($,App,Storage,TemplateTags,Config,Moment,Velocity) {

Note: this is an example, the libraries you include may differ depending on your theme.

If you are not familiar with using JavaScript in WP-AppKit, there is a doc section about that: https://uncategorized-creations.com/wp-appkit/doc/#346-javascript-in-themes.

WP-AppKit

WP-Appkit doesn’t provide any animations out of the box (we are going to create some in this very tutorial). Instead, it allows to catch the moment between two screens. Doing that, you will be able to know from where you come from and where you go with all app’s necessary elements to be eventually animated.

By default, WP-AppKit replaces a screen by another. To add custom transitions, you have to bypass this adding the following line in functions.js.

App.setParam( 'custom-screen-rendering', true ); // Don't use default transitions and displays for screens

We can now hook into the WP-AppKit transition mechanism.

Hooking Transitions

To hook the WP-AppKit transitions, we use the screen-transition action hook. In that hook, we are going to launch the proper transition according to the previous and next screens.

App.action('screen-transition',function(
    $wrapper,
    $current,
    $next,
    next_screen,
    current_screen,
    $deferred ) {

});

Friendly reminder: we are not talking of PHP WordPress hooks but WP-AppKit JavaScript hooks that you will use in functions.js.

screen-transition takes 6 args:

  • $wrapper: jQuery object corresponding to the div tag with the app-content-wrapper id. This div element is added automatically by WP-AppKit.
  • $current: the previous screen to be hidden. A jQuery object corresponding to div tag with the app-screen class. This div element is added automatically by WP-AppKit.
  • $next: the next screen to be shown. A jQuery object corresponding to div tag with the app-screen class. This div element is added automatically by WP-AppKit.
  • next_screen: information about the next screen to be shown (eg. screen type).
  • current_screen: information about the previous screen to be hidden (eg. screen type).
  • $deferred: a jQuery deferred object allowing to resume the screen display after the transition has ended.

Getting the Right Direction

The first thing to do in the screen-transition hook is to identify the direction (eg. coming from archive and going to single).

For that, we use the getTransitionDirection() method with the current_screen and previous_screen args.

App.action('screen-transition',function(
    $wrapper,
    $current,
    $next,
    next_screen,
    current_screen,
    $deferred ) {

    // Get the direction keyword from current screen and  previous screen
    var direction = App.getTransitionDirection( next_screen, current_screen );

});

getTransitionDirection() returns keywords like next-screen and previous-screen. (You may even add yours.) So we are going to launch the proper transition according to the returned keyword.

App.action('screen-transition',function(
    $wrapper,
    $current,
    $next,
    next_screen,
    current_screen,
    $deferred ) {

    // Get the direction keyword from current screen and  previous screen
    var direction = App.getTransitionDirection( next_screen, current_screen );

    // Launch proper transition
    switch ( direction ) {
        case 'next-screen': // eg. Archive to single
            transition_slide_next_screen($wrapper, $current, $next, next_screen, current_screen, $deferred);
            break;
        case 'previous-screen': // eg. Single to archive
            transition_slide_previous_screen($wrapper, $current, $next, next_screen, current_screen, $deferred);
            break;
        default: // Unknown direction
            transition_default( $wrapper, $current, $next, next_screen, current_screen, $deferred );
            break;
    }

});

Note that we have a default transition in case the app has to handle an unknown direction.

Code the Animations

Now that we have identified the directions and mapped them to transitions, let’s code the animations themselves.

To slide from right from left:

  • Have the two screens at the same time in the app’s DOM tree (ie. have 2 div elements with the app-screen class). The next screen is hidden on the right. Both are in the wrapper.
transition_slide_next_screen = function ( $wrapper, $current, $next, next_screen, current_screen, $deferred ) {

    $wrapper.append($next); // Add the next screen to the DOM / Mandatory first action (notably to get scrollTop() working)

    // 1. Prepare next screen (the destination screen is not visible. We are before the animation)

    // Hide the single screen on the right
    $next.css({
        left: '100%'
    });

    // 2. Animate to display next screen

    // Slide screens wrapper from right to left
    $wrapper.velocity({
        left: '-100%'
    },{
        duration: 300,
        easing: 'ease-out',
        complete: function () {

            // remove the screen that has been transitioned out
            $current.remove();

            // remove CSS added specically for the transition
            $wrapper.attr( 'style', '' );

            $next.css({
                left: '',
            });

            $deferred.resolve(); // Transition has ended, we can pursue the normal screen display steps (screen:showed)
        }
    });
}
  • Slide the screens’ wrapper to reveal the next screen (ie. div with the app-content-wrapper class). To slide we use VelocityJS moving the wrapper from 0 to -100% (to hide the previous screen and reveal the next one). The transition’s duration is 300 ms and we apply the ease-out easing.
transition_slide_next_screen = function ( $wrapper, $current, $next, next_screen, current_screen, $deferred ) {

    $wrapper.append($next); // Add the next screen to the DOM / Mandatory first action (notably to get scrollTop() working)

    // 1. Prepare next screen (the destination screen is not visible. We are before the animation)

    // Hide the single screen on the right
    $next.css({
        left: '100%'
    });

    // 2. Animate to display next screen

    // Slide screens wrapper from right to left
    $wrapper.velocity({
        left: '-100%'
    },{
        duration: 300,
        easing: 'ease-out',
        complete: function () {

            // remove the screen that has been transitioned out
            $current.remove();

            // remove CSS added specically for the transition
            $wrapper.attr( 'style', '' );

            $next.css({
                left: '',
            });

            $deferred.resolve(); // Transition has ended, we can pursue the normal screen display steps (screen:showed)
        }
    });
}
  • Now we can delete the previous screen from the app’s DOM tree and use the jQuery deferred object to resume the normal app’s event flow. For that we use the VelocityJS complete which is fired as soons as our transition ends.
transition_slide_next_screen = function ( $wrapper, $current, $next, next_screen, current_screen, $deferred ) {

    $wrapper.append($next); // Add the next screen to the DOM / Mandatory first action (notably to get scrollTop() working)

    // 1. Prepare next screen (the destination screen is not visible. We are before the animation)

    // Hide the single screen on the right
    $next.css({
        left: '100%'
    });

    // 2. Animate to display next screen

    // Slide screens wrapper from right to left
    $wrapper.velocity({
        left: '-100%'
    },{
        duration: 300,
        easing: 'ease-out',
        complete: function () {

            // remove the screen that has been transitioned out
            $current.remove();

            // remove CSS added specically for the transition
            $wrapper.attr( 'style', '' );

            $next.css({
                left: '',
            });

            $deferred.resolve(); // Transition has ended, we can pursue the normal screen display steps (screen:showed)
        }
    });
}

Sliding from left to right is almost the same.

transition_slide_previous_screen = function ( $wrapper, $current, $next, next_screen, current_screen, $deferred ) {

    $wrapper.prepend($next); // Add the next screen to the DOM / Mandatory first action (notably to get scrollTop() working)

    // 1. Prepare next screen (the destination screen is not visible. We are before the animation)

    // Hide the archive screen on the left
    $next.css( {
        left: '-100%'
    } );

    // 2. Animate to display next screen

    // Slide screens wrapper from left to right
    $wrapper.velocity({
        left: '100%'
    },{
        duration: 300,
        easing: 'ease-out',
        complete: function () {

            // remove the screen that has been transitioned out
            $current.remove();

            // remove CSS added specically for the transition
            $wrapper.attr( 'style', '' );

            $next.css( {
                left: '',
            } );

            $deferred.resolve(); // Transition has ended, we can pursue the normal screen display steps (screen:showed)
        }
    });
}

Et voilà! We have now a nice sliding transition for our theme 🙂 Happy coding!

Having questions?

FAQ | Tutorials | Documentation

Or

Contact Us