Get your iOS device push token

When adding notifications to your iOS app using the WP-AppKit Pushwoosh Addon, you may need to know your device push token.

If you use Xcode you can get it from your app logs, as explained here: http://docs.pushwoosh.com/docs/ios-faq#how-do-i-obtain-my-ios-device-push-token-to-use-in-test-devices

If you don’t use Xcode, you can get it by using the cordova pushwoosh plugin api function “getPushToken()” that you’ll have to (temporarily) add directly to your app javascript code (in your WP-AppKit theme’s functions.js), as follows:

if ( typeof cordova !== 'undefined' ) {
        var pushNotification = cordova.require( 'pushwoosh-cordova-plugin.PushNotification' );
        pushNotification.getPushToken(
                function( token ) {
                        alert( 'Push token: ' + token );
                }
        );
}

This will display your push token when you launch your built app on your device, provided you have the PushWoosh Addon activated for the app and correctly configured iOS push certificates.

WP-AppKit 1.2: Better Deeplinks

WP-AppKit 1.2 is there! So what does that mean for you?

TLTR: when using deeplinks, you can now point towards posts, custom posts or pages that are not retrieved by your app.

Download WP-AppKit on WordPress.org

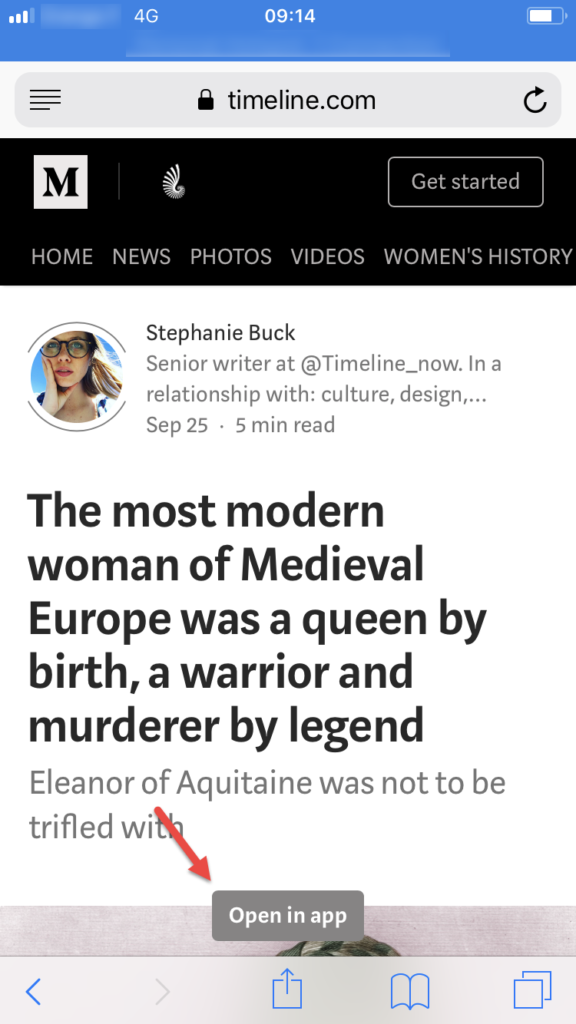
Deeplinks are a great feature. To make it short, they allow to create special links to call your app and display a specific screen. For example, you could put links on your site to let users read articles using your app like Medium does on its mobile site.

Medium Open in apps button

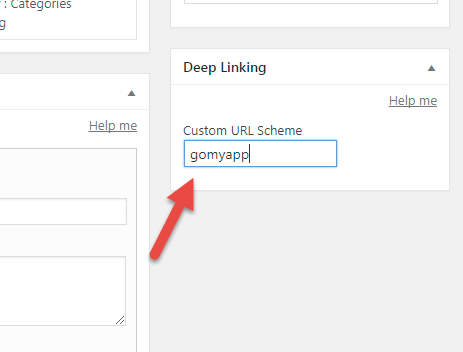
WP-AppKit supports by default deeplinks. If you don’t know how to activate them, edit your app and search for the Deep Linking box. There you can create a custom URL scheme. Deeplinks are not standard http links. They use a scheme which is unique to your app. If you create the gomyapp scheme – which is not very unique but is a good example – you will be able to use links beginning by gomyapp://.

Deep Linking box in Edit panel

WP-AppKit 1.2 enhances the deeplinks by allowing to point towards content that may still be on the server. Before 1.2, you would point towards content that would always be there (eg. a dedicated page). It is still a good practice and many apps do that. They have a dedicated landing screen for deeplinking (notably when use with notifications). But in some cases, you want to point to content that has been not retrieved by your app yet. With 1.2, WP-AppKit does that by default. If the content has not been loaded in the app, it is dynamically retrieved from the server.

As usual, we like our version to have one core feature we focus on. For 1.2 it is the dynamic deeplinks. This version also comes with bug fixing and small enhancements. You can discover them in our changelog. We often choose the core features among our user requests and dynamic deeplinks are no exception. This is a good occasion to thank you (yes you :-)) for all the feedback on WP-AppKit. That helps a lot to make it better.

If you wonder if our new notification add-on is compatible with dynamic deeplinks. it is of course.

Download WP-AppKit on WordPress.org

Thank you for reading and happy coding!

First WP-AppKit Add-ons Are Available

Today we launch add-ons for WP-AppKit. It is a major step for WP-AppKit and we wanted to give you insights about it.

We already explained earlier this year (2017) how support is a challenge for us (as for any open source project fueled by it’s contributors’ freetime). To make it short, we adopted better tools and organization. We also launched the Pro Support to help professional projects that often require more support without burning the team out.

So why add-ons and how is it related to support?

Support helps you to identify user pain points and we began to wonder if we could address some of these recurring needs with packaged solutions. This is how we came up with the idea of add-ons.

Add-ons are companion plugins you install along with WP-AppKit. When you activate them, they add new functionalities to the main plugin. Maybe the best way to get what are add-ons is to talk about our first 2 add-ons: Google Analytics for WP-AppKit and PushWoosh for WP-AppKit.

Integrating third party solutions in apps are among the most popular support requests. Google Analytics and push notifications are clearly high in the list of demands. This is why we have developed an add-on for each. (Something important to note: add-ons are not mandatory at all. You can develop your own integrations of PushWoosh and Google Analytics.)

Add-ons are great value as they enable ready to use features that normally require a good amount of development. To be able to support and update add-ons, we also have decided that they will be paid products (the first two are $49 each for a year of support and updates).

Now, enough chit-chat…

Discover Wp-AppKit Add-ons

And as usual, happy app coding!

Disable CrossWalk Usage

By default, WP-AppKit includes CrossWalk Cordova plugin, leading to a heavy final application (+20MB).

To disable CrossWalk and reduce the size of the application, add the following in a php file in your WP-AppKit theme’s php folder:

function remove_crosswalk( $default_plugins ) {
     if( !empty( $default_plugins['cordova-plugin-crosswalk-webview'] ) ) {
         unset( $default_plugins['cordova-plugin-crosswalk-webview'] );
     }
      return $default_plugins;
}
add_filter( 'wpak_default_phonegap_build_plugins', 'remove_crosswalk' );

Warning: this could lead to some features not being well handled by some old devices, especially animations.

Extend history behavior for a post to post navigation

You may want to create link to another post from the single.html. In that case, you’ll need to modify the history and screen transitions behavior.

The code below detects a post to post navigation and modifies the history accordingly. It is already there by default in Q theme for Android. What you’ll need to add is a “last history action” memory to it (see highlighted lines), so that the correct screen transition can be triggered:

//Memorize last history action to be able to run the corresponding transition:
var last_history_action = '';

// @desc Catch if we're going to a single and coming from a single (it is the case when clicking on a post in the last posts widget at the bottom of a post)
// Update properly the history stack
App.filter( 'make-history', function( history_action, history_stack, queried_screen, current_screen, previous_screen ) {

    if( queried_screen.screen_type === 'single' && current_screen.screen_type === 'single' ) {
        if ( ( queried_screen.item_id !== previous_screen.item_id ) ) { // Going to a single to another single that is not the one we came from

            history_action = 'push';

        } else { // Going back to the previous single
            history_action = 'pop';
        }
    }

    //Memorize last history action:
    last_history_action = history_action;

    // Return the proper history action
    return history_action;

});

Then, thanks to this last_history_action memory, we can trigger the correct “previous” or “next” screen transitions when going from a single to another single:

// Handle screen transitions when going from a single and coming to a single:
App.filter( 'transition-direction', function( transition, current_screen, next_screen ){
	if( current_screen.screen_type === 'single' && next_screen.screen_type === 'single' ) {
		if ( last_history_action === 'push' ) {
			transition = 'next-screen';
		} else {
			transition = 'previous-screen';
		}
	}
	return transition;
});

Your “single to single” links should now behave nicely 🙂

PhoneGap Build: Compiling Android ARM/x86 Apps

Many of our users – and I guess many of the PhoneGap Build users – face the problem of properly compile Android apps. Compiling for Android is pretty straight forward compared to iOS except when it comes to both ARM and x86 platforms.

How to know when you are facing this problem?

Generally, the problem appears when you access the Device catalog in the Google Play Console and that it shows you a ridiculous amount of devices your app is compatible with.

I won’t write an article about processor architectures but it’s good to know that Android supports different processor architectures, notably ARM and Intel (aka x86).

If you’re curious, you can read this article: ARM vs X86 – Key differences explained!.

While developing, you don’t sign your app and PhoneGap Build silently compiles it for ARM devices. It’s a good thing as the ARM architecture is far more widespread than x86. When ready, you sign your app, compile it and upload the APK file in the Google Play Console. This is when the problem appears. You check the Device Catalog and it tells you that your app is compatible with less than a thousand devices 😱.

The reason is that if you don’t sign your app, PhoneGap Build compiles it for ARM devices and when you sign it, it compiles it for x86 (ie. a very small fraction of the devices on the market). I know… Don’t ask me why.

The Solution

You’ll find many posts and threads about uploading multiple APK to support both ARM and x86. In this article, I’ll show you how to do it with WP-AppKit and PhoneGap Build. (Fair warning: I know it’s a tedious process but at the moment, we don’t have another solution.)

Please, remember that you don’t need to create multiple APK during the development phase and it only applies to Android apps. Also ensure that you use the latest version of WP-AppKit (1.1+).

Basically, we’re going to:

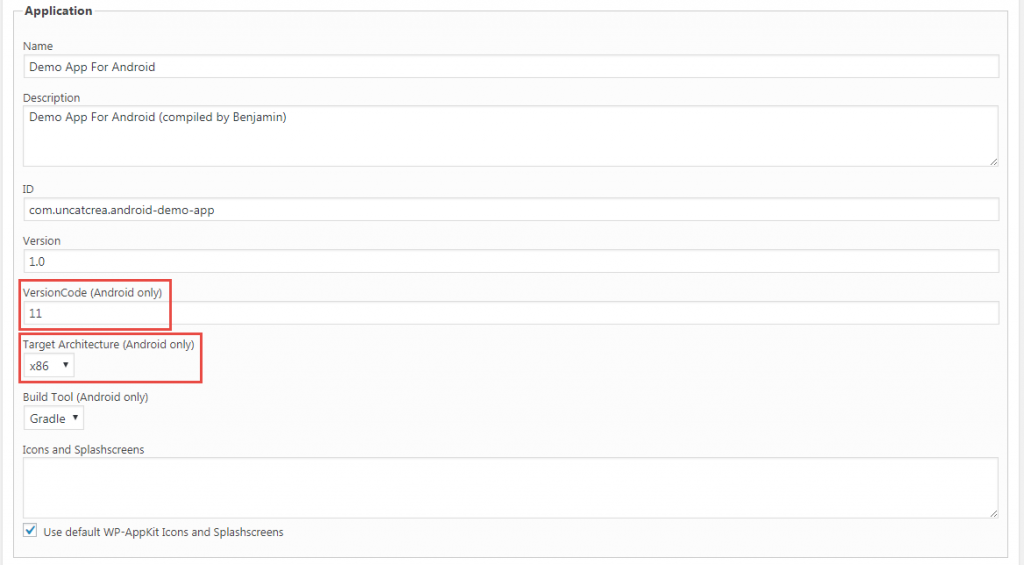
  • Set a specific VersionCode
  • Choose ARM as target architecture
  • Export the project .zip
  • Compile for ARM on PhoneGap Build
  • Increment the VersionCode
  • Choose x86 as target architecture
  • Export the project .zip
  • Compile for x86 on PhoneGap Build

At the end, you’ll have 2 APK files to upload in the Google Developer Console (ie. 2 versions) and the Device Catalog should give you a lot bigger number of supported devices.

Compile for ARM

  • Edit your app in WordPress
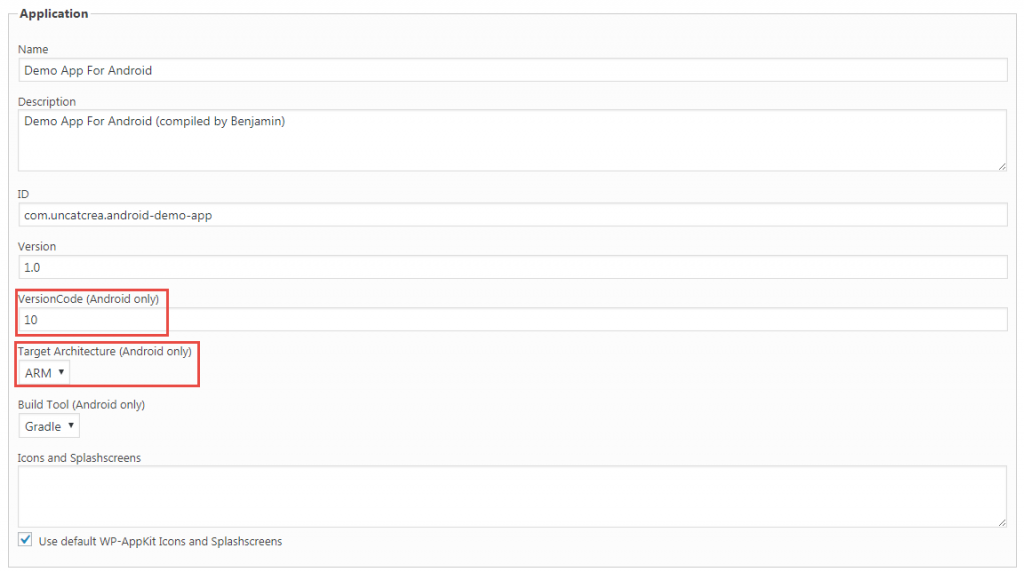
  • Scroll to the PhoneGap Build box
  • Set the VersionCode
  • Choose ARM as Target Architecture
  • Export the project .zip file

Compile for x86

  • Edit your app in WordPress
  • Scroll to the PhoneGap Build box
  • Set the VersionCode (it is mandatory to have a different VersionCode for ARM and x86 as they are going to be 2 different versions in Google Play Console)
  • Choose x86 as Target Architecture
  • Export the project .zip file

Compile each .zip as a different application in PhoneGap Build. At last, upload the 2 APK files as versions in the Google Play Console.

Mystery solved 🙂 Happy coding!

Create a custom screen attached to a custom template

To create a custom app screen that is rendered using a custom template:

//In functions.js:
App.addCustomRoute( 'my-custom-screen-fragment', 'my-custom-screen-template' ); 
//Note: no final .html for the template name here!

This creates a new screen in the app that can be reached at #my-custom-screen-fragment and is rendered using the my-custom-screen-template.html template.

Then to pass custom data (my_custom_data) to your custom template:

App.filter( 'template-args', function( template_args, view_type, view_template ) {
	if ( view_template === 'my-custom-template') { //Don't need .html here

		//Add our custom data:
		template_args.my_custom_data = { key: 'value' };

		//Now "my_custom_data" variable is available in the my-custom-template.html template :)
	}
	return template_args;
} );

To go further:

2 categories for one component

As explained here Post List components queries can be customized using the wpak_posts_list_query_args filter hook.

Here’s how to define a component (slug my-component-slug) that gets posts from 2 categories (my-first-category-slug and my-second-category-slug) instead of only one.

Create a post list component in your app, associated to one category. Then use the tax_query parameter of WP_Query to customize the component’s categories and add a second category it:

//To put in the "php" folder of your WP-AppKit theme:
function two_categories_for_my_component( $query_args, $component ) {
	
	if( $component->slug === 'my-component-slug' ) {
		$query_args['tax_query'] = array(
			array(
				'taxonomy' => 'category',
				'field' => 'slug',
				'terms' => 'my-first-category-slug'
			),
			array(
				'taxonomy' => 'category',
				'field' => 'slug',
				'terms' => 'my-second-category-slug'
			)
		);
	}
	
	return $query_args;
}
add_filter( 'wpak_posts_list_query_args', 'two_categories_for_my_component', 10, 2 );

Sort component posts by alphabetical order

As explained here Post List components queries can be customized using the wpak_posts_list_query_args filter hook.

Here’s how to customize a Post List component (slug my-component-slug) query so that the posts can be sorted by alphabetical order instead of default chronological order:

//To put in the "php" folder of your WP-AppKit theme:
function my_custom_query( $query_args, $component ) {
	
	if( $component->slug === 'my-component-slug' ) {
		$query_args['orderby'] = 'name';
		$query_args['order'] = 'ASC';
		//see https://codex.wordpress.org/Class_Reference/WP_Query#Order_.26_Orderby_Parameters
	}
	
	return $query_args;
}
add_filter( 'wpak_posts_list_query_args', 'my_custom_query', 10, 2 );

Custom Templates For A Custom Post Type

An example – to be used in functions.js – to customize both the archive and the single templates for a custom post type registered as my-post-type.

App.filter( 'template', function( template, current_screen ) {
      if ( current_screen.component_id === 'my-post-type-component-slug' ) {
            template = 'my-post-type-archive'; //Don't need .html here.
      } else if ( TemplateTags.isPostType('my-post-type', 0, current_screen ) ) {
            template = 'my-post-type-single'; //Don't need .html here.
      }
      return template;
} );


Having questions?

FAQ | Tutorials | Documentation

Or

Contact Us